Easy DIY No-Sew Fabric Window Valance

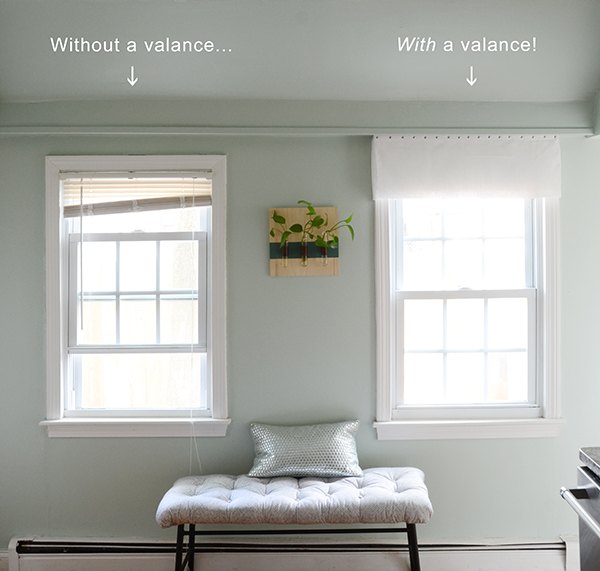
When we moved into our house, the windows in the kitchen came with a set of old mini blinds. And although I hated the way they looked, I liked their functionality – we do lower them every once in a while. And then it dawned on me… hide them with valances! So another DIY was born.
So much better, right!? They are a contemporary way of adding a more traditional window treatment without blocking out any light. And because I mounted them a couple of inches above the window frame, the whole window looks taller! Win win.
And I can’t even tell you how easy these were to make. You’ll just have to try making some yourself to find out! Here’s what you’ll need…
- 1/2″ thick wood planks, (2.5″) x (window width + 2″)
- Scissors
- Hammer
Begin by folding the fabric in half (so it’s now 13 inches tall) and centering the width of the fabric along the width of the wood (it should be standing up on its edge). Position the fabric so that 11 inches are below the wood, and about 2 inches are draped over the top of the wood. Center the ribbon on top of the fabric. Place a thumb tack (centered from left to right) through the ribbon, fabric and into the edge of the wood.
Then move all the way to the right side, and do the same thing. Make sure the fabric and ribbon are both pulled taut, and that exactly 11 inches of fabric sits below the ribbon. Do the same on the left side as well.
Then add thumb tacks halfway in between the original tacks, and then halfway in between those until you have done the whole front edge. It should now look like the image above.
Now it’s time to do the small sides. Fold the remaining fabric and ribbon around the corner of the wood and place a thumbtack in to secure it (about half an inch from the corner). You should have a few inches of fabric left. Fold the raw edges in on themselves so they are hidden. They should be folded so that they hit right at the back corner of the wood, as shown above. Secure with another thumb tack. Repeat the process on the other side.
Staple the raw fabric edges to the wood. Now you’ll want to iron your fabric so it is completely wrinkle-free. Iron the corners as well, so they form a nice, crisp box shape.
You’re now ready to mount it to the wall. I would recommend mounting everything a couple of inches above the top of your window frame because it will make your window look bigger! Just make sure that the bottom of the valance still covers the mini blinds.
This is what mine looks like mounted, from the underside. Conveniently, there was a ledge above our windows so I screwed the wood right into the underside of the ledge. But if you’re not blessed with a random ledge above your windows, buy two per window and mount them to the wall and then place the wood on top and secure with the included screws.
The last step is to glue a clothespin to the underside of the wood so you can clip those ugly strings up inside the valance and out of sight. I also removed the rod that you twist to open and close the blinds… you can still twist the little hook without the rod.
And that’s it, you’re done! Easy peasy, right? So much cleaner and more “finished.” Be sure to check out my blog for lots more DIYs. And I'm now teaching virtual crafting workshops... learn more about Crafty Hour here!
Enjoyed the project?
Resources for this project:











Frequently asked questions
Have a question about this project?
what color is your wall paint? Love it.
Could you somehow add floor length sheers inside to make it not just a valence but an entire window treatment? (I don't sew).
Going to think about this in my kitchen. Two little windows over the sink but also with mini blinds. How did you mount them? Puppy loves that spot!!!