Miniature Dollhouse Leather Couch Tutorial

by
Mish Volonino
(IC: homeowner)
2 Materials
$15
Advanced
Hello fellow Hometalkers.
Back again with some updates on my newest projects. I'm in the process of renovating, what they also call bashing in the mini world, a Melissa and Doug Victorian Dollhouse.
I've been working on this for about 4 months. With each new project I try to learn more and take on more challenges.
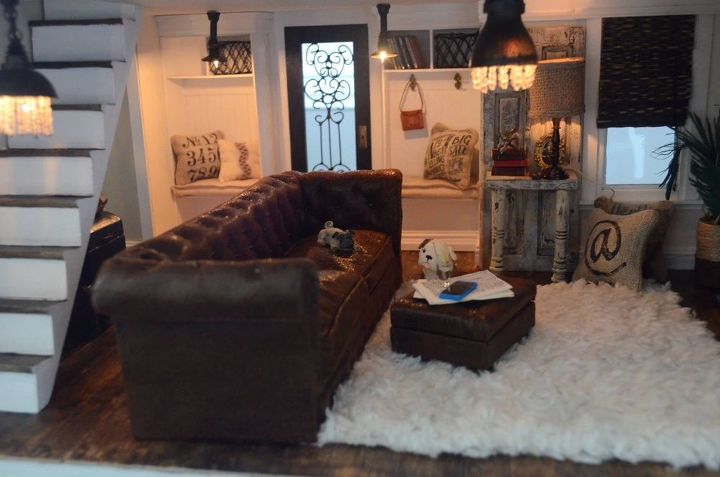
I promise I will create a post about the stages of remodeling this house but for now this is all about my miniature Kensigton Vintage Leather Tufted Sofa from Restoration Hardware.
I've been wanting to make this sofa so bad. I picked up this fantastic faux leather fabric from Joanne's that I knew immediately would be good to work with.
The base was pretty easy. On my first try, I thought I could achieve the tufting by placing three layers of thin batting under the fabric. I would string a small bronze seed bead and pull through tight. Once it was done I would secure the fabric to the wood base. Well I learned that really didn't give the tufts the look I was going for.
This was my process for the sides and back of the couch. I made cardboard templates and marked where I wanted the tufts. I then used a hole puncher to make with template, and punch the holes out of each layer. I then used the template to make the wood piece. I used a small hand drill to drill the holes through. I layed the three pieces of batting over the wood and topped with a piece of faux leather. I marked the leather with a sharpie from the template too. I threaded a needle with a thicker thread and a bronze bead. I pulled the thread and bead through all layers. When I have two threads through, I would tie them tightly, knot them, snip long ends and dap with tacky glue.
This is a very slow process with a lot of steps but the end result is fantastic.
I did the nailheads on the couch using pin findings in the jewelry section. I used a sharp needle poke polymer clay to to push a pilot hole in. I cut the pins down to an 1/4 inch and pushed them thought the fabrics and into the wood
I'm not going to tell you this was an easy project. It was time consuming and difficult through trial and error but it came out so much better than I thought it would. And as of today, I haven't found this style sofa in miniature size available anywhere.
I decided to sew the pipping instead of glueing piping on. I felt the couch needed a more realistic look.
Thanks for checking out my post. Hope I motivate you to take it to the next level in miniatures. Love and light.
Enjoyed the project?
Suggested materials:
- Base wood (Hobby Lobby)
- Faux leather fabric (Joanne's)
Published August 17th, 2016 9:06 AM
Comments
Join the conversation
2 of 63 comments
-
 Norma Whalen
on May 20, 2018
Wow
-
-
 Stephanie Sh
on Jul 10, 2021
Very impressive. I bought a house at Goodwill. Needs love but turning into a Vampire house. Looove halloween and vampired. So this couch will be perfect. Thanks for sharing. Will send picture when done.
-








Frequently asked questions
Have a question about this project?