How to Make Gorgeous Popsicle Stick Decorations for Your Home

When you’re a child, you’re always crafting. Even the simplest bits and pieces that you find around the house are turned into clumsy but colorful works of art but, as we get older, we tend to lose some of that limitless imagination.
Unless we choose not to! For me, there’s something magical about making adorable accessories out of the odds and ends I find lying around, and popsicle sticks are a prime example. Coming in supremely handy when you feel your creative juices stirring, here are just a few of the ways you can create popsicle stick decorations for on-trend additions to your interior.
Popsicle Stick Sign
Step 1: Gather Your Materials
When it comes to crafting cute additions to your interior, this popsicle stick sign is simple but stylish. To make it, you’ll need:
- Popsicle sticks
- Glue
- Stencil
- Stain
- Paint
- Twine
Step 2: Glue the Sticks Together
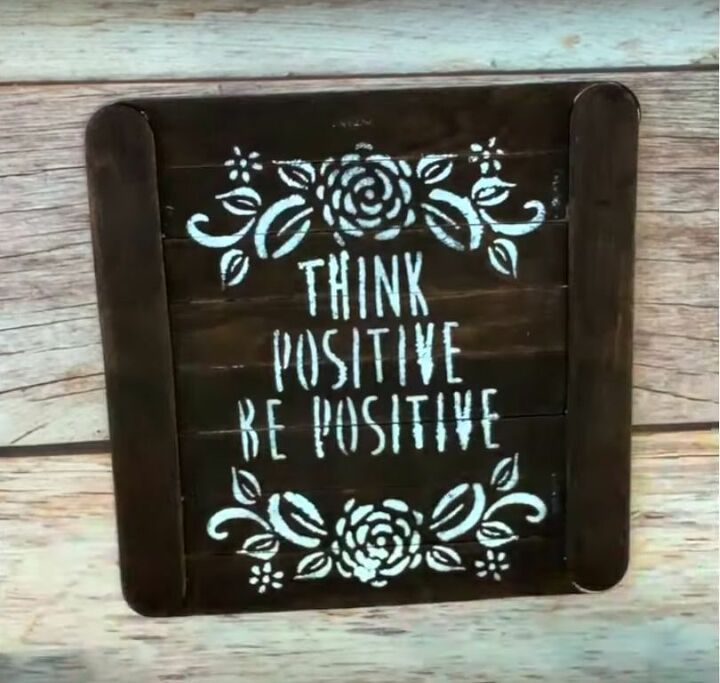
Once you’ve got your materials together, you’ll need to place eight sticks side by side, with two additional sticks glued top and bottom to hold them in position.
Step 3: Stain
With the shape of your sign assembled, it’s time to take your stain and apply it to the wood, to create a sweet and stylish rustic aesthetic.
Step 4: Paint
Achieved the color you want? Then crack open the paint and position your stencil. I opted for white as it stands out well against the darker wood, but most lighter shades work, so feel free to experiment with different hues to add your own unique twist.
Step 5: Attach Twine
Once the paint has dried, you’re nearly done! The final step is an easy one: add two blobs of glue to the back of your sign, one to the right and one to the left, and use these to attach your twine. With this in place, you can hang your handcrafted sign in pride of place on your wall.
Popsicle Stick Arrow
Step 1: Gather Your Materials
If your creative juices are now in full swing, how about trying this next idea? Creating a popsicle stick arrow. To pull it off, you’ll need:
- Popsicle sticks
- Spray paint
- Glue
Step 2: Lay Out the Arrow
Once you have what you need, the next step is simple: lay out your arrow in the shape you desire. Depending on how many sticks you have and your personal preference, you can play around with your dimensions until you achieve a size and style you’re happy with.
Step 3: Glue Together and Paint
When you’re content with your final design, use the glue to fix the sticks in place. Once this is done, place your completed arrow on some old newspaper and apply a coat or two of spray paint in a color of your choosing. Don’t be afraid to play around with your options to find a shade that perfectly complements your interior.
Popsicle Stick Honeycomb Shelves
Step 1: Gather Your Materials
If you want to try your hand at something a little more complicated, I loved working on these clever honeycomb shelves. If you’d like to give them a go, you’ll need:
- Popsicle sticks
- Glue gun
- Paint
Step 2: Lay Out and Glue the Design
To start with, you need to assemble your honeycomb, so use sets of six sticks to create hexagonal shapes. Add these onto each other as you go, until you’re left with a honeycomb design. Once you’re happy with the look and size of this, glue your individual components in place, before using additional sticks to increase the depth of your shelves.
Step 3: Paint
With your honeycomb shelves complete, it’s time to add an individual touch, so apply a coat or two of paint in a color that complements your overall style and aesthetic.
Step 4: Hang and Decorate
Once finished, mount the honeycomb on your wall and add some cute ornaments and accessories to show it off.
Popsicle Stick Vase Cover
Step 1: Gather Your Materials
The next idea on this list is something a little different. To give it a go, you’ll need:
- Popsicle sticks
- Scissors
- Glue gun
- Paint
Step 2: Lay Out and Glue the Sides
To begin, you’ll need to trim the tops off eight popsicle sticks to leave straight edges. Laying these side by side, place two more sticks top and bottom to hold them together, using your glue gun to attach them. Repeat this four times over.
Step 3: Assemble
Once you have four individual squares, glue these together to create a box. Placing this upright, attach an additional popsicle stick along each of the uppermost rims.
Step 4: Paint
Choosing four colors of your choice, you’re now going to paint your vase cover. Beginning with the lightest shade, work down until you’re left with an on-trend ombré effect.
Step 5: Add Flowers
With your cover finished, pop a vase complete with flowers into your box for a gorgeous home accessory that’s sure to receive plenty of compliments.
Hanging Popsicle Stick Planter
Step 1: Gather Your Materials
Sticking with the floral theme, you could also have a go at creating this hanging popsicle stick planter. To give it a go, you’ll need to get your hands on:
- Popsicle sticks
- String
- Glue gun
Step 2: Glue Individual Sticks Together
Before you lay out your popsicle sticks you need to glue together sets of three, one on top of the other. This creates a stronger base for your hanging planter.
Step 3: Lay Out and Glue the Sticks
Now you need to assemble your planter. The precise pattern you should use is best illustrated by the snapshot below. Once you have each individual component in place, apply glue to hold your popsicle sticks together and create a solid and sturdy structure. While this looks simple and stylish without any help, you can use paint to add an individual twist if you like.
Step 4: Attach Twine and Hang
Taking your twine, thread it through your planter to give you the means to hang it. The end result is delicate, pretty, and looks gorgeously professional.
Easy Popsicle Stick Flowers
Step 1: Gather Your Materials
If you still have some creative juices left in reserve, here’s one final idea for you to try: popsicle stick flowers. To create them, you’ll need:
- Acrylic paint
- Popsicle sticks
- Floral stickers
Step 2: Paint the Sticks
Taking your acrylic, the first step is to paint one of your popsicle sticks green to about three-quarters of the way up.
Step 3: Add the Stickers
Once your paint has dried, take a sticker and attach it to the top, being sure to press it firmly in place.
Step 4: Stick in Planters
With your first flower completed, repeat the process as many times as you like. Once you’re done, stick your popsicle creations into your planters to add an extra pop of color and a cute accessory for your floral compositions.
When it comes to taking your used popsicle sticks and turning them into sweet and stylish popsicle stick decorations, there are so many different DIY ideas to try! Why not share them with your crafty friends to see what they can come up with?
Enjoyed the project?
Resources for this project:
See all materialsComments
Join the conversation
-
-
 Normasbathandbody
on Feb 16, 2025
So cool. Brought back.Childhood memories. We made a lot of things with them!
-











Frequently asked questions
Have a question about this project?
I've never seen such HUGE popsicle sticks! These look bigger than paint stir sticks (which are wrong shape too). Where do you find these, please?
Another question about the huge craft sticks used for the arrows and hexi decor. Exactly how big are the ones you used?? Those are definitely bigger than 6 x 3/4 inches!!!!!!!
What do you use to hang the honey comb on the wall