How to Build Your Own Custom Built-ins

by
Jenni Ingram
(IC: blogger)
8 Materials
$800
10 Hours
Medium
We recently moved into a new house and are slowly tackling our space. The only room still not unpacked is the office.
The problem is that we had built-ins at our last house that we DIY'ed and LOVED... so it was time to build and paint our own AGAIN. Let me show you how we did it!
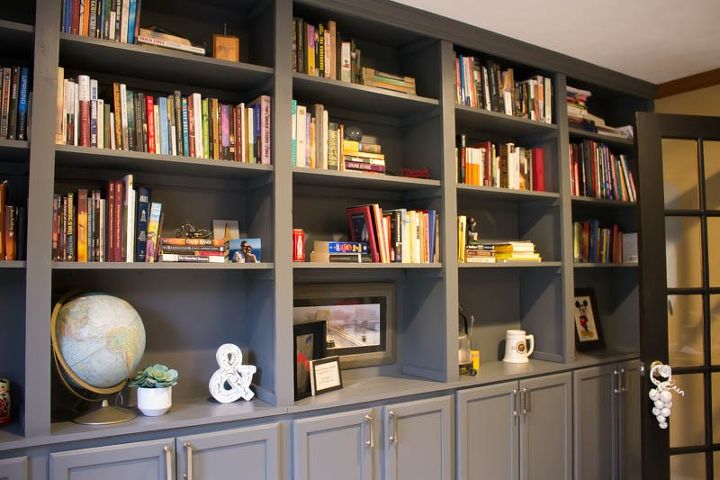
This what I wanted to build: a wall-to-wall bookcase that gives plenty of storage for us readers and hidden storage in our office. It makes it a comfy space. This is a big project, keep in mind you can visit my blog post here to get more in-depth explanations, helpful tool & product references and more photos.
Before it was looking like this ... we had a big empty wall. Zero storage.
First we cut through the carpet where the cabinets will sit. (We plan on changing the floors much later...) Then we cut off the moldings (but saved it for later). With 2x4's we built a base to raise the cabinets off the floor and give us a sturdy place to set them.
I found out unfinished cabinetry was on sale for Black Friday. We placed each cabinet on the base, and screwed the cabinet into the studs on the back wall.
The last part of the base is the "counter top". My blog post has a few ideas how to do this. I used panels that gave me a seam, so I made sure the seam would be directly under one of the book case sides helping to hide it.
Then I screwed a 1x12 directly into the ceiling and a 1x12 going up each side wall, screwing it into the studs. I cut a bunch of 1x2's to length and added these as cleats in the corners - using cleats allows you to nail into the top and sides of each shelf. I just used a little wood glue and brad-nailer to attach these.
We painted the back wall the built-ins' color and added towers,
lining each of these up the same width as the base cabinets (so each book case tower is 30" wide). Again I used my cleats to anchor and hold them in place. (My blog post has some tips on how to secure the cleats and a few extra pictures)
Once all the sides were done, I added shelf supports all the way around each book case. I found the studs in the back wall with my stud finder and made sure to anchor each support into the stud. Then added the shelves.
Unlike the bookshelves at our last house (which is also on my blog and includes how we worked around a window), I decided I wanted a taller shelf on the bottom row for decorations, pictures, etc. That's why you keep seeing the globe in these photos, I kept using it as my measurement! I ended up with the bottom shelf 18.5" high and then each other shelf 13.25" from that. It turned out to be the perfect height for most books .
We used 1x3's for the trim - they covered all the raw edges perfectly and this gives the crown molding something to hold on to! Remember how we saved it for later? We shortened the moldings that connected and added our original molding back. GENIUS.
My blog post has all the details on how we sanded, painted and chose the hardware -- plus this beautiful gray paint color! And a trick to getting cabinet doors level.
Voila!
We unpacked our books and *kind of* styled the shelves. I love that the books aren't packed in there - there's still room to breathe (and add more books!).
I'm so happy with the decision to make the lowest shelf high enough for decor. Not only does it make a fun space to decorate, but I think the height of the book shelves are more proportionate. It's a better use of space than having a bunch of wall space in between shelves.
If you made it through this post and loved the fact that I built and painted this custom bookcase, you must subscribe to my blog here. I'm always sharing DIY projects like this and you'll get the projects directly to your inbox!
You can also find me on Facebook just search rootsandwingsfurniture, most shared projects and you can catch me giving tips and painting projects on my next Facebook Live.
Again, click on the blog link below to see more in-depth instructions and some helpful extra photos.
Thanks for stopping by! Happy Reading!
Enjoyed the project?
Any price and availability information displayed on [relevant Amazon Site(s), as applicable] at the time of purchase will apply to the purchase of this product.
Hometalk may collect a small share of sales from the links on this page.More info

Want more details about this and other DIY projects? Check out my blog post!
Published December 14th, 2017 2:28 PM
Comments
Join the conversation
2 of 148 comments
-
 Emily Harris
on Sep 15, 2024
Awesome idea!
-
-
 Omaifi
on Sep 15, 2024
Look fantastic, thanks for sharing! I’ve been wanting to build some custom built-ins myself, but I haven’t had the time to get started yet, I have to do many things around the house first. I’ve been looking at materials and tools on lowes.ca to get an idea of what I’ll need for the project, and they seem to have a good selection. I’m just a bit nervous about starting since it seems like such a big task.
-








Frequently asked questions
Have a question about this project?
Why are the two lower cabinet doors, on the right, sit higher than the ones to the left?
What did you do about the receptacle(s)?
It is so difficult to find really good straight and plumb wood. What did you do about that?