Curio Wall Cabinet Made From Dollarstore Tea Boxes

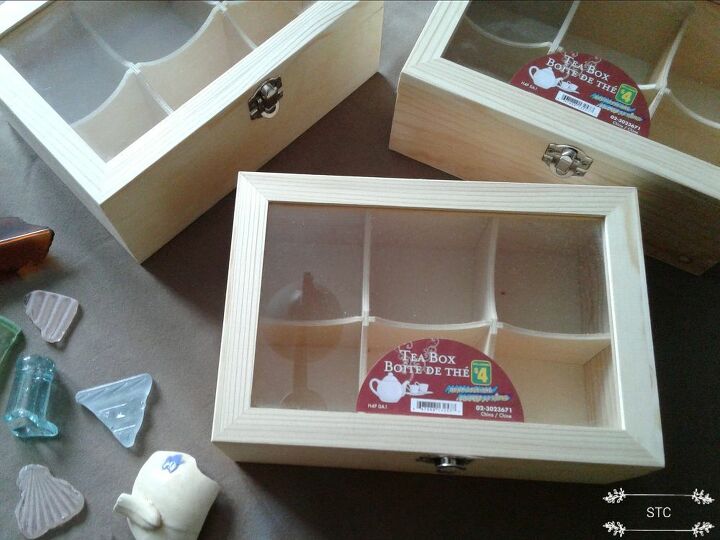
I'm that person who always lingers in the craft aisle scheming ideas about what I can create with the loads of items they tease me with! Like these tea boxes at Dollarama, some walk on by, I stop and take one off the shelf twist it, open it and tilt it. Then I get 2 from the shelf and place together and the concept of a faux window idea came to me which led me to buy four at $4.00 each! 😁
Hometalk Recommends!
Devising the Plan
The boxes all open and have closures but I wanted to glue the four boxes together and create one large unit. In order for this to work I'd need to remove the hinges and latches that fell in the center.
Removing Extra Hardware
So for two of the boxes I removed the hinges and the other two boxes I removed the latches because I will be creating 2 individual window panes to open. The four glass lids will operate as two pairs, a top and a bottom once the boxes and lids are glued together.
Brief Overview
The video just shows the summary of what I'm doing to alter the tea boxes.
Gray Base Coat
I chose a light gray for the base coat because I'm aiming for a weathered window look as the final result. The interior back is left blank because that will be covered with scrapbook paper.
Creating the Weathered Finish
With the base coat being a light gray, I used a darker gray to dry brush everything and then switched to dry brushing on white. This isn't hard to do, the main point is to keep your artist brush almost dry. If you overload your brush blot some paint off in a paper towel.
Three Step Process
You could create this finish in browns or whatever shade you'd prefer just remembering to use a light and a dark of your color choice and a white or off white. Wait for each layer of paint to dry before adding the next color.
Change of Plans
I always change the plan as I go along, thats okay...I learn as I go! I could foresee that the interior would be a little too dark with the gray so I switched to painting it white, shelves too.
Glue Boxes and Doors Together
So originally there were four boxes, I joined them together to create one large box with two opening glass doors. Above I've glued two together and secured with clothepins until the glue sets. The bottles are put there to add weight in order to keep the panes flat on the table.
Filling in the Seam
I used a spackling product to fill the seam gap, just applied with my fingertip, let dry and paint over.
Test Run
I had to try this all out before I glued the final join of the top unit to the bottom unit. Originally I was going to glue all doors into one but I changed it. I chose to have two opening doors because everything is built slight and I thought it would be less strain on the hinges.
Choosing the Scrap Paper Backing
Normally I would choose a certain color to highlight my project but since the seaglass I would be displaying was in an array of colors I opted to go neutral.
Cut to Fit
I simply cut the paper to fit inside the back of the tea box, since the insert would press the paper in place I didn't use any glue. You see if and more than likely I will... want to change the contents or the paper background I can!
Last Join to Glue
The final step was attaching the top unit to the bottom unit, I used wood glue for this final join. I attached some thin wood strips on the back for reinforcement, you could use paint stir sticks easily! Sorry I don't have a picture but if I choose to hang the cabinet the added strips will hold everything in place.
Letting the Glue Set Up
I know you're laughing at my clothepins but heh....they did the job! I used what I had, who needs clamps when you have clothespins? 😃
Adding my Treasures
Now comes the icing on the cake, adding in my treasures that I have found over the years along our beaches. They have no value I'm sure but they hold memories of collecting them and history of their past life!
Cabinet Filled
There's shard of milk glass, carnival glass, ale and pop bottles, fancy dishes, javex and medicine bottles and the list goes on.
Done!
Its sitting on a stand here now but I have the option as I mentioned to hang it on a wall too. I am super pleased with how it turned out, it filled the need I had in finding some way to display my seaglass. This could have a broad range of uses I'm sure you have one in mind already. A little girls doll pieces...Polly pocket is all I recall because my kids are grown, lol! Jewelry, little toy cars, hair accessories, sewing notions, nail polishes??
Update...
I finally decided on its home, it's hanging in my craft room where all of the other good junk is found! 😃 Thanks for viewing and tell your husband to blame me if you stay in the Dollarstore a little longer than usual after viewing this post! 😃😃😃
Enjoyed the project?
Resources for this project:
See all materialsComments
Join the conversation
-
 Mrs127224919
on Jan 24, 2026
👍️
-
-
 Lin28425841
on Jan 25, 2026
This is such a clever idea. I love how you thought "outside of the box", or should I say "tea box", when you spotted these at the dollar store. Thank you for providing the easy to follow step-by-step instructions. And for sharing your change of plans mid way through the project. I often do the same thing! Great job!
-
 Skilled Thrifty Creatives
on Jan 25, 2026
Thank you so much! Your comment absolutely made my day It's viewers like you that make creating my posts all worthwhile. Please visit my space here anytime!
-
-











Frequently asked questions
Have a question about this project?
Where or where can I find those tea boxes? I love this idea!
in what state they sell the tea boxes i had never seen them
Great idea. I’d never think of it.