7 Amazing Recycled Crafts Anyone Can Enjoy Making

Do you have old stuff at home that is just cluttering up the place? These terrific recycled craft ideas will help you turn that stuff into useful items that add a very special touch to your home. Find out how to make DIY home decor and turn trash to treasure with these clever ideas.
1. DIY tin can wine rack
Tools and Materials
- Tin cans
- Paint
- Glue
- Paper
Step 1: Gather Your Materials
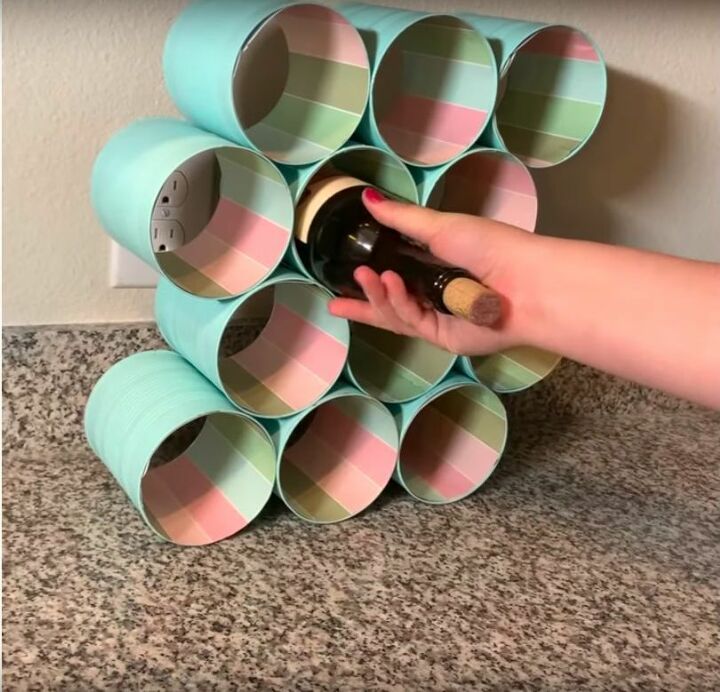
The number of cans you need depends on the size of the wine rack you want. I used 12 cans for mine.
You can use any sort of can that you would normally throw away, although they need to be big enough to fit wine bottles inside them.
Step 2: Remove the Label and the Bottom of the Can
The next step is to take off the label and the bottom. This leaves us with a smooth metal tube for our project. The only things to bear in mind here are that some labels are difficult to peel off and that you need to be careful when removing the bottom.
Step 3: Paint
Painting the outside of the can transforms it. I chose a light, neutral tone but you might opt for something a bit brighter. These are easy recycled crafts, so even a complete DIY beginner should be comfortable with this task.
Step 4: Line with Paper
You could paint inside of the can too, if you want to. However, I found that lining it with nicely colored paper gave the wine rack a better look. I just cut the striped paper to size in strips and then taped it securely to the inside of the cans.
Step 5: Glue Together
This final step is where the finished wine rack starts to take shape. Just a little bit of glue where the cans meet is enough to give you a firm structure. I chose to make mine four rows high and three cans wide. However, you can try whatever shape you most like the look of.
This is an incredibly simple recycled crafts project that looks great. It is also a smart way to reuse your old cans, so it is definitely worth giving a try. Wine lovers will be particularly pleased at how practical it is.
2. DIY tin can night light
Are you fed up throwing out old tin cans? This terrific project lets you recycle them very easily. Best of all, you will turn them into useful night lights that look great. Take a look at the few simple steps you need to make to create this object.
Tools and Materials
- A tin can
- Spray paint
- Drill
- Night light
Step 1: Gather Your Materials
There is very little needed for you to get started on this task. Just look for an old tin can that you would normally throw away. Just about any kind of can would work. Before you start, check that the can fits properly over your existing night light.
Step 2: Remove the Label
This is one of the fastest and easiest recycled craft ideas around. To begin with, you just need to peel off the label. In most cases, you can peel it off with your fingers. With other cans, you might need to use some warm water to loosen the label.
Step 3: Drill Holes
The next step is crucial, as the holes you drill will let light through the finished lamp. How you make these holes will determine the overall effect. I decided to make a series of dotted lines on the top and around the sides. This gave a pleasant effect that I really like.
Step 4: Paint
I used linen white chalk paint to get the look I was after. Spraying it on was easy, although I would recommend placing some cardboard underneath to avoid causing a mess. It is then just a question of letting it dry before the final step.
Step 5: Attach to Night Light
I now had to attach my painted tin can to the night light. I think that it looks great and it gives off a really nice glow that was just what I wanted. If you want more light, drill some more holes.
You can get a pretty night light while reducing the amount of garbage you create. This is one of these great projects that are good fun and very satisfying to see the results of. Don’t throw away a tin can when you could use it in this way so easily.
3. DIY gold leaf candle
Do you want to add a warm, luxurious feel to your home but aren’t sure how to do it? This recycling craft project shows you how to create a wonderful gold leaf candle that will brighten up any room you put it in.
Tools and Materials
- Glass jar
- Gold leaf
- Metal leaf adhesive
- Wax
- Wick
Step 1: Gather Your Materials
I chose a small glass jar that I hadn’t yet found a use for. Gold leaf is easy to get hold of online or at craft stores. As for the wax, ideally you will be able recycle some old candles for this. If not, you can buy pillar wax at a craft store and use that!
Step 2: Apply Gold Leaf
This is the most enjoyable part of the job for me. Rather than covering the entire jar with gold leaf, I created a partial gold leaf design that I really liked. You need to dab on the adhesive first of all, and then use your fingers or a brush to stick on the gold leaf.
Step 3: Melt Wax
Cut your wax into chunks and place it in a bowl. You can then put this bowl over a pot of boiling water with no need to cover it. The wax will melt and it will then be ready for you to pour it into your jar.
Step 4: Insert Wick
You need to insert a wick that is long enough to reach the bottom of the jar and stick out the top as well. Don’t worry if it looks too long, as you will cut it at the end if this is the case.
Step 5: Pour Wax
You can pour the melted wax into your jar. A neat trick here is to use a couple of sticks to hold the wick in place as you pour. Otherwise, it will fall to the side.
There is no need to buy expensive candles when an easy recycling crafts project gives you a beautifully presented candle so simply. Give it a try and you might end up filling your house with them.
4. DIY soda can candle holder
This is a fun project for recycling an empty soda can into an elegant candle holder. There are just a few steps and you are sure to be impressed at how lovely the results are.
Tools and Materials
- Empty soda can
- Scissors
- Glue
- Candle
- Spray paint
Step 1: Gather Your Materials
Any sort of soda can will do for this task. It is so much more satisfying to use it in this way than to put it out with the garbage.
Step 2: Cut Petals from Cans
Take your scissors and cut the top off the can. Then make a cut from top to bottom before cutting off the base. You can now cut into small sections and then shape them into petals. Try to make them all the same size if you can. Leave one big section of the can for the base.
Step 3: Glue Together to Create a Flower
You can glue the petals to the base one by one. I recommend starting on the outside and working your way in.
Step 4: Paint and Add a Candle
The candle holder now looks impressive, but we still need to paint it. I chose a metallic gold spray paint and covered the entire object with it. Once the paint had dried, I placed a candle in the middle.
This is possibly the best way to put an old soda can to good use. You will be helping the planet and giving your home a delightful new item of decoration if you carry out this interesting project.
5. Shampoo bottle hanging planter
Do you like the idea of hanging some plants around your home but don’t want to spend too much money on buying planters? This neat project gives you the information you need to turn unwanted shampoo bottles into practical planters.
Tools and Materials
- Shampoo bottle
- Glue
- Twine
- Plants
- Pencil
- Utility knife
- Paint
Step 1: Gather Your Materials
I had a used shampoo bottle that was about to get thrown out. The rest of the materials are things that you will hopefully have around your house too.
Step 2: Remove the Label and Cut Off the Bottom
We only really need the bottom of the bottle. I marked it with a pencil and then used a utility knife to cut it.
Step 3: Paint
I used linen white chalk paint. Spray paint is easiest for a job like this, but be sure to cover the work surface to keep paint off it.
Step 4: Attach with Twine
The next task is to glue some twine to the sides. I made my hanging planter using two pieces of shampoo bottle that we connected by the twine.
Step 5: Add Plants and Hang
Finally, it was simply a question off adding some plants and then hanging the planter. You are sure to find a perfect spot in your home for putting it.
You can add color and a touch of nature to your house with this DIY recycling task. Your old shampoo bottle will be put to good use too, giving you an environmentally friendly planter to be proud of.
6. Recycled mason jar soap dispenser
Is your bathroom lacking a soap dispenser that you enjoy looking at and using? This project is all about using a jar and a few other simple materials to produce a stunning soap dispenser that you will want to show off to everyone.
Tools and Materials
- Jar
- Pump
- Drill
- Glue
- Elastic bands
- Spray paint
Step 1: Gather Your Materials
You will want a mason jar that is big enough for this purpose and that has a lid. You also need the pump part of a soap dispenser.
Step 2: Drill a Hole in the Top
I marked on the lid the size of hole I needed for the pump to be fitted. I then drilled this size of hole. Make sure you do this as close to the center as you can.
Step 3: Insert Pump
The pump can simply be slotted into this hole. It needs to be the right size, which will be the case if the jar and the original soap dispenser are more or less the same height.
Step 4: Add Rubber Bands and Paint
This is where I put a number of rubber bands around the outside of the jar and painted it. Doing this leaves a pretty pattern on the glass.
Step 5: Fill with Soap
After removing the rubber bands, I could see that the attractive design I was looking for had worked. It was then just a question of filling it with my favorite soap and starting to use it.
Buying soap dispensers all the time is expensive and bad for the planet. This is a great recycled crafts project to get a wonderful dispenser that you can use time and time again.
7. Hanging bottle planter
Getting rid of plastic bottles in a way that doesn’t harm the planet can be difficult. Thankfully, this short DIY project does that and gives you an attractive hanging planter at the same time.
Tools and Materials
- Plastic bottles
- Ruler
- Tape
- Utility knife
- Wire
- Rocks, soil, and plants
Step 1: Gather Your Materials
A big, empty plastic bottle is the main material here. In fact, if you have several of them then so much the better, as you can make a multi-level planter.
Step 2: Remove Label and Cut a Hole in the Bottle
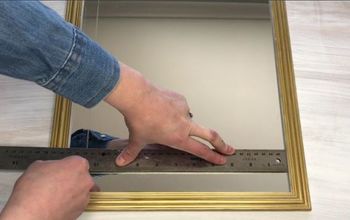
I removed the label and then folded it over, allowing me to use this to mark the size of hole I wanted to cut out. It is a good idea to tape on a ruler, so that you cut a perfectly straight line with your utility knife.
Step 3: Add Wire
I made holes near the top and bottom of the bottle. The next step was to feed my wire through here. The length of the wire really depends how many bottles you want to use and the space you want between them.
Step 4: Fill with Rocks, Soil, and Plants
This is the crucial part, where I arranged a nice display using rocks, soil, and plants. When using several bottles, I suggest using a variety of plants for added effect.
Step 5: Hang
Once you connect all of the bottles, the planter is ready to hang. I chose a spot near the window where my plants would get a lot of natural light.
This is a fine way of adding more plants to your home and of using up those awkward empty bottles too.
If you enjoyed these recycled craft ideas, please share them with your friends and let more people know about them.
DIY home decor using recycled plastic bottles
Enjoyed the project?
Comments
Join the conversation
-
-
 Vicki
on Dec 08, 2023
I'm an (underfunded) art teacher in a middle school. I rarely throw away anything :) My students leave water bottles all over my room. I cut the tops off of them to use on tables to dispense media (colored pencils, markers, crayons, whatever we need to use for the day), or cut them down even to a shorter height to dispense measured amts of paint (one color per cut-down container), or to parcel out paper clips, hand held pencil sharpeners ( & their refuse) etc. I also have 101 uses in the art room for a paper bag....but I do go on......If you have something you might think an art teacher could use in your school district....give them a call......or better yet meet w/them to show what you have....A computer concern going out of business gave me TONS of a computer cleaning cloth...that turned out to be the best "wicking" material I could have hoped for & we made beautifully colored Koi windsocks with it. A grocery concern gave me paper bags, with which we designed and made Native American drum heads (w/artful Native art using wax crayons a'la wax resist and other methods). We've used xerox papers to make 3-D "snowflakes" and old photo-developing papers to make our DIY scratch art media. Old purple ditto paper makes a creepy October project when water is added. Old sheet music makes a background for almost anything, as does old dictionary pages. An upholstery/home decor business gave me tons of material, with which we made more than one African-based project....Think before you throw away :)
-
















Frequently asked questions
Have a question about this project?
In the first project, the wine rack, will it actually hold 12 bottles of wine?
I saw that my question was asked, but not answered. How do I attach the can to the nightlight?
How do you cut a can so edges are smooth & not dangerous? I would not reuse any of my cans. Too easy to get cut. Thank you.