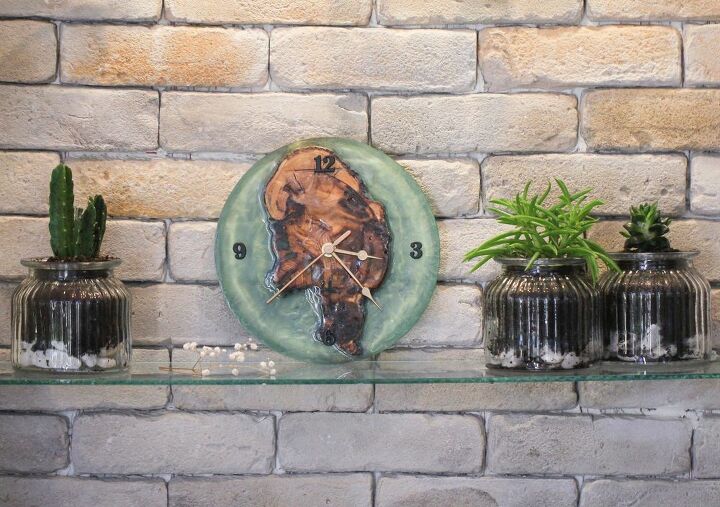
Epoxy & Wood Clock

It all started when I was stuck in a traffic jam.
Instead of getting frustrated and upset as I usually do I tried looking at the view outside and just then I noticed a majestic log laying on the side of the road.
Without giving it a second thought I rushed outside (traffic was standing still) and took it with me.
My husband sliced the log using a chain saw.
Once it was sliced, we discovered that our olive tree log used to be an ant colony, which was great! The big hole in the middle would be a perfect fit for a clock mechanism.
We took a sliced wood and sealed it using a simple "white glue". Sealing prevents air that is trapped inside to come out in a form of bubbles during the epoxy cast process.
We let it dry in the sun for an hour.
We measured and mixed the epoxy resin with a beautiful metallic olive-green pigment.
When the epoxy was ready, we poured it into a plastic plate.
After 48 hours the epoxy cured completely. We removed it from the plastic plate that served as a mold.
Using an eccentric sander we smoothed the surface and leveled the wood. When sanding Epoxy it becomes opaque but applying a second layer of epoxy makes it transparent again.
Then, came the messy part.
Using a Makita router we made a hole in the back of the soon-to-be clock for the mechanism.
The wood was still semi-wet underneath the epoxy, which made sawdust fly everywhere when we were cutting.
Once the hole was big enough for the mechanism to fit, we drilled a hole for the clock hands.
We applied a thin second layer of Epoxy to have a nice vivid finish. We set it to cure for the night.
At the top of the clock we drilled a blind-hole (a hole that doesn't go through) to hang it on the wall
After everything was set, we purchased black plastic digits and glued them to the clock using a ruler in order to position them in the right place
We weren't happy with the color of the clock hands, which made it hard to read. So, we sprayed them with a golden-brown color.
We still have a few other sliced woods we don't know what to do with. If you have any idea, you are welcome to post it in the comment section below.
Enjoyed the project?
Resources for this project:

Comments
Join the conversation
-
 Carol Cole
on Jul 14, 2019
Awesome job. Very pretty and I agree by trying to sell them.
-
-
 Carol Cole
on Jul 14, 2019
From a distance it looked Like Italy to me.
-









Frequently asked questions
Have a question about this project?
Did you notice that if turned up side down it looks a lot like a map of my adopted home state. West Virginia very nice.
Why not make lights for your bedside nightstand? Would b absolutely gorgeous.
Why don’t you use them in your kitchen to put your hot food pots on top when you’re serving dinner/lunch/breakfast you know??like hot pads (only made with wood)