How To Make A DIY Farmhouse Wall Clock Using Reclaimed Wood

Over-sized wooden wall clocks are super trendy and also super pricey. Don't toss your farmhouse decorating dreams aside before reading this farmhouse wall clock tutorial!
We'd like you to welcome back Greg, one of the Cutting Edge Stencils owners and a creative DIYer. As Greg was driving to work one day, he spotted pieces of an old wooden fence sitting by the garbage. While most cars were passing it by, he saw some DIY potential in the old wood so he scooped it up. Greg decided to turn the old wooden fence pieces into a farmhouse style wall clock using our new Clock Stencil.
We want to help you DIY, so some of the materials in this post are linked to sellers. Just so you know, Hometalk may collect a small share of sales from the links on this page.
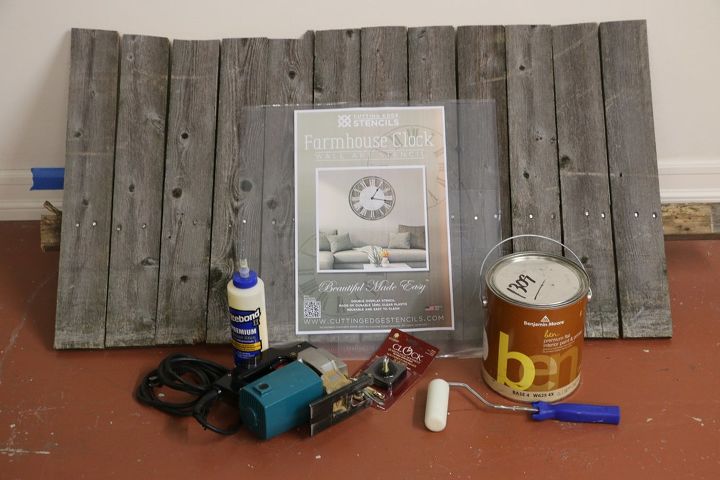
The first thing he did was round up the supplies needed for this project.
Then he cleaned off the reclaimed wood to ensure there was no debris that would get stuck under the stencil or make the paint peel. Greg scraped off the debris and then used sand paper to smooth the wood.
Once the wood was cleaned up, Greg grabbed a piece of 1/4 inch plywood. He used Loctite Premium Construction Adhesive to glue the old fence wood onto the plywood.
Once all the wood was glued into place, Greg let it dry for 24 hours. Staples can be used to reinforce and hold the wood in place however it's not necessary. Greg drilled a hole in the center of the wood canvas.
Now it was time to give the reclaimed wood a circular shape. Greg used a jigsaw to cut the wood. To ensure he cut the wood in a perfect circle, Greg used a large compass. A tool like this can be purchased at a local craft store or you could create a DIY version using a string and pencil.
After the wood was prepped and ready to go, Greg decided to use our new Farmhouse Clock Stencil. This stencil comes with two pieces so it enables you to stencil different variations of the clock.
Greg chose to paint the outer circle in Benjamin Moore Navajo White. He used repositionable spray adhesive on the back of the stencil and then placed the circle stencil in the center of the wood. Using a stencil brush he painted the edge of the circular pattern in white.
A chip brush was used to paint the rest of the wood in white.
Once the entire outer circle has been painted, lift the stencil.
With his pretty Farmhouse Clock pattern in hand he was ready to keep stenciling! Greg cut his wood in a 32 inch circle so he chose to use the large clock stencil for this project. He sprayed the clock stencil with spray adhesive and placed it on top of the wood. Then he evenly loaded the stencil brush with black paint. Greg made sure he brushed off any excess paint on a piece of paper towel. Too much paint will cause the design to bleed. Then he painted the mandala design.
Once the entire design was painted, Greg lifted the stencil back to reveal the pattern.
To complete the farmhouse clock, Greg purchased a clock movement kit from Amazon. He attached the clock hands according the directions included in the package.
Are you ready to see how it all turned out? Here is Greg's reclaimed wood project.
It's gorgeous! And it's amazing how he took old fence wood and turned it into this rustic farmhouse treasure.
To enhance this farmhouse clock we stenciled the small Deer Head Wall Art Stencil in the center of the clock.
With his pretty Farmhouse Clock pattern in hand he was ready to keep stenciling! Greg cut his wood in a 32 inch circle so he chose to use the large clock stencil for this project. He sprayed the clock stencil with spray adhesive and placed it on top of the wood. Then he evenly loaded the stencil brush with black paint. Greg made sure he brushed off any excess paint on a piece of paper towel. Too much paint will cause the design to bleed. Then he painted the mandala design.
Once the entire design was painted, Greg lifted the stencil back to reveal the pattern.
To complete the farmhouse clock, Greg purchased a clock movement kit from Amazon. He attached the clock hands according the directions included in the package.
It's gorgeous! And it's amazing how he took old fence wood and turned it into this rustic farmhouse treasure.
DIY home decor using reclaimed wood
Enjoyed the project?
Resources for this project:
See all materialsComments
Join the conversation
-
 Roberta Shaw
on Feb 07, 2018
I love it and I can get the wood to make 2 clocks. I’m going to put my grandsons picture on them. I wanted to point out that the numbers V and VI are upside down. You made a beautiful clock and I can’t wait to get started.
-










Frequently asked questions
Have a question about this project?
How and when did you cut the square in the back for the clock mechanism? It would be nice to know.