DIY Bed Canopy

I wanted to put a canopy over my daughters cot/crib (for decor purposes - I move it when she sleeps) but couldn’t find one that I liked for a decent price, so I decided to make my own. 😊
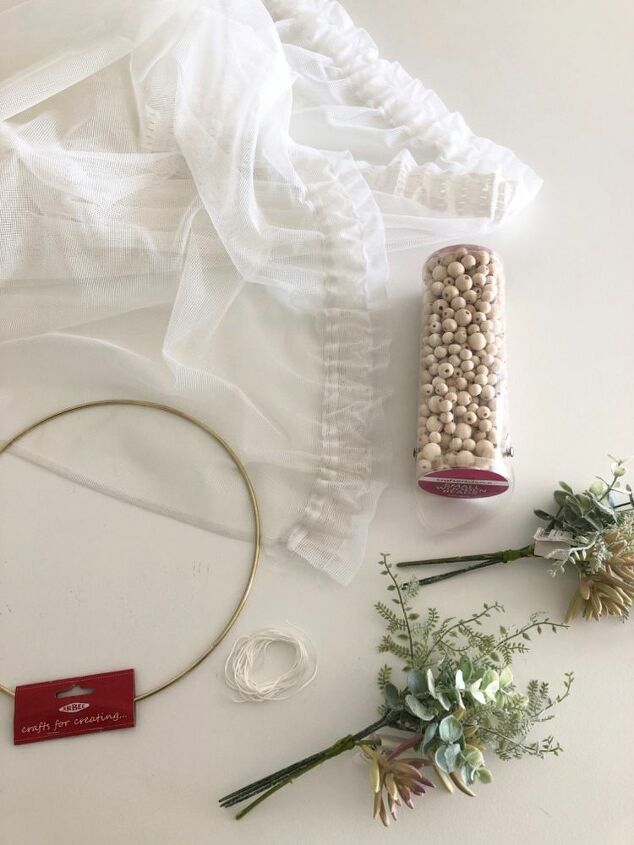
I decided to use a sheer curtain with a hidden rod pocket for the material to save me from sewing 😉. I managed to pick one up from my local thrift store for a couple dollars. (The Ikea Vivan would also work great!)I then headed to my local craft store and bought a medium sized metal ring, some wooden beads and two small artificial flower arrangements that I liked. I had string, tape, glue etc at home so didn’t need to purchase any of that.Once I had all my materials, the first step was too cut the metal ring so that I could slide the curtain onto it. For this, I used a small hand saw and cut along the join, just enough to weaken it and the I bent it gently back and forth until it snapped.
I then slid one end of the ring into the hidden pocket on the curtain, being careful not to tear the curtain with the point.
Once my curtain was on the ring, I used some tape just to close the ring up again.
Next, I taped the flower arrangements onto the ring, in between where the two ends of curtain met.
Once my two flower arrangements were taped on, I tied a little bit of string in the middle where they overlapped, just to keep them in place.I then pulled the curtains over top of the stems I had taped, and attached the top of the two curtain ends together with a small stitch of ribbon.
Next, I cut 3 pieces of string (I used nylon cord), approx 1m long each, and then folded them over to make 6 strands, and tied a knot at the top to attach them all and make a loop for hanging. (See photos below).
Once I had my 6 pieces attached with a loop, I started threading the beads onto each strand, making sure that I had the same amount of beads on each one.
I then took a larger bead, thread the loop/hook through it and pushed it over the knot to cover it.
Once I was happy with how many beads I had on the strings I put some tape on the ends so that I could work on the next step without the beads falling off.
Next I layed the bead strings over the curtain top, dividing them evenly around the ring.
I then, one by one, took the tape off the ends of the strings and tied each string to the ring, threading them through the pockets from the inside to disguise the knots.
Once it was all attached, I put a dab of glue on each knot to stop them from coming loose.Now it was done and ready to be hung up! 👍🏻Check out my Instagram page @_prettyliving for more of my DIY projects! 😁
Enjoyed the project?
Resources for this project:
See all materialsComments
Join the conversation
-
 Cheryl Kengott Wypyski
on Dec 07, 2022
Beautiful
-
-
 Johanne Palange
on Jan 14, 2023
I read all the comments about safety issues, and that you specify that the curtain should be pushed out of reach while a baby naps. I have 2 things to say about that. 1) Why bother having a curtain that will just add 1 more task to you routine, no, two tasks, really. You have to put it back when not in use. 2) I've seen babies rock their little bodies side to side to give the crib momentum to get it sliding in the direction they want to go. So they could reach the place where you've moved the curtain to. Therefore still a safety hazard.
-

















Frequently asked questions
Have a question about this project?
Could you describe the last step (hanging it)? And a picture showing it? Thanks.
How long can you keep the canopy over the crib? Most babies are pulling themselves up to a standing position 6-8 months old. I'd hate to see a wee one get tangled up.
Great job 🤱