DIY Balloon Easter Basket

by
Wet & Forget
(IC: professional)
12 Materials
$8
24 Hours
Easy
Instead of using tacky store-bought Easter baskets to decorate, create your own with our tutorial! You can pick out the color of the basket and personalize it with our decorating ideas. This DIY Easter basket is a great project to work on with kids too!
Step 1: Blow Up the Balloon
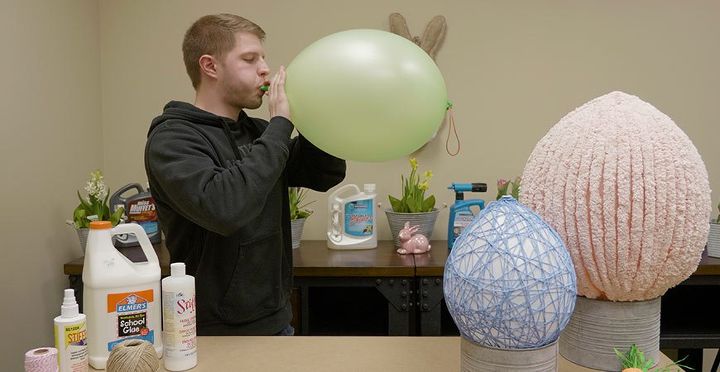
Create the base for your DIY Easter basket by blowing up a large balloon. Blow air into the balloon until a large egg shape forms. Tie off the balloon and set it aside.
Step 2: Preparing the String
Put your spool of colored string into a bucket. Fill the small bucket halfway with modge podge. Let the string soak in the solution for a few minutes. The modge podge coated string will hold the shape of your basket.
Step 3: Wrapping the Balloon
Tie the modge podge soaked string to the balloon tie. Start to wrap the colorful string around the balloon to create an egg-shaped base. This step is a great way to get your kids involved with crafting. Your hands may get a little messy- but it’s totally worth it!
Continue to wrap the string around and across the balloon until it almost looks like a spider web. The more crossing of the strings the better, as this is what creates the structure of the basket.
Step 4: Spray Away!
Spray the string and balloon evenly with a fabric stiffener. This will help hold the string into place after the balloon is popped. Let the balloon and string dry for 24 hours.
Step 5: Pop the Balloon!
Pop the balloon with a pin and allow the air to drain from the balloon. You may need to pop the balloon from two different places so the air can drain more quickly from the balloon.
Step 5: Cutting the Basket
Cut an oval shape into the basket. This will be the opening of your basket to display your Easter decor. After this, cut out the balloon remains inside of the basket.
Step 6: Decorate and Personalize your Basket!
Decorate both the inside and outside of the basket to your liking. We used a hot glue gun to attach the rope around the opening of the basket to smooth out the edges and give the basket a farmhouse look. We then stuffed the basket with faux moss. Then we added a statue of a bunny and a few easter eggs to help celebrate the season. Statues of chicks and other baby animals make a great decoration for this DIY Easter basket. If you’re using this Easter basket as a place for the Easter bunny to deliver gifts, leave the Easter basket empty or fill it with faux moss.
This Easter basket project is a great craft to complete with kids, then let the Easter bunny surprise them with gifts on Easter Sunday.
{
"id": "4774858",
"alt": "",
"title": "",
"video_link": "https://www.youtube.com/embed/9MFXZx1tfQM",
"youtube_video_id": "9MFXZx1tfQM"
}
{
"width": 634,
"height": 357,
"showRelated": true
}
Get extra hints and tips with our DIY Easter tutorial video above.
Enjoyed the project?
Suggested materials:
- Balloons
- Pins
- Blunt Large Eye Needle
- Colorful String
- Small Bucket
- Scissors
- Modge Podge (can substitue with 1 part glue: 1 part water)
- Fabric Stiffener Spray
- Decorative Rope (optional)
- Faux Moss (optional)
- Rabbit Statue (optional)
- Plastic Eggs (optional)
Published April 12th, 2018 12:31 PM
Comments
Join the conversation
2 comments
-
 Joy martin
on Mar 24, 2022
Love how this turned out! TFS 💗
-
-








Frequently asked questions
Have a question about this project?