Faux Stained Glass Window With Unicorn SPiT

by
Karen
(IC: blogger)
3 Materials
$50.00
2 Days
Easy
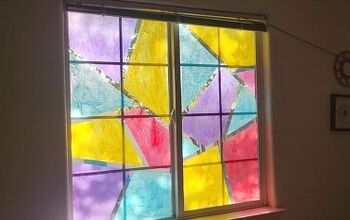
You can easily create a beautiful stain glass window with Unicorn SPiT and not break the bank in the process. Plus you will have leftover Unicorn SPiT to do many more projects (check out my blog to see more projects). I have had bare sidelight window for years...and yes everyone could see right in! I wanted something that I could still see out of but to see in was a bit distorted. So for me I didn't want curtains. Years ago I did a similar thing but used the paint that was being sold for doing stained glass...boy was it expensive! So since I already had my stash of Unicorn SPiT I gave this a try last fall. So far it has held up beautifully!
Decide on your template. I found mine on Pintrest. I created a board with a bunch of templates...feel free to browse my board. Skip this step if you want to create your own template. For my template I just pulled it up on my photo editing software and had to print it in sections so that it fit in my window. Then I taped it to the inside of my window. I chose to do my painting on the outside since I have dogs that could scratch the surface of the paint if I did it inside.
Protect your surrounding area. This includes taping off the edges of your "canvas". This is very important if don't want the surrounding edges to get painted.
Wipe down the glass with your rubbing alcohol. This helps to remove any oils or dirt that can prevent the paint from adhering to the glass.
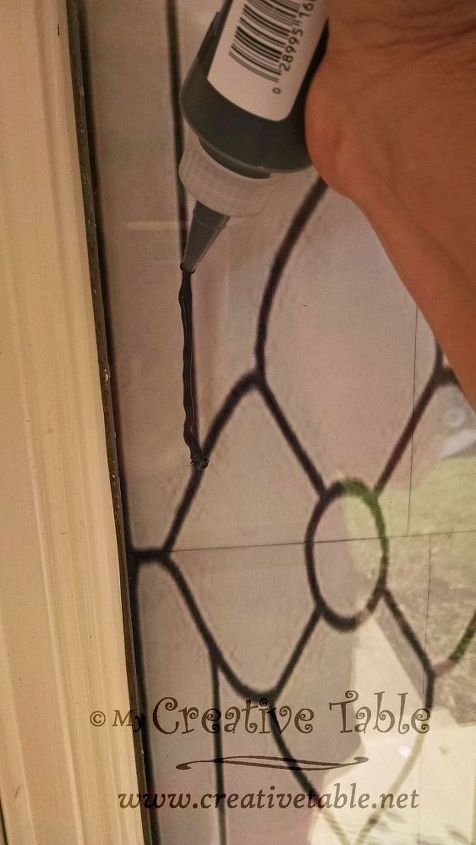
Start outlining your template with the liquid leading. You can also buy premade lead strips (may be a little expensive though). These are a good option if you do not have a lot of curves or movement in your design. I don't know what my problem was the day I did mine but I had a very unsteady hand so I ended up having to clean up the lines with my exacto knife the next day, after the lead had dried (next day), which turned out to be very easy. The nice thing is your lines really don't even have to be perfect anyway.
Now choose your starting color or colors and pour a little on a paper plate. Pour a little of your Mod Podge (dishwasher safe version) on the same plate. It's ok if any or all colors blend together. Dip your brush in the Mod Podge and paints and start painting the sections you want in those colors. Keep in mind if you want a more sheer look use more of the Mod Podge. Likewise, if you want a more opaque look just use more of the paint but ALWAYS use the Mod Podge on each section. I addition for another affect you can also paint each section with Mod Podge first and then go back with your colors. Really, it all just depends on what look you want. For the most part I wanted the colors to be a bit more transparent so I used more Mod Podge than color.
Note: be sure to clean up any spills immediately so you don't discolor areas not intended to be colored
Keep repeating this step with each of your colors until your project is completed. Let the paint dry over night. I wanted a lot of movement in each section so some of my strokes were pretty thick which resulted in a longer dry time. However, if you choose to do a smoother finish it may only take a couple of hours to dry.
Let your Unicorn SPiT Dry. You will know it is dry when it has a very dull matte like look. If it is shiny it is still wet. Do not skip the next step...it is very important.
Finally, when your paint is dry use an oil based sealer to protect your Unicorn SPiT. I used an outdoor rated Polyurethane. If you are using Unicorn SPiT do not skip this step. It not only seals your finished work it really makes your colors pop!
I live near Washington DC. Our Winter has been much warmer than normal but still have had some cold. These windows have held up to both hot and cold temps. Super excited that they are doing so well!
I know there are other products that can achieve the same result but Unicorn SPiT happens to be my favorite because of it's versatility and its ability to forgive mistakes. For this project it was less forgiving of mistakes because of mixing with the ModPodge but normally you can just wash it off. I love that it is non toxic and water based and smells awesome (Jasmine).
Added note: If when you are done or you want to change your design someday all you have to do is scrape with a razor blade to remove.
I hope you enjoyed this tutorial. Let know what you think. Be sure to check out my website for more projects with Unicorn SPiT www.creativetable.net
Enjoyed the project?
Resources for this project:

Mod Podge -Dishwasher Safe
Any price and availability information displayed on [relevant Amazon Site(s), as applicable] at the time of purchase will apply to the purchase of this product.
Hometalk may collect a small share of sales from the links on this page.More info

Want more details about this and other DIY projects? Check out my blog post!
Published March 17th, 2017 3:31 PM
Comments
Join the conversation
2 of 54 comments











Frequently asked questions
Have a question about this project?
Why do we need to use Mod Podge with it??
I love this idea... I have the same window but mine has a greenish tint already. Hope to change the old out dated glass, but I think this would be cheaper. Where or how did you get the stencil ????
Did Plaid stop making the gallery glass colors and frosts? Or do you prefer the unicorn spit?