My Bohemian Balcony Makeover: Built a Mini Deck, Stained & Stenciled..

by
Winnie Luthien Thye
(IC: vlogger)
11 Materials
$200
1 Week
Easy
Hello again from sunny Malaysia :) Just wanna say a big thank you to all who have visited and liked and commented on my 2 previous projects!! :)
This is to be my 3rd makeover of the year! And this time, I have chosen to do an outdoor space. Living on the 8th floor, our only outdoor space within the apartment would be the balcony. We have a relatively small balcony, probably about 12 feet x 5 feet give and take. It's a space that I seldom use because there was nothing there. Well we had a table and some plants but that was it ... a neglected space (for me at least). The husband likes to use it in the night when it's cooler outside. It is his go to space to write.
It's a really lovely space if I think about it, because we get to watch the most beautiful sunsets during the evenings from this balcony. Don't know why I didn't give it more attention earlier. Anyways, it's time to do it up and give the family a hangout space, watch the sunset and give my husband a nice little nook to write surrounded by beauty instead of dying plants ((O_O))
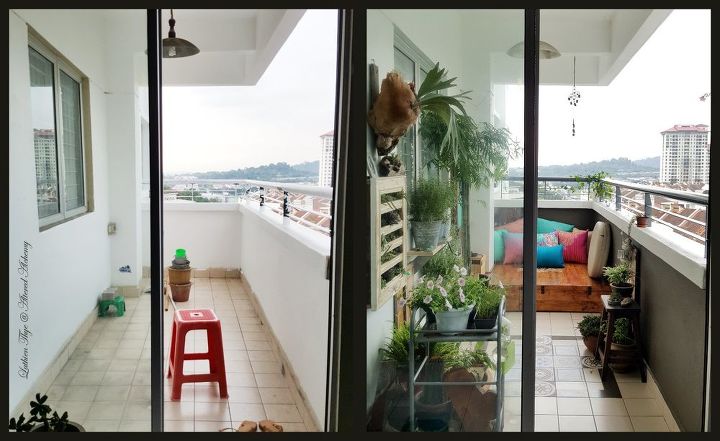
SO here is the Before and After photo of our balcony, and after that I will give you a brief description on the whole makeover process and what projects I did to enhance this outdoor space.
*you can see the full process in the video link at the end of this article.
I decided to give our balcony a Zen Bohemian look, if there is such a thing ... because my husband and I have been quite into yoga lately, so I thought it would be nice to bring in the same sort of vibe into the home as well.
I began by building a mini deck.
We had a table which was one of the first things that came into this home with us some 12 years ago, and I have never been able to part with it. So after many different uses, this table has now become the foundation of my deck. However, it wasn't enough to cover the whole deck area, as such I had to build extra framing to fill the whole space.
After framing up the extra area, I began to lay the 4x1 timber on top and secured them to the table/frames. I must mention that after my 2 previous makeovers, I got the attention of a local online hardware store ATKC, and they offered me all the wood I needed to build my deck for free! I only had to document my process on video so that they can put it on their website. Of course I was delighted with the offer!! As such, my deck costed me close to nothing to build :)
If you look at the photo, I have made a removable panel on the left of the deck. The reason is because my drainage outlet is there, so I thought I'd better make that part removable in case something needs to be fixed. Who knows!
On the right, I have added like a flip up panel with a magnet just for some extra storage space for unsightly object that we want to hide :)
So that's the deck done! I have also stained it with a mixture of 2 different stains which I had leftover from other projects.
And then, I designed and drew out a stencil of a stylized Lotus and simply stippled it onto the stained deck. After which I coated the deck with 3 coats of polyurethane to make it sufficiently waterproof.
And here is the finished deck. It is important to mention that the height between the floor of the deck to the top of the rail is still within the safety specs of 1 meter, as I do have a 7 year old.
Next, I decided to make a table so that my husband would have a proper surface to write on. But I didn't want the table to be there all the time. As such I thought the best solution was to make a fold-up table.
I first cut up some block board which I had left over from my kitchen makeover, for the tabletop. And then painted it turquoise. I was determine to use brighter colors here, colors that I have never dared to use inside the home.
I made the legs with 2x1 timbers, and made it so that when the table is folded up, the legs would look like some sort of frame.
Within the frame, I stenciled the Sanskrit symbol "AUM" to go with the Zen Bohemian theme. I also fashioned a 'stopper' to hold the table up when it's folded against the wall.
The table sits comfortably at the edge of the deck so that there's plenty of space still to move around on the deck. I was pretty pleased with the results :)
These were the 2 main things I wanted to do to the balcony. Of course before that, I did paint some walls a deep brown-grey to give some accent to the stark white walls. I could only paint on the walls that would not affect the facade of the apartment block when viewed from outside.
After building the deck and the table, I decided that it was time to beautify. I had a friend who was also doing some reno to her bathrooms and when her contractors ripped off all her old bathroom cabinets, I told her to save 2 doors for me. I had something in mind for the doors.
First I cut some windows into the slates of the cabinet door. Then I took some recycled wood and fashioned a shallow shelving. Attached the door to the shelving units and voila I have a vertical planter!
So this becomes my new succulent planter and I even kept the doorknob!
As for the other door, I cut it into half and made them into shelves for my potted herbs.
Oh! not forgetting also, another planter I made out of recycled wood and cake tins I bought from Daiso (our 5 dollar shop)
I added some floor decal which I bought online. Stick and peel tiles that were easy to apply, and remove should it fall out of favour :)
And the money I saved from the deck (it was sponsored) I bought a beautiful bamboo plant and those potted herbs in the photo above, some succulents and ferns. All in all I am a happy girl!
And here are some photos of my balcony now.
You can see the whole makeover process in the video link below.
Thank you for reading :)
Enjoyed the project?
Any price and availability information displayed on [relevant Amazon Site(s), as applicable] at the time of purchase will apply to the purchase of this product.
Hometalk may collect a small share of sales from the links on this page.More info
Published January 8th, 2018 7:18 AM
Comments
Join the conversation
3 of 328 comments
-
 DeeDee Bibbs
on Apr 13, 2025
Awesome job 😁I bet sunrises and sunsets are beautiful from a beautiful patio.
-
 Winnie Luthien Thye
on Apr 15, 2025
thank you!! indeed they are 🥰
-
-
-
 Talent lawrence
on Dec 14, 2025
This is beautiful, you did a great job, seems you have some good experience in this
Just Incase anyone is interested in this type of balcony or maybe you need a good home renovations or luxurious settings you can contact this guys they are absolutely good, professionals and reliable
https://renovation.reviews/t/balcony-renovations-in-condominiums/38954?u=talent_lawrence_godw
-










Frequently asked questions
Have a question about this project?
You did a beautiful job on your patio!!! You are so creative. No, I could not do anything like this. I have MS and in a wheelchair so all I can do is look and say, WOW, she is so creative. Good for u!!! What' your next project? You are so blessed!! Bye, Mary D.
GM ☀️🤗
would you have a plan or instructions for the table that folds up on the wall?
thanks
It's a day & night change from "before"! I have 1 question? Where do you & the family sit comfortably? Are there cushioned seats on the other side, not in view? Seems the only bo ho thing missing? Anything macrame 😉