How to Make a Stunning Front Porch Planter Idea for Spring

As the weather starts warming up, it is the perfect time to refresh your home's exterior and add some pops of color. One great way to do this is by creating a beautiful front porch planter idea for spring.
In this tutorial, I will walk you through the step-by-step process of making a rustic, whitewashed planter and filling it with your favorite flowers.
This post was transcribed by a member of the Hometalk editorial team from the original HometalkTV episode.
Hometalk Recommends!
By incorporating vibrant spring porch plants and some simple DIY techniques, you can create a stunning porch display that will be the envy of your neighborhood.
1. Whitewash the Pot
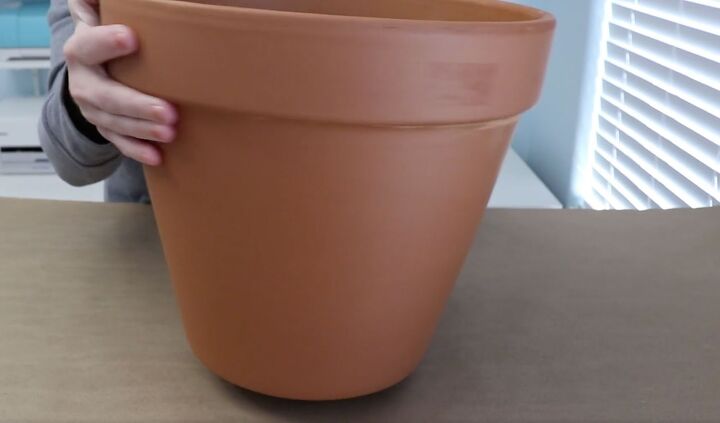
I began this cute spring planter porch idea, by selecting a 12-inch terracotta pot to use as the centerpiece. However, since this pot was quite basic, I felt that I needed to customize it to create my desired look.
I decided to whitewash the planter to give it a weathered look.
To achieve the worn, whitewashed appearance, I mixed a small amount of white craft paint with some water in a dish until it reached a runny consistency.
Then I stirred it up to combine the paint in the water.
Once the paint was ready, I grabbed a rag and dipped it into the whitewash. Starting from the top, I rubbed the rag back and forth. Rubbing it this way helps to create the weathered style I wanted to achieve.
I continued this process around the whole pot making sure the white paint looked worn down in some areas.
I also made sure to apply the same technique to the pot's lip and inside ring to maintain a consistent and cohesive appearance.
The whitewashing technique was simple, yet highly effective in transforming this basic pot into the base for this rustic porch decor piece.
2. Prepare the Planter
Now that the spring porch planter idea was starting to come together, it was time to move on to the next step - prepping the planters for your spring flowers.
Firstly, I allowed the whitewashed paint to dry entirely before carrying on with the porch pot.
To create the planting space, I inserted a small disposable planter into the center of the large terracotta one.
I then added some stones to the bottom of the large pot to raise the smaller pot higher. Using the same stones, I filled the small pot as well to ensure that the flowers would have good drainage.
For a flat planting surface, I added a bit of gravel on top of the stones.
Once that was done, I filled the space between the middle and outer pots with soil. This ensures that the flowers have sufficient space to grow and thrive and create a beautiful, lush appearance that is perfect for a spring porch pot.
3. Add the Flowers
Now it's time to fill up your outer planter with soil.
If it is still late winter you can add faux flowers to your planter. Then once spring arrives you can swap them out for some gorgeous spring bulbs.
I think the best spring flowers for pots are pansies and violas with some green foliage between them, however, there is a wide range of flowering plants that you can choose from for your spring container garden.
Fill up the outer part of the pot with your flowers.
Once the larger pot is fully covered with flowers, place a glass vase in the center and make sure it sits flat on the gravel.
To add an enchanting touch, insert a battery-powered candle into the glass vase, and watch as it emits a beautiful glow.
This candle is the perfect finishing touch, and this planter is going to look great on my porch throughout spring.
More Porch Planters
Porch Planter Idea for Spring
By following these simple steps, you can create a stunning spring container garden that will impress your guests and neighbors alike.
Don't wait until early summer to enjoy the beauty of these spring pots! Give your front door a fresh new look with this DIY project.
Don't forget to share your tips and tricks for creating stunning planters.
Enjoyed the project?
Resources for this project:
See all materials














Frequently asked questions
Have a question about this project?
where did you buy the rocks from?