DIY Library Wall - Billy Built-in Bookcases

by
Maria
(IC: homeowner)
3 Materials
$440
20 Hours
Medium
I have been researching this project and planning it for a while now. As we moved the guest room we were left with an empty room that was supposed to be our home office. Our books have been in boxes since we moved in 3 years ago so I decided to just go for it and do it. And I DID IT! 100% by myself. And I am so proud. :)
I started by calculating the number of IKEA Billy bookcases needed for this project. It came out to 3 of the 15" wide and 2 of the 31.5" wide shelvings and I bought the 1 foot height extensions as well. One day after work ( I get off at 6 pm) I drove down to IKEA and bought them all in two transactions using $25 OFF of $150, so saved $50 dollars :)
The third night I put all the rest together.
The 4th day I was off. I secured them to the wall. I started in the center of the wall with the middle piece and used the "L" brackets that came with the units. I had to do on the side as there was no room to work with above the bookcases.
Then I realized I can not put the neighboring bookcase flush to the wall as the bracket screw was in the way. So I took it off and used 1/4 inch plywood pieces to space them off the wall. Did that at the bottom and at the top. Also I was using a level to make sure everything lines up.
Considering the spacing, the moldings I picked etc. I needed a 3/4 inch gap between the cabinets, so I just used leftover 1x4 pine and screwed the sides together on the bottom and on the top. Then that one got an "L" bracket as well.
I did all 5 pieces in the morning, They are super sturdy, not going anywhere for sure. Then I ran to Home Depot to get the baseboard, casing and crown molding, also color matched a quart of paint to the shelf's color.
Then I took my miter box upstairs and did every cutting by hand. I used a dremmel tool to cut out the wall's baseboard to make room for the bookshelf baseboard. Then added the middle casing, and finished up with the crown.
I added the shelves.
I also added some shoe moldings over the gaps that were between the baseboard and the first shelves.
This took up my afternoon. The next day I was off again, this is day 5, I filled every nail holes and caulked every bit of gaps to create a professiona,l built-in look. I then painted the moldings around the whole library wall.
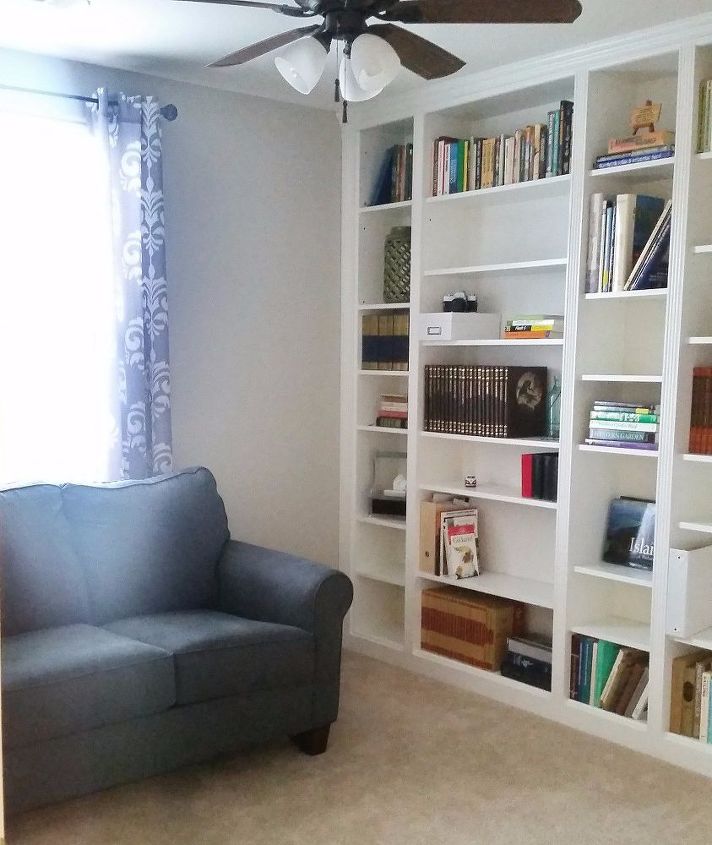
Then in the afternoon, with a little bit of help I started to un-box the poor books that had been sitting untouched for 3 years and started to fill up the shelves. I didn't realize that we have so few books :-0 So now I get to buy all kind of decorations to fill the whole wall. :) Exciting :)
I was so lucky to find a twin sleeper sofa that fits perfectly in the space! On Craigslist, unopened box for $200! YAY! An extra bed just in case :)
Sorry for the color of the picture, it was taken at night and can't really adjust the colors. Anyways, that is IT! :)
Enjoyed the project?
Resources for this project:

INSL-X PRODUCTS CC4510092-01 Gallon Satin White Cab Enamel
Any price and availability information displayed on [relevant Amazon Site(s), as applicable] at the time of purchase will apply to the purchase of this product.
Hometalk may collect a small share of sales from the links on this page.More info
Published December 25th, 2016 9:18 AM
Comments
Join the conversation
2 of 954 comments
-
-
 Mary Key
on May 31, 2025
Wow Maria, this looks amazing! You’ve seriously inspired me — and I love how you did all the math for the Billy bookcases yourself (and the savings too, respect!). Honestly, just figuring out the measurements and spacing would’ve stressed me out more than the build. When I get stuck on numbers, I usually cheat and get a hand — because lining up bookcases is one thing, but algebra? That’s a whole other DIY.
-










Frequently asked questions
Have a question about this project?
I always wanted to do this with the Billy bookshelves, looks super!
I was wondering if the books and decorative objects stuck to the painted shelves as the article seemed to indicate they were placed on the shelves the same day (afternoon) as being painted earlier in the day.
I saw that you had an electric outlet on the wall but did not see it in your photos of the finished project. Did you cut out the back of that bookcase so the outlet is usable or did you leave it behind the bookcases unusable? You did a great job! Thanks for sharing!
On a scale from 1 to 10, how tricky and demanding was this 'project'?