How to Easily Turn a Bookshelf Into a Bar Cart

My husband has wanted a bar cart for quite some time, so I decided to repurpose some on-hand furniture for the job.
A bookshelf is a pretty common household item and has perfect shelf space for holding bar cart items! With an old bookshelf, some copper pipes, a set of wheels, and some lumber you will be set with a bar cart for any swanky house party.
This piece can also be customized in size and color to fit the space you have!
This project was inspired by Emma Jeffery at Fiskars. Read more here.
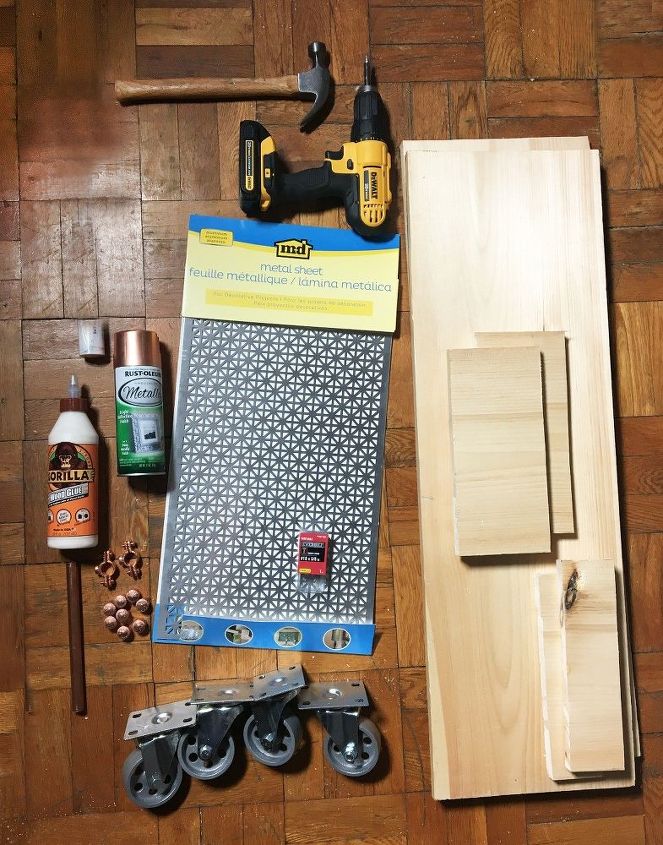
Supplies
- Bookshelf
- Circle Saw
- (1) 1/2" x 10' Copper Pipe
- Wood Glue
- Spray Paint (optional)
- Pipe Cutter
- (6) 1/2" Copper Caps
- (2) 1/2" Copper Plated Steel Split-Ring Hangers
- (1-2) 1"x12"x10' Wood Board (If you have a longer bookshelf than I do you will need more wood)
- Cuts / These will be according to your shelf, mine were as follows: 2 36", 2 3" and 2 5"
- (2) Decorative Metal Sheets
- Drill
- Tacking Nails
- (4) 3" Casters (Wheels)
- (16) 1" bolts
- (2) 5/8" x 1" bolts
- (8) 1" Wood Screws
- 5/8" Spade Bit
1. Spray paint your metallic sheets (optional)
Spray your metallic decorative sheets with your choice of spray paint (I used copper since it will match the pipes we will be using later in the project). I bought these in silver, but you can buy them in copper too, here on Amazon.
If you want your wheels to match, you can spray them as well at this time.
2. Attach your sheets to the back of the shelf
Use tack nails to attach your metallic sheets to the back of the shelf allowing it to serve as a decorative backing.
3. Add a lip to the bottom shelf (optional)
Use wood glue to attach small pieces of wood to the front section of the lower shelves to create a lip for smaller items to be stored.
4. Attach wood to the top
Grab one of your large wood slabs and attach it to the top of your bookshelf. Use wood glue to help it adhere and then screw it into place in each of the 4 corners. *Be sure to use screws that are short enough that they won't go the whole way through both layers, but long enough to connect each.
5. Attach your copper pipe
Use a 5/8" spade bit to drill holes through each of the walls of the shelving unit making sure they are aligned with each other. Cut a piece of pipe that is 1" longer than the width of the bookshelf. Feed your copper pipe through the holes you just drilled allowing a 1/2" to rest on the outside on either side.
Cover the ends of the pipe with a cap on either end so that no rough edges are showing.
6. Add a pipe for towel or cup hangers
Cut 2 6-7" pieces of copper pipe and feed them through the split ring hangers. Cap off either end with a copper cap. This will serve as towel/cup hangers.
Drill a pilot hole on both sides of the bar cart top making sure they are placed evenly. Screw a bolt through the hole and into the ring hangers securing the handles/hangers in place on either side.
7. Attach the bottom slab of wood
Flip your cart over and attach the bottom slab of wood as you did the top, however instead of screwing the screws in from inside the shelf screw them from the bottom through the wood.
Remember to apply wood glue for extra security and screw 4 screws at each corner.
8. Attach your castor wheels
To attach the wheels place two on either end of the cart and mark off where they will be placed ensuring they are lined up evenly. Drill pilot holes through each of the screw slots in the wheels.
Secure the wheels in place by inserting bolts into each slot and screwing them tightly in place.
9. Add more pipe railing
Now is the time to add more pipe railing. First mark where each hole will be drilled so as to keep them aligned.
You will need to drill more holes with your spade bit for the pipe to be fed through. These pipes will be added to the bottom shelf in both the front and the back.
10. Make shelf pockets
To create shelf pockets on either side of your cart you will need to encase the copper pipes with pieces of wood. Grab your 5" pieces of wood and attach it to the bottom piece with wood glue and screws.
Be sure to put pilot holes first so the screws don't split the wood. These will serve as a guide for how long your copper pipe rails should be. It should rest between both sides.
Use a sealer to seal your wood so that it doesn't get damaged from any spills... I haven't purchased one yet, but will be adding this as soon as possible!
Bookshelf Turned Bar Cart
Here is a shot of the before and after! What a transformation! And don't worry my books occupy another space in the house now...
I can't wait to host a little get-together with this swanky number!
Here you can see some of the close up details... The pipe handles are perfect for storing some handled cups! I may stain the wood and I plan to seal it so that spills won't mess with it and I would suggest the same.
Enjoyed the project?
Suggested materials:
- Everbilt 3 in. Steel Swivel Caster (Home Depot)
- 2 - 1/2-in copper-plated steel split-ring hangers, #301343 (Lowe's)
- 2 - 3/8-in x 1-in hex-head bolts (Lowe's)
- 6 - 1/2-in copper caps, #21728 (Lowe's)
- 1/2-in x 10-ft copper pipe, #23817 (Lowe's)
- 1"x12"x8' Top Choice EWP (Lowe's)
- Gorilla Wood Glue (Amazon)
- 2 M-D Decorative Aluminum Sheet (Amazon)
- OneSpace 4Cube Organizer White (Best Buy)
- Everbilt #18 x 5/8" Tack Nails (Home Depot)
- 18V Dewalt Drill (Lowe's)
Comments
Join the conversation
-
-
 Krafty Kathy
on Sep 12, 2023
LOVE IT. The copper would be perfect in my kitchen where i have used that hammered copper spray on switch plates to match kitchenware. The addition of side shelves and cup rack is brilliant. This could be a great little kitchen cart or coffee bar.
-









Frequently asked questions
Have a question about this project?
I love this , now that you've had it a few months I wondered how the painted castors were holding up. I've always worried that painting wheels might "gunge" them up a little, do they still roll?
Btw, I'm going to totally copy this regardless of your answer. I just want to figure out if I need a work around on them.
Do you have another repurpose for these cubes? Ty