Two Easy Glazing Techniques To Makeover Your Cabinets

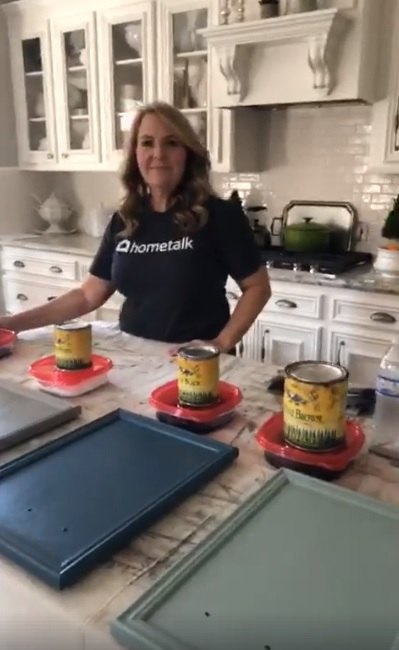
Hi there, I'm Rhonda! I recently did a Facebook Live with Hometalk where I shared a cabinet glazing technique. In case you missed it, here's my tutorial!
Want to get this gorgeous glazed look? I can help! Head over to my page to get started!
Today I wanted to show you two glazing techniques that will help you bring depth and character to your kitchen, bathroom or laundry cabinets. Why glaze, you ask? Glazing is really popular now, and if you’re sick of your cabinets and looking for a new look, glazing is an easy way to redo your cabinets without having to repaint.
For this tutorial, I went ahead and painted these cabinet doors with 2 coats each of Annie Sloan chalk paint. I used four different colors of chalk paint: Old white, Duck egg, Aubusson blue and French linen.
After you apply your chalk paint, make sure to seal with a topcoat. Sealing before glazing is important, otherwise the paint will absorb the glaze and it’ll change the color of the paint. So if you want to keep your paint color true to color, I recommend sealing first with a water-based top coat. I use General Finishes High Performance water-based topcoat.
Today I want to show you two different ways to apply glaze; accent glaze and all-over glaze.
To apply accent glaze:
For the first cabinet, I’m glazing over chalk paint in Old White, and I’m using General Finishes glaze in a mixture of a clear base glaze with a little bit of Pitch Black mixed in to make a gray glaze. I also like to add some extender to the glaze which gives you more time to play with the glaze to get the look you want. Without extender, the glaze dries faster and you’ll have less time to play with the look.
To apply the glaze, you can use a sponge brush, a regular brush, or even an old cotton t-shirt. For an accent glaze, apply the glaze with a brush to the edges and and detail on your furniture. You don’t want to apply it to the whole surface of your cabinet, just use it to fill in the nooks and crannies as you go.
Once applied, wipe off the excess glaze with a cloth, paper towel or cheesecloth. (Cheese cloth is fun because it gives you more texture as you remove the excess glaze. More on that later!)
Start wiping the glaze with a dry cloth. If it feels like you're not removing enough glaze, you can always wet it a bit and that will help pull the glaze back. Use a spray bottle to wet your cloth, and keep wiping! If you're not loving the look, don't panic! Keep going until it starts to look like something you love. What’s great about this product is that it’s water based, so you can clean it off at any time with water if you don’t like the look. Easy clean up means no mistakes!
With glaze, you’ll want to keep in mind that it’s not a perfect finish-- it won’t look like factory finish, because it’s hand applied, and that's a good thing! The look we're going for is rustic and imperfect.
Keep wiping to perfect the look until you get it exactly as you’d like. There you have it: accent glaze!
For an all-over glaze:
I painted this cabinet in Annie Sloan French Linen, and I’ll be glazing it in a winter white.
For an all-over glaze, apply the glaze to the whole surface of the cabinet.
Begin wiping off the excess with a paper towel or cloth. Again, wipe as you go until you get the look you love.
These lighter color finishes over darker cabinets are really popular right now. What do you think?
For the next all-over glaze, I wanted to show you a really great combination. This was painted in Annie Sloan Chalk Paint in Aubusson Blue, and I applied a pitch black glaze. This is one of my favorites!
For this one I used cheese cloth to wipe away the dark glaze, and you can see that the natural abrasiveness in cheese cloth gives the glaze a little more texture, giving the finish an even more rustic look.
If it’s not what you’re looking for, don’t panic! It usually looks like a hot mess in the beginning, but keep going!
I love the glaze on the darker, heavier side, but if that's not your thing, you can always remove more glaze (spray your cloth if the glaze starts to dry) to let the blue show through.
The last door I’m going to do today is painted in Annie Sloan Duck Egg Blue which is also very popular right now.
I glazed the cabinet with Van Dyke Brown glaze, and the finished look is beautifully rustic.
Which is your favorite? I can't decide! I'd love to help you with your next glazing project. Click here to set up a cabinet glazing consult!
Blessings,
Rhonda
Enjoyed the project?
Resources for this project:


Comments
Join the conversation
-
 Jill Gunzenhauser
on Aug 31, 2018
I too have been playing with gel stains and glaze, but like the gal above, I do not like that "dirty" look, either. The beauty of a glaze is that it gives depth, and tones down a base color, but also adds the look of "antiquing" that people like. So, two things I have learned recently. You can add water to the glaze so when you wipe it off, there are little "puddles" droplets really, still left in the cracks. If you take a small but stiff brush, you can pull all those little droplets straight down until you run out of glaze. This creates a very nice brush stroke and does not look like you tried to clean your cabinet with a dirty rag. It keeps the lines completely vertical and looks professional, rather than messy. Something which I have not tried yet but have heard, you can buy "extender", which keeps glaze or any other product from drying too quickly so you can play with it longer. Consult your local paint store about high-end cabinet grade paint if you use your kitchen as I do. You really can paint your cabinets and have them last!
-
-














Frequently asked questions
Have a question about this project?
Like 2 years ago I did my cabinets dark brown with the kit from Home Depot called Rustolium. I would like to brighten the cabinets and make them grey with white gloss. Is that something I can do?
Do you need to sand before paint
Can I apply glaze over water base Latex. Your are Beautiful