How to Update an Antique Cabinet With Contact Paper and Chalk Paint

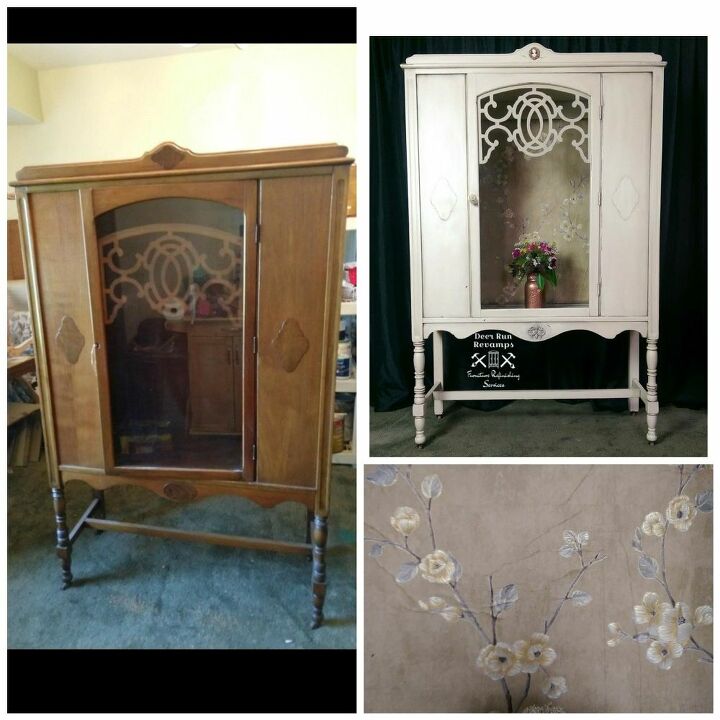
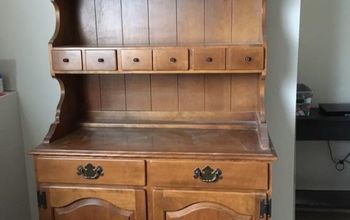
I was given this antique cabinet to update for a lovely boutique's bathroom. I was so excited when I saw this piece because I've never worked on one before. They are just so darling 😍
This update is an easier process, perfect for beginners!
Here are the steps that I took to go from dark and boring to bright and eye catching!
If you have ever read the first step on any of my other tutorials, you'll know what this step is.
PREP
Even when using chalk paint, prep your piece. This will ensure all your hard work lasts for decades, not just a few years. There's a saying that floats around the refinishing world..."your finish is only as good as your prep" and this is so true when painting a piece!
Clean the piece thoroughly, make any needed repairs, sand out scratches, scuff sand the entire piece with 180-220 grit sandpaper, and finally, wipe down with a damp (water) cloth. If you're painting a dark piece a light color, think mahogany wood being painted white, you'll need to prime first. If bleed through is a concern, use a shellac based primer.
Once you're prep is all done, it's time to lay on the paint!
A good paint brush will allow the paint to go on like butter and reduce brush stroke lines. I prefer the S40, round cling on by Wise Owl or the large round Staalmeester. They are pricey but will last YEARS! Well worth the investment.
I mixed together my own bright beige color using a few leftovers that I had laying around and added calcium carbonate to make chalk paint. If you'd like my recipe for homemade chalk paint, send me a message over on Facebook. Just search for Deer Run Revamps and I'll pop up 😉
Two more tricks to reducing brush strokes... spritz the piece with water before painting and sand with 220-400 grit sandpaper after each coat has dried.
For my cabinet, it took 3 coats total and I used no primer. I knew I was going to be distressing and primer makes that technique a bit difficult to achieve a natural look. I tested a spot first to make sure I wasn't going to have any bleed and I got lucky!
Once the paint is dry, you can do any distressing you'd like. There's 2 popular ways to achieve a natural distressed look. One is using sandpaper. I like to use 180 grit to get it done quickly, just be careful not to scratch your brand new paint job! You can also use 220 grit if you're worried you won't be able to control it as much and possibly scratch the paint. The other way is with a wet rag called wet distressing. Using a damp rag, you rub the paint off of the areas you want distressed. Both techniques should be done over areas that naturally would get worn. For example, the area around knobs and pulls get a lot of wear so that would be a perfect spot to remove a little paint. The edges, feet, and corners would get a lot of wear. I just don't recommend removing a big spot of paint in the middle of a side panel. That would never happen naturally and therefore obvious it was purposely done and not just a sign of age.
Now that your piece is completely painted and distressed, let's do the paper back. I took a few days just looking at design after design trying to find the perfect fit for this cabinet. I always want my pieces to look perfect but I felt extra pressure for this one since it was going in a high end boutique. Finally I came across the gorgeous contact paper. It has a fabric feel to it and lots of texture! And if you've never worked with contact paper before, the entire back is extremely sticky. No glues or pastes are needed. Depending on the size you're working with, you may want an extra set of hands to help line it up.
Measure out your space and cut the paper accordingly, adding about 1/2 inch to be sure it will fit properly. **This is very important....make sure the multiple pieces will line up correctly as you cut.
Always double check and triple check! So before removing the backing, line it up over your space and make sure your cut was correct. Now this is the part where the extra hands may be beneficial. Remove only the top portion of the backing and line it up. Slowly work your way down, removing the backing as you go. Once it's in place, press it down. You can use a credit card or something similar to remove any air bubbles. I took this on by myself and ended up with a few wrinkles. In the end, I prefer the wrinkles for this piece, it adds to the antique charm. But for other pieces, it won't be suitable.
Repeat these steps for the following pieces until you have the entire area covered. Then go in with an exacto knife and remove the excess paper.
Now it's time to seal! I'm a wax girl. If the piece is only getting light use, I'll wax it. But you can use your topcoat of choice here. I've been enjoying Behr clear wax on a foam pad lately. It has a great sheen to it and it's easy to apply, doesn't even need buffing if you like the look after applying. Buffing will give it more shine. I also waxed over the paper edges for a reason explained further down.
Now you have a decision to make....if you like the look here, you're finished and can move on down to the materials section!
If you want more detail and depth, continue on.
This is where I used Wise Owl's black walnut wax. It's such an easy to use wax with such a deep color to it! I just love it for adding depth to my pieces. And it comes in numerous colors!
When using colored waxes or glazes, you want to topcoat or clear wax first. This will give you more control and work time and not allow the colored wax to soak into the paint, making it impossible to remove! This is why I waxed the edges of the paper.
Using a pointed brush and working in small sections, apply the dark walnut wax into all the crevices, joints, details, and even flaws! I like to highlight everything! Then wipe away the excess with a cloth. If there's still some left that want to remove, put a little clear wax onto your foam applicator and rub it over the areas you want to remove the dark wax from. This will take it right up! Continue this process until you've highlighted all the areas you want to "pop"
And that's how you get an antique look!
If you notice, I made a couple of molds using silicone molds and paper clay. The cabinet has these raised detail areas, one at the top, the bottom and each side. I felt the top and bottom definitely needed a little something. So I did a cameo mold for the top, painted it all pretty and made it look older, then added a scroll like mold to the bottom and blended that in using the same paint color and dark walnut wax. If you'd like to know how I did the molds, again, search for Deer Run Revamps on Facebook and I'll pop up. Just send me a message with any and all questions you may have! I'd be happy to answer them 😊
Hopefully you enjoyed this tutorial and learned a little something. My main goal for doing these tutorials each month is to teach different techniques using different products.
I hope I've inspired you to give a piece in your home a new look!
Visit my Facebook page at Deer Run Revamps to see more unique pieces!
Enjoyed the project?
Resources for this project:
See all materialsComments
Join the conversation
-
-
 Carole White
on Jun 23, 2021
So beautiful! Great tutorial, thanks for the tips!
-










Frequently asked questions
Have a question about this project?