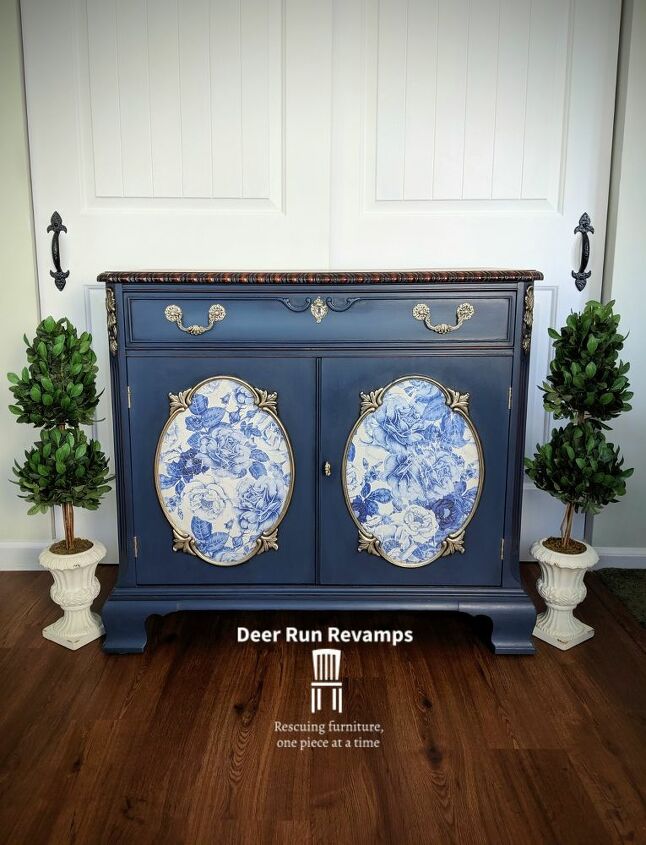
Cabinet/Buffet/Sideboard Makeover From Boring to Traditionally Elegant

I've recently expanded my business which has given me immediate access to all kinds of new products ❤️ This really helps me be more creative than ever!
Now, on to this beautiful cabinet that has many different uses.
I picked up this piece a few weeks ago and right away, I pictured how this piece was always meant to look!
Traditional, elegant and classic, I went with navy blue, black glaze, champagne gold metallics, and the Frenchic Ceramics II transfer from Redesign with Prima.
Everything used for this project can be found in store as well as online in the Deer Run Revamps Etsy shop.
And now, a before photo
First step is always prep. Your finish is only as good as your prep!
Look over the piece and plan out your repairs. I got lucky with this piece, it was in relatively good condition. I did have to strip the top due to "Alligator" finish (when the old varnish starts to look like alligator skin from due to age and temperature fluctuations). So make your necessary repairs and strip any surface you want stripped. After removing the stripper, residue may remain, easily remove it off using mineral spirits.
Now sand down the entire piece using 220 grit sandpaper. This will give the paint something to grip to. If you have scratches, sand those out as well too. If you stripped surfaces, sand those down starting with 120 grit, then 150-180 grit, and then 220 grit.
Now it's time to clean your piece. I prefer to use Frenchic's Sugar Soap to clean my pieces. This is a concentrated liquid that needs to be added to water. One bottle will last quite awhile! This will remove all of the grease, dirt, built-up grime and even nicotine! Mix according to directions and spray the piece. Wipe down using paper towels. If the piece is extra dirty, use 0000 steel wool to scrub it.
Now wipe down with plain water. Do not skip this step! Any remaining sugar soap or mineral spirits will prohibit the paint from adhering correctly and must be removed.
Allow to dry, and your prep is done!
Now it's time to paint! I used Frenchic Furniture Paint's Hornblower. This is a beautiful deep blue. With Frenchic, primer is not necessary (I always do anyway when using whites), and the coverage is phenomenal! I needed 2 coats to get full coverage, waiting 1.5 hours between coats.
I painted the oval details on the doors in Frenchic's Ivory Tower. This will make the transfer pop even more!
The drawer got just a little bit of Ivory Tower blended in the middle as a highlight.
Tip: Frenchic is self leveling, but it needs to be applied in thinner coats, so don't lay it on thick! And keep the brush damp by spritzing it with water every so often.
After the paint has dried for at least 2 hours, we can now apply our French Ceramics II transfer by Redesign with Prima! First thing I did was go over the raised moldings with wax. This will stop the transfer from adhering to places that I don't want it to.
Transfers come in sections, this specific one came in 3 sections. I laid one section out, cut it to fit the space with extras on all sides just in case, then lined up the other section to make sure it will match, and cut that one. Once you are sure the pieces will fit and line up correctly, remove the backing of your first piece. They will stick to anything it touches so be careful! Place it where you want it to be, and starting at the top using your wooden burnishing tool that is included with your transfer, or fingers, or preferred tool, and press firmly over the entire transfer, working your way down, paying extra attention to the edges. Once you have burnished the entire transfer, you can peel off the protective layer. Choose a corner and slowly start lifting it off. If a spot didn't adhere, lay it back down and press over that section again. Of any pieces of transfer stick in places you did not want, you can sand it off using 180-220 grit.
Repeat these steps for each section, making sure that the design lines up correctly
Now it's time to seal. I chose wax for my project (expect for the top). This piece will be more of an accent piece than a daily use piece.
I prefer automotive foam pads or Frenchic's small wax brush to apply the wax. Frenchic Furniture Wax is extremely easy to apply, and can be buffed immediately or within 1 hour of application. I usually do it immediately.
Apply the wax in circular motion all over including the transfer. Then buff in circular motion using a clean, dry, soft rag.
Now let's make our glaze.
With Frenchic products, always apply wax before galze! Applying wax before glaze prohibits the glaze from seeping into the paint and keeps it easily workable.
Mix 2 parts Frenchic Finishing Coat to 1 part Blackjack, more or less paint/finishing coat until desired color is achieved. This process can be done with any Frenchic paint color or metallic Frensheen! This allows for so many combinations! You can also add a little bit of our paint and Frensheen into our waxes! Colored and metallic waxes are always fun to play with!
Ok, back to it....
Using a smaller brush, apply the glaze along the moldings and in the details, wiping away excess with paper towels/rags. Work in very small sections so that the glaze does not dry! Once it dries, it's a bit difficult to get off and easier to just paint over it. So save yourself the frustration and work in small sections.
Once the glaze has dried, you can add the Frensheen! I love this stuff! Highly pigmented metallics that can really take your piece to the next level!
For this champagne gold color, I mixed 3/4 gorgeous gold with 1/4 sexy silver with finishing coat until the desired consistency was achieved.
Using a small detail brush, I went over all of the easier details with the Frensheen.
Now I went onto staining the top. I used Retique It Red Mahogany Waterbased Gel Stain. This color is so rich! I applied it all over the top and let it sit for a minute, then wiped off the excess. Once dried, I sealed with Retique It Polyacrylic.
Around the edges, I added black glaze into the details to give it that vintage feel
To finish, I painted all of the original hardware with the Frensheen and applied a pretty paper inside the drawer and cabinet. This has become my new favorite makeover 😍
Visit my Etsy page to find all of the products used for this project as well as other refinished furniture pieces (links below)
Check out my Facebook page, Deer Run Revamps, if you'd like to follow my journey of living out my passion every single day ❤️
And as always, if you have any questions, please don't hesitate to reach out 😉
Enjoyed the project?
Resources for this project:
See all materialsComments
Join the conversation
-
 Connie Sherman
on Aug 10, 2024
I agree with NO.. it was beautiful as is.. The only time I would do a transformation as you did was if the piece was non repairable. That being said its new look is beautiful and probably would fit into more modern homes. You do nice work..I just hope its not at the expense of preserving a valuable antique.. We lose so much of our past as it is. Thank you
-
 Aud62616903
on Aug 10, 2025
I too agree with you. The two panels stand out too much.
-
-
-













Frequently asked questions
Have a question about this project?
Will you be getting a supply of frenchic top coat. I love their products.
Diane....I live inside Toronto and don't have any storage but am always on the lookout for pieces of furniture to refinish. Post them on Kijiji or FB marketplace (I'm sure that you know) and you'll get takers. Good luck! PS: do you have any tiny pieces of furniture? Hallway consoles? Corner units?
This is so beautiful! Lovely workwomanship! Gorgeous piece!