How I Transformed My Flooring in One Weekend With Malibu Wide Plank

This post is sponsored by Malibu Wide Plank.
Updating the flooring in my home had been on my to-do list for ages, and when I found Malibu Wide Plank's French Oak Waterproof Luxury Vinyl Flooring in Shoreline, I knew it was time for a change.
The clarity of the wood grain makes these planks look like real, natural wood which I absolutely love. And I also fell for the beautiful color tones and undertones right away. I knew this gorgeous flooring would give my home the refresh it deserved.
So, in just one weekend, I completely transformed my family room and kitchen! Here’s how I did it, step by step.
Table of contents
1. Clearing the space
The first thing I did was move all the furniture out of the room. Even though my home has an open floor plan, I had to deal with two different types of flooring — carpet in the family room and vinyl tiles in the kitchen.
2. Removing the old flooring
Carpet removal:
- I started by scoring and removing the baseboards, which exposed the edges of the carpet. I made sure to clear away any nails or debris as I went.
- Working from a corner, I pulled up the carpet from the tack strips and cut it into smaller, manageable sections for easy removal.
- After the carpet was gone, I removed the padding the same way and used a pry bar to pull out the tack strips from around the edges.
Vinyl and linoleum removal:
- In the kitchen, I tackled the vinyl tiles by peeling them off section by section.
- Underneath the tiles was an old, discolored linoleum sheet glued to the plywood. I used a floor scraper to loosen it, and in stubborn areas, I brought out a heat gun to help soften the glue and scraped it off piece by piece.
3. Preparing the subfloor
Once the old flooring was out of the way, it was time to prep the subfloor.
Installing the subfloor:
- In the family room, I added a ¼-inch subfloor to match the height of the kitchen floor. I secured it with narrow crown staples and filled in the seams with flooring compound.
- I made sure to sand and clean the subfloor thoroughly to ensure everything was level and free of debris before laying the new flooring.
4. Acclimating the planks
Before I could start installing the planks, I let them acclimate to the room’s temperature and humidity for at least 48 hours. This step is really important as it helps to avoid any warping or expansion later on.
5. Trimming the door jambs
To make sure the new flooring would fit neatly under the door jambs, I used a scrap piece of plank as a guide and trimmed the jambs to the correct height.
6. Installing the new Malibu Wide Plank flooring
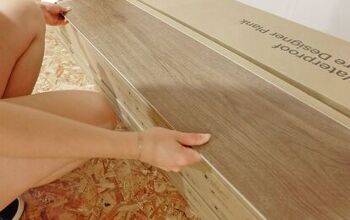
Onto the exciting part! It was time to lay the Malibu Wide planks. I couldn’t believe how easy this part was thanks to the long, wide planks:
- I started in the left corner of the room. The first plank was cut in half, and I placed the right half parallel to the long side of the wall, with the tongue side facing the wall.
- I clicked the next full plank into place using the tongue-and-groove system, then measured the length I needed for the next plank and cut it using a utility knife.
- After snapping the board along the scored line, I laid it in place and tapped it gently with a rubber mallet to secure it.
Staggering the rows:
As I worked my way through the room, I made sure to stagger each row for a natural, random look.
To ensure variation in color and texture, I worked with several cartons of planks at once. For tricky cuts around vents or corners, I used a circular saw to get precise measurements.
7. Adding the finishing touches
Reinstalling baseboards and quarter round moldings:
- Once all the flooring was in place, I removed the wall spacers and reinstalled the baseboards.
- To finish off the look, I added matching Malibu Wide Plank French Oak Shoreline Quarter Round Moldings. After measuring the walls, I used a miter saw to cut the moldings at a 45-degree angle for inside corners and 90 degrees for outside corners.
- I used Loctite Construction adhesive to secure the quarter round to the walls, making sure not to glue it to the floor.
Malibu Wide Plank French Oak Shoreline Quarter Round Moldings
Creating seamless transitions:
- Where the new vinyl plank flooring met the carpet, I used Malibu’s coordinating 3-in-1 molding. This was perfect for making a clean transition between the two surfaces.
- After measuring the length and cutting the molding and track to size, I secured it with adhesive and snapped the molding into place. A quick tap with a rubber mallet ensured everything fit perfectly.
Malibu Wide Plank 3-in-1 Molding French Oak Shoreline
The finished look
With the baseboards and moldings in place, the project was complete! I couldn’t believe how amazing the room looked.
The Malibu Wide Plank Luxury Vinyl Flooring not only has a beautiful, real wood look but is also scratch-resistant and waterproof — perfect for high-traffic areas like my family room and kitchen.
Malibu Wide Plank makeover
I’m beyond thrilled with how my weekend flooring project turned out. The Malibu Wide Plank French Oak Shoreline planks completely transformed my space, giving it a warm, cohesive, and stylish feel.
Check out this before vs after of our kitchen space:
I can’t believe the difference!
And the best part? The Malibu Wide Planks were so easy to install that I could do it all myself. Now, my family room and kitchen have a durable, beautiful finish that I know will last for years!
Malibu Wide Plank's French Oak Waterproof Luxury Vinyl Flooring in Shoreline
Enjoyed the project?

Comments
Join the conversation
-
 Ham67767184
on Oct 17, 2024
Looks absolutely beautiful ! Great job !!!
-
-
 Pollyyy
on Dec 11, 2024
Transforming your flooring in just one weekend with Malibu Wide Plank sounds like an amazing DIY project! If you're considering an upgrade like that, you might want to look into empire today reviews for a hassle-free experience. Their site has helpful insights on flooring choices, and many people have shared positive experiences. It's worth checking out CarpetFlooringReviews for a broad range of customer feedback and reviews to guide your decision. The website offers a good perspective on different flooring options, helping you make the best choice for your home!
-













Frequently asked questions
Have a question about this project?
The floors look really nice, why didn't you take out that small section of tile?