I Made an End Grain Wood Floor From Scratch and Saved Myself $4000!

One day I had come across a flooring in an old church and became intrigued, I had never seen anything like it before. It was a wood floor, but as opposed to the side of the grain being exposed, it was the end of the grain. I decided that I needed to recreate this old world craftsmen appearance in my own home. Full details of the entire project are here: http://goo.gl/pV51hA
Hometalk Recommends!
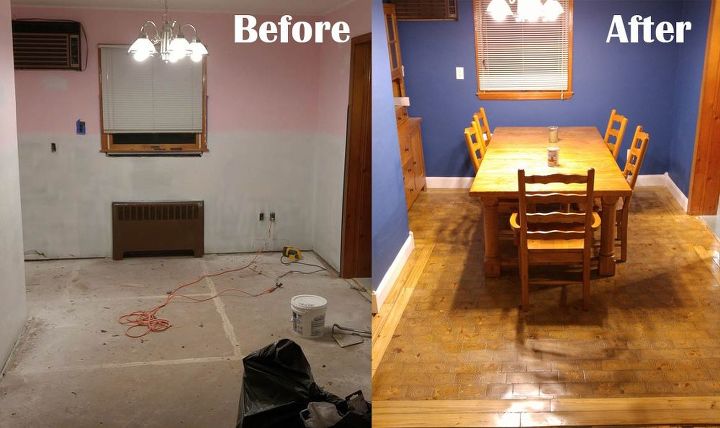
A few months ago I purchased a house that was carpeted from wall to wall with the most horrible carpeting. Before purchasing it I had done some snooping and after lifting several corners, realized that underneath the carpeting was hardwood flooring, throughout. So, I knew after purchasing the home it wouldn't be much of a task to rip up this eye sore, spend a few hours sanding and refinishing and I would be happy with the new look. Below is what the dining room looked like on closing day.
After ripping up the carpeting, this is what I found in the dining room... MDF. Not what I wanted to see. I had hopes that there might be some hardwood under it so my adventure continued.
After ripping up the first MDF subfloor (and having started some painting), I stumbled across this, more of less of what I wanted to see, linoleum flooring.
I went out and found twelve 8 foot long 4 x 6 timbers of reclaimed yellow heart pine that I proceeded to cut into 1,800 4 x 6 tiles. I set up my Dewalt DW705 chop saw with a 1/2" stop to make the cuts quickly and consistently. This process took about 5 hours. When I was done I was left with a completely filled 32 gallon trash can of sawdust that I saved for later. I had plans for that too.
Here are some of the piles and piles of tiles and more tiles
Along the way I decided to border the room to accent the edges.
After the tiles were set, I sealed them with a coat of polyurethane, lightly thinned with about 30% mineral spirits.
After the tiles and border were set and sealed. I made a mixture of sawdust from my cuttings with polyurethane with a ratio of about 2 parts sawdust to 1 part polyurethane
After letting the grout dry for 3 days, figuring that was enough for the 1/8" wide by 1/2" deep channels to fully dry, I went to work on sanding the floor smooth. I used an orbital sander which took 4 hours, I imagine it took much longer than a drum sander would have, but it saved me a step of needing to do the center of the floor and then follow up with an edger.
The finished product!
I am thrilled with the results and the warm feel of real wood is so much better than the cold feeling of an icy tile, or the disingenuous look of a laminate, which were my second and third, much simpler choices.
Here is a close up of the finished surface.
Enjoyed the project?
Resources for this project:
See all materialsComments
Join the conversation
-
 Emily Harris
on Sep 14, 2024
Amazing!
-
-
 Omaifi
on Sep 14, 2024
That’s awesome! I’ve always admired the look of end grain wood floors, and the fact that you made one from scratch is seriously impressive. I recently re-did my floors and checked out options from Floor and Decor. They’ve got a good selection, but seeing what you’ve done makes me wonder if I should have gone the DIY route too.
-










Frequently asked questions
Have a question about this project?
When you said "the end of the grain", does it mean is the back side of the tile?
It looks to me that instead of cutting wood planks transversal, the idea was to cut "slices" from the tree trunk...You can see the rings ( one ring is added per new growth season of a live tree and equals 1 year per ring )...
Question is what did you use to glue all the pieces down to the subfloor?
This is great. I wonder if you stained the end grain would it take the stain evenly or be blotchy? i also just bought a house with some hardwood but not everywhere so would be nice to try this trick.