Entertainment Center Becomes Mudroom Storage/seating

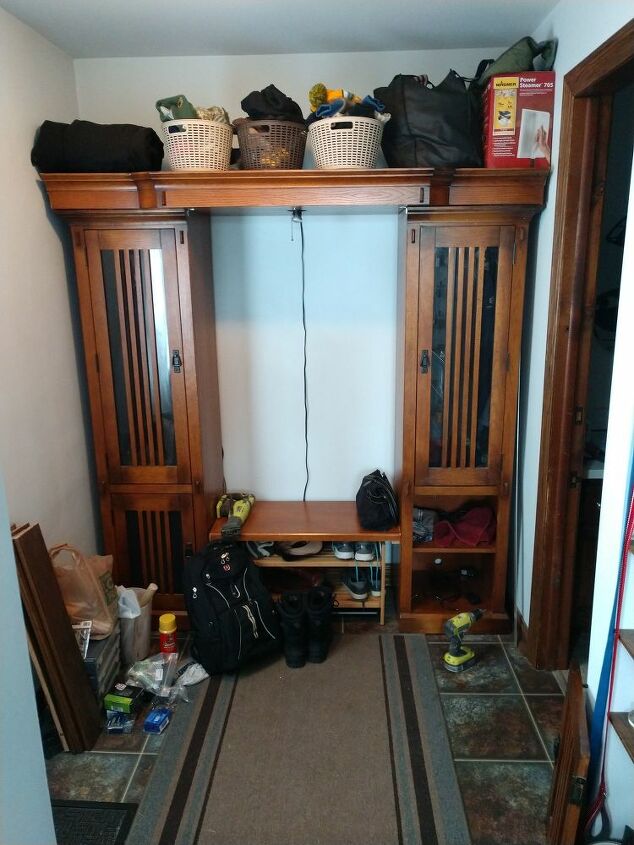
Our mudroom didn't have any closet space or seating so we started looking around for different types of solutions. I was wondering around a local Habitat Restore and saw an old entertainment center and I immediately saw it as storage and seating. It was in really good shape and initially, I didn't think I'd have to make many updates. After we got it home, I had to trim the top piece to make it fit, and once it was inside, I decided I was going to make a few extra adjustments.
This is the entertainment center when we first set it up in our mudroom. Originally, I thought I wouldn't mind the dark wood color because it matches the trim well. However, once it was in the space, I thought it was too dark for such a small room and I wanted to lighten it up. I also decided to remove the bottom doors to create open shelves and I wanted to turn the top doors into sliding barn doors.
The first step was removing the trim that was directly above the door because I needed that space for the barn door hardware. After I unsuccessfully tried to "chisel" away at the trim, I brought in a jigsaw. The jigsaw definitely got the job done, but it did leave some rough edges so I went over it with 80 grit sandpaper to smooth it out.
There were holes on the side of the shelves so I used wood filler to fill them up and then sanded the whole unit with 120 grit sandpaper.
I used two coats of Behr paint.
On the doors, I covered the glass with masking tape before I painted. When it was dry, I used a blade to cut through the dried paint on the tape, and then it easily pulled away without pulling the paint off.
I wanted to keep the dark wood on the top trim so I taped that off and painted the rest of the top piece.
For the barn doors, all I needed was a long flat bar and two Patio Door Roller Kits. I learned about this barn door technique from the Engineer Your Space YouTube channel. It was much cheaper than buying hardware specifically made for barn doors. It was convenient since the doors I had are not standard size doors and this process allowed me to make my own measurements.
I cut four smaller pieces of metal from the long flat bar. The rest of the flat bar is used for top bar that the doors slide along. I used a black automotive spray paint because it is made to be used on metal.
In each of the patio door roller kits, there are four cylinder metal pieces. These pieces were wide enough for the screws to fit through so I used them as spacers between the top bar and the shelving unit. After drilling holes in the top bar, I put the screw through the top bar hole and then through the metal cylinder pieces and screwed them into the shelves.
On the smaller pieces of metal, I drilled three holes - one for the rolling piece and two for the screws that attach to the doors. Once the hardware is attached, I just placed the rollers on the top bar and the barn doors were done.
I also added hooks on the sides for extra hanging space.
Before and After
Enjoyed the project?
Comments
Join the conversation
-
 Jody Price
on Jun 02, 2020
Really nice job! You're good!🌴
-
-
 Robyn Garner
on Jun 04, 2020
Terrific change! How lucky for you that the width was just perfect.
-












Frequently asked questions
Have a question about this project?
Did you reenforce the seat. I have a unit that might be repurposed like this, but I think the seat might be a little weak.
Looks great! What a transformation! I think I would have liked it just as well w/out the barn door bar, though. Is there a reason you felt the doors should slide rather than just open normally?
Holy transformation, Batman!! That is gorgeous!!!!!!