Create Recycled Pallet Wood Wall Art in 6 Easy Steps

Recycled pallet projects are all the rage right now. As we try to reduce our impact on the Earth, we have turned to recycling objects that are often thrown away. I used some old pine pallets to create decorative wall art sure to wow my friends and family! This project is easily customizable, you choose the colors and exact design that you want for your space, the options are endless! Another major bonus is that with the exception of a circular saw, most of this project can be done without power tools, so you don’t need to have a fully stocked arsenal to create a beautiful piece of pallet wood wall art.
Tools and Materials:
- A pallet (already broken down into planks)
- Paint
- A sheet of plywood
- Wood glue
- Nail gun
- Nails
- Tape measure
- Electric sander
- Circular saw
I started this project with my pallet already broken down into planks. There are many tutorials online to show you how to do this. Be careful as most pallets have a ton of nails in them.
The first thing I needed to do was find the exact center of the sheet of plywood I would be using. For the design to work and look right, it was important for it to start at the exact center of the piece. I measure the center lengthwise and widthwise, and where they met would be my starting point. I marked this with a pencil. We are going to be covering up the entire board with planks from the pallet, so it’s fine to make as many markings as you need to get the right spot.
In my video I had already painted the wood beforehand, so I don’t show this part. It’s up to you what colors you want to use. I painted a few planks grey and a few white. Once the paint had dried I roughed them up a bit with an electric sander.
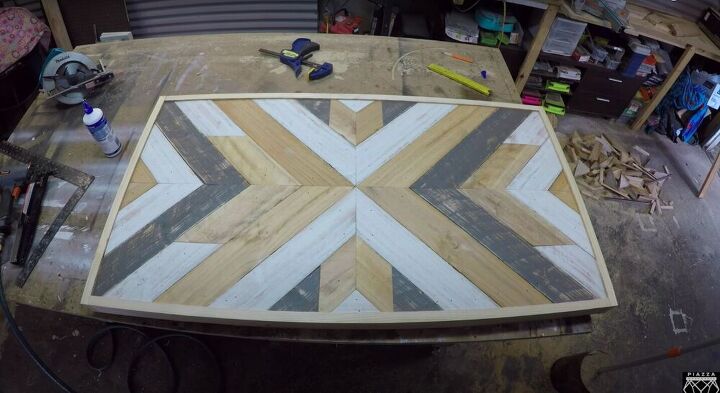
How you do this step depends on the design you want. First I cut all of the planks at a 45 degree angle on one side. I knew that I wanted an X at the center of my pallet wood wall art piece, so I cut four pieces of wood with a 45 degree angle on one side, and the same angle in the opposite direction on the other side. In the meantime, I also added a few lines on my plywood to guide me with exact placement of the pieces.
Then I laid them out in the center of the plywood.
Once I was happy with how they sat I glued them down with wood glue.
Then I added a few nails.
Next I filled out the center. Make sure to keep your project symmetrical in both design and color, but other than that it’s totally up to you to experiment with how you want it to look. Don’t worry about any pieces of wood that hang over the edge of the plywood, we’ll deal with that later.
Once I had glued and nailed the center of the wall art, I moved on to the sides. I wanted them to be symmetrical as well, so I made sure to lay out both sides before I glued them down.
Here and there they didn’t fit snugly, so I sanded the edges down a bit. This is another reason it’s important to lay everything out before gluing and nailing.
Once I was happy with my design I glued the pieces down and then added nails for security.
Remember how I told you not to worry about the ends matching up with the edges of the plywood? Now it’s time to fix that. I flipped the pallet wood wall art over and, using a circular saw, cut off any overhang. This left me with a nice crisp edge.
I used a few planks of wood to create a frame around my newly created wall art.
Once they were cut to the proper size, I glued and nailed them onto the sides of the piece.
That’s it! The only tedious part of this project is making all of those 45 degree angle cuts, everything else is just like doing a puzzle! What colors would you do this project in? Let me know in the comments below!
Enjoyed the project?
Resources for this project:
See all materialsComments
Join the conversation
-
 Allen Lilly
on Nov 05, 2022
Yes, I intend on doing one for sure.
-
-
 Dan88953307
on Sep 20, 2023
Try with paint,make some art for wall, not pallets, no saw, so compromise.
-







Frequently asked questions
Have a question about this project?
Why would you not put a clear coat or sealer on it? It looks great. I guess I just prefer shiney!
I have a bunch of scrap wood flooring from a local mill, I could use your idea, scaled down a bit...grab a diy cleat and hairpins legs and make an entry table or two? Do you think that would work? Or would it be heavy due to the thickness of the flooring?