Easy DIY Accent Wall Tutorial
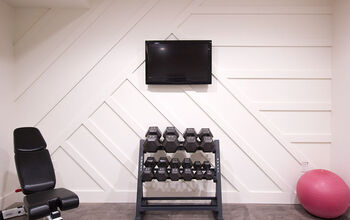
I’m sharing an easy DIY accent wall tutorial with you and how you can achieve this look on your own.
An easy DIY wood accent wall is a budget friendly home decor idea that adds character to your space.
I did a lot of research on feature walls including DIY wall panel molding, board and batten accent wall, wallpaper. I decided a simple DIY wood trim accent wall or plank wall will be the best way to go. Once I figured out that I was going with an accent wood wall. It was time to figure out the pattern.
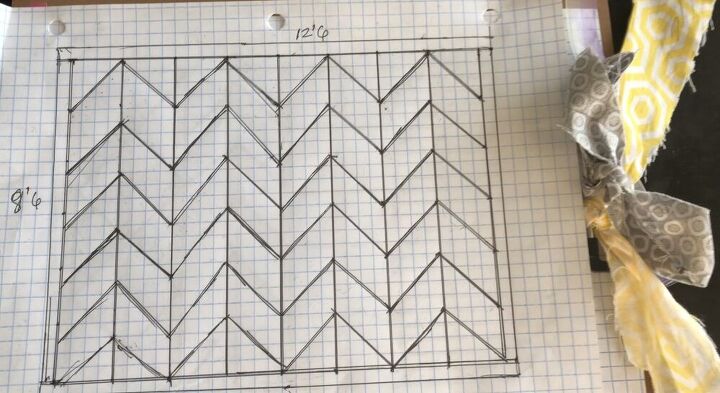
I’m a bit old school when it comes to drawing up plans and typically put my plans on paper.
Supply List:
- 1X2 boards (I got 1x2x8ft)
- 2 inch Finishing Nails
- Caulk
- Spackling paste
- Painter’s Tape
- Roller paint brush
- Angle Paint brush
- Primer for wood
- Paint of your choice
Tools Used:
- Miter Saw
- Brad Nail Gun
- Stud Finder
- Leveler tool
- Sanding Tool
- Tape Measure
Using the stud finder, I marked up the wall. The next step was to figure out the 8 sections with multiple spacing to avoid studs. I went through and marked up the wall using the spacing that was configured. Once this was done, it was time to frame the wall and add the vertical boards. The walls in this room are taller than 8 foot, so it required piecing wood together seamlessly to create each lined section.
The next step was to start adding the sections to create the herringbone pattern. I used a digital angle finder to get the degree for my cuts, the edges are all at a 45-degree angle, so I knew it would be less. However, if you do not have this on hand, you can grab a piece of wood and make a mark on where you would like the cuts to be. With a little trial and error, you can figure out the miter cuts you need to make. Mine was right at 30 degrees.
This stage is critical to ensuring that your accent wood wall DIY looks like a professional finish. I started out by covering all the lines where wood meets wood with spackling paste. This process allows you to hide the joints and gives it a seamless look. Once applied, use a sanding tool to remove excess to create a flush look with the wood.
The next step is to caulk all areas were the wood meets the wall. You also caulk to fill in holes created by your brad nailer and any additional holes naturally occurring on the wood.
Cover all edges with painter’s tape, apply primer to the wood portion using an angled paint brush and allow to dry. You could skip this step if you bought your wood already primed or if you primed it prior to application. Then apply paint of your choice and let dry and your wall is done.
Love the way it turned out.
Enjoyed the project?
Resources for this project:
See all materialsComments
Join the conversation
-
-
 Martha Ortiz
on Oct 13, 2022
Very pretty! Yes I would try it.
-












Frequently asked questions
Have a question about this project?
Did you REALLY do this all on your own? No partner help? Amazing job. I really love it 😊
Did you say you were avoiding the studs?
Can you tell me the color if the paint you used. Makes it feel elegant and refined. Appreciate it!