DIY Dollar Tree Candle Holders – Three Daughters Home

Keep reading to see how I made these beautiful and easy candle holders, and if you like this post and want to see more DIYs and other home projects, check out my blog site and subscribe! You'll receive my 'Top 10 Tips for Refreshing a Space' as a thank you for subscribing!
Hometalk Recommends!
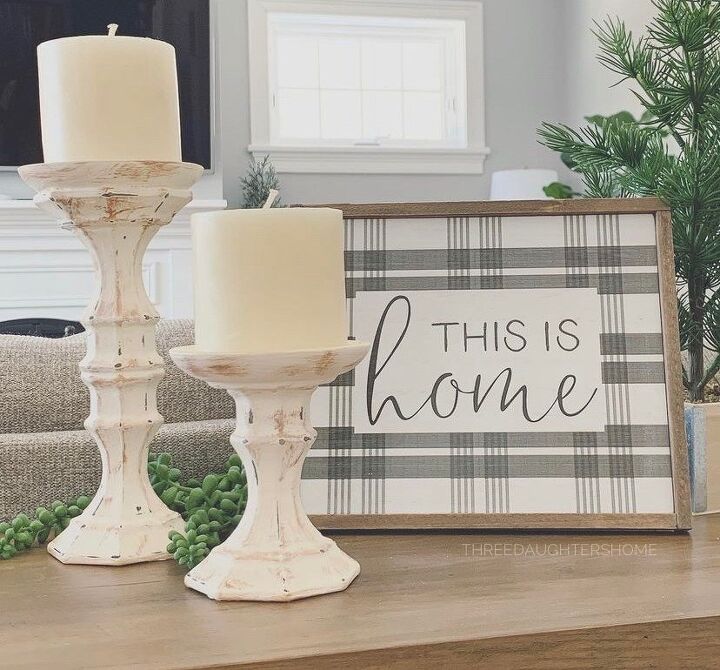
Love the look of chippy, distressed candle holders but hate the price tag? You gotta try these amazingly simple DIY Dollar Tree Candle Holders! I originally saw this idea from another DIY-er on Instagram, (@peonyaccents), and couldn’t wait to try it out! One trip to Dollar Tree later, and I had two easy peasy candle holders.
What You’ll Need (to make 2):
-3 glass candle holders from Dollar Tree
-2 trinket/jewelry dishes
- chalk paint (I used Craft Smart chalky acrylic paint in 'Parchment')
- antiquing wax (I used ArtMinds wax in 'Tea Stained')
- super glue
-foam brush
-fine grit sandpaper
How To:
Step 1: Super glue two of your glass candle holders by gluing the two smaller ‘top’ ends together
Step 2: Super glue the trinket dishes to the top of both holders — the taller one you just created and the third one you haven’t used yet.
Step 3: Make sure the glue is completely dry. I let mine sit overnight to be safe.
Step 4: Paint the entire candle holders with your chalky paint. Let dry, and repeat. I did three coats total.
Step 5: Using a cloth, I took a small amount of wax and gently applied to spots that are raised to give the candle holders an ‘antique’ look. A little bit of wax goes a long way!
Step 6: Using your fine-grit sandpaper, lightly sand along edges and random spots to give a distressed look. Voila!
Step 6: Using your fine-grit sandpaper, lightly sand along edges and random spots to give a distressed look.
Voila!
Since I already had all materials other than the Dollar Tree items, this project cost me a total of $5! You can literally do this with any chalk paint color, and it’s such an easy, fun craft! Perfect to add to a shelf, bookcase, or centerpiece. If you give this a try, please let me know how yours turned out! (email threedaughtershome@gmail.com, or tag me on Instagram @threedaughtershome).
*& if you like this post and want to see more DIYs, check out my blog site and subscribe! You'll receive my 'Top 10 Tips for Refreshing a Space' as a thank you for subscribing!
**This post may contain affiliate links – please read my Privacy Disclosure Policy for more information, and as always, thank you for shopping my links, which allow me share fresh content with you!**
Enjoyed the project?
Resources for this project:
See all materials
Comments
Join the conversation
-
-
 Miss Daisy
on Jun 13, 2024
Really like this and plan on making up to three, thank you.
-











Frequently asked questions
Have a question about this project?