How to Frame a Doorway for Barn Doors

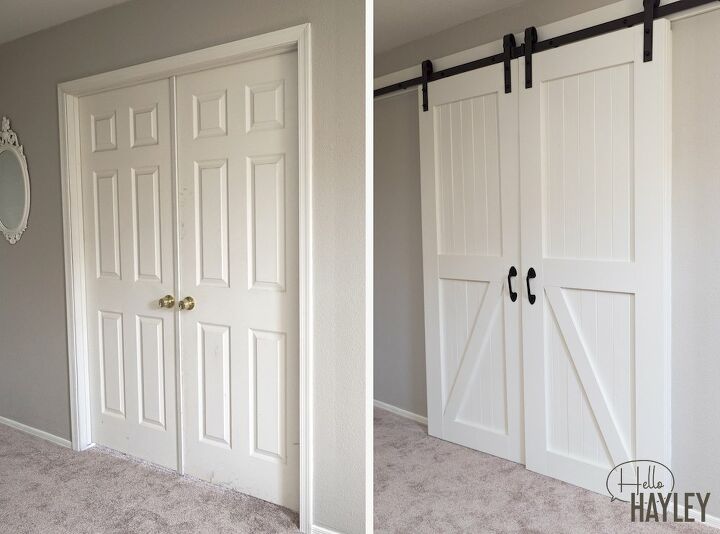
We’ve been working on an exciting new project: BARN DOORS! We have a loft upstairs with double doors, and we’re replacing them with two barn doors. There are a few different stages of this project, so today I’m excited to share Part 1: How to Frame a Doorway for Barn Doors!
Now, you can’t just slap up a couple barn doors and expect them to look Pinterest-worthy - unfortunately! If the doorway already had doors in it, you’ll need to convert the hinged doorway into a walkway! This includes taking off all the existing door hardware and smoothing out the sides and top panels so it looks more like a walkway than a doorway.
Step 1: Removing the Doors & Door Hardware
Taking off the doors should be surprisingly easy. There’s a peg in the top of each door hinge – just pull it out, or grab a hammer to help knock it out. Once you take the peg out the hinge will come loose.
Once you have the doors off, take off ALL the hardware attached to the door frame. It should just take a screwdriver to take out the screws and the hardware will pop off.
Step 2: Remove the Inner Trim
In every doorway there’s a piece of trim running in the middle that keeps the door from swinging all the way open to the other side – see it in the last picture? We need to take that off. Fortunately, it’s usually just a piece of wood nailed on there and can be pried off with a wedge and mallet! It’s really fun tearing it apart and makes me feel like Chip Gaines on demo day. Hehehe.
After removing all the hardware and extra trim, make sure to scrape off any loose paint with a scraper and remove any excess nails or staples sticking out from the doorway.
Step 3: Smooth Out the Doorway with Wood Filler
Now that all the hardware and extra trim is removed, you’ll need to smooth out the inside surfaces with wood filler.
For this step, you’ll need wood filler, a putty knife, and fine/220 grit sandpaper.
Use a putty knife to smooth wood filler over the spot where the hardware used to be. The wood filler should slightly overfill the spot, as you’ll be sanding it smooth later. Make sure to spread the wood filler slightly outside of the spot, too, so there’s a nice transition between where the spot was and the rest of the surface.
We like to let it dry overnight so that it’s completely dry before sanding. Otherwise, chunks will fall off when you try to sand! No good! So once it’s dry, take the 220 grit sand paper and lightly smooth out the surface. When you run your hand over the surface, you shouldn’t be able to feel where the spot was.
Once it’s smooth, take a lightly damp towel and wipe off the surfaces to remove excess dust.
Step 4: Paint the Walkway with Your Trim Color
Now that the doorway (now just a walkway!) is completely prepped, it’s time to paint! If you don’t already have the exact paint color of your trim, I recommend taking the piece of trim you pried off in Step 2 to Home Depot and having them do a color match. You’ll want to get a semi-gloss finish so it’s easier to keep clean!
Now your doorway-turned-walkway is barn door ready! This technique is incredibly handy anywhere you want to remove a door in your home. For example, our master bathroom had 3 doors in a 3 sq ft space. I was getting lost in doors. We removed the door from our walk-in closet, converted it to a walkway, and it feels way less cluttered.
If you have any questions about how to frame a doorway for barn doors, just leave me a comment and I’ll get back to ya ASAP!
Enjoyed the project?
Suggested materials:
- Paint, color matched to trim (Home Depot)
- Putty Knife (Home Depot)
- Wood Filler (Home Depot)
- 220 grit sandpaper (Home Depot)













Frequently asked questions
Have a question about this project?