Simply Stunning Planter Box

It is so crazy to me how sometimes the most simple upgrade can change the look of a space so much.
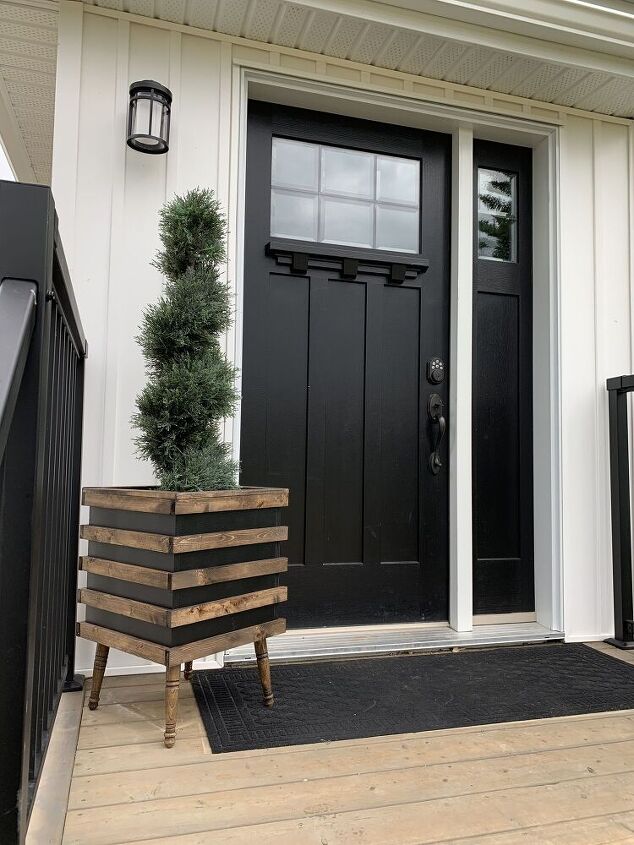
This super simple planter box is exactly what my front porch needed.
Follow along with me for a simple one hour DIY and I will show you how I made my new planter box.
- 4 screw in 8” spindle legs
- 4 angled top plates
- 1 can of flex seal
- outdoor varathane
- stain of your choice
- 2- 1x2” pine
- 3/4” plywood
(in the picture I have a can of black spray paint that I didn’t end up using)
Tools
- brad nailer
- table saw
cut list
- 3- 15”x15” pieces out of the 3/4” plywood
- 2 -13.5”x15” pieces out of the 3/4” plywood
- 10 - 15” long pieces out of the 1x2
- 10 - 16.5” long pieces out of the 1x2
- 4 -16.5” long pieces out of 1x2 long point to long point at 45 degree angles (these will be used to cap the top)
I used my brad nailer with 1” long nails to assemble the planter. Start with all the 15”x 15” pieces, use one for the base and secure the other 2 to the base on opposite sides.
Next nail in the 13.5” pieces to complete the box.
*drill a few holes in the bottom of the box next. These holes will allow for drainage. When I did mine, I forgot to drill the holes at this step and had to do it after.
I decided to use flex seal to waterproof the plywood as best as possible. I sprayed the inside, as well as the outside with 3 light coats of flex seal.
Be sure to spray this in a very well ventilated area and use proper PPE. Allow it to dry throughly.
While you are waiting for the flex seal to dry, you can cut all the 1x2 strips for the outside of the box and stain these as well as the legs.
Use your brad nailed to secure the pieces on the outside of the box. I added the 15” top and bottom pieces first. Then I secured the bottom of the middle piece 7” and then spaced the other two In between at about 4.5”.
After you have the 15” pieces on, put on the 16.5” pieces on.
Air nail on the top trim pieces. (The ones that were cut at 45 degree angles)
Secure the leg plates onto the bottom of the planter box with the screws provided.
I used varathane outdoor gloss sealer. I applied 3 light coats over the entire box. Be sure to spray the legs as well as the bottom.
allow to dry throughly.
I chose to put a fake plant in my planter box since I am horrible at keeping live plants or flowers alive. You can fill your planter box with whatever you chose.
I absolutely love projects like this. They are simple to do, don’t cost a lot of money and beautiful and add so much to an area.
Thanks for following along with me for this simple DIY. If you have any questions please do not hesitate to ask.
Don’t forget to follow along with me on here (Hometalk) as well as Instagram.
cannot wait for the next DIY
xo
Amber











Frequently asked questions
Have a question about this project?
What a beautiful entrance your front door with the addition of the planter looks stunning. Black is such an elegant color for the front door. In my case the door is red so I will be painting the box red and keep the wood accent to make everything blend. You had a great idea thanks for sharing your creativity.
Why not use a plastic box, just drill some holes in bottom, glue recycled wood slats, used spindle legs (like old table found at tag sale) or small blocks of 2x4's for legs? You can save a small fortune.
I love this! Is the flex seal harmful to plants?