How to Make Pretty Fabric Covered Flowerpots

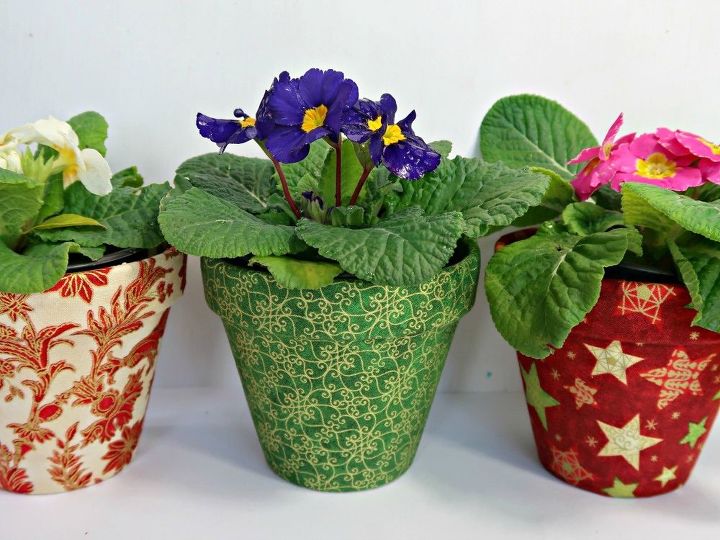
We love to make homemade gifts for family and friends and think these pretty little fabric covered flowerpots fit the bill perfectly. They are simple and cheap to make but look fabulous paired with a lovely plant as a thoughtful gift.
What you need to make fabric covered flowerpots.
White Glue (I used Bostik)
Fabric
Terracotta flowerpots
Paper, pen, pins and scissors to make a template and cut out the fabric.
Acrylic paint and paintbrush
How to make a template for the fabric covered flowerpots
To start, I made templates for the fabric that I was covering my flower pots with. Although not essential, this step really does make the rest of the project more manageable.
I also painted the inside of my flower pots with acrylic paint to coordinate with the fabric and give them a bespoke look.
I had two different size pots, so made two templates.
I first marked the top of each size pot with a sharpie, so that I had a point to work from. I placed the pot on a piece of paper and traced the top edge while rolling the pot one complete turn plus a little extra for the overlap, and then did the same for the bottom edge.
To account for the fold of fabric over the top and bottom of the pot, I used a measure to add an inch then cut out the template and checked that it fitted as planned. You can see from the shape of the template that you would end up cutting lots of excess fabric off if you didn’t use one, so this step definitely makes everything easier later.
I then evicted our cat from his new found bed and cut out the fabric pieces using the template as a guide.
How to make fabric covered flowerpots
I used Bostik White Glu to stick the fabric to our flower pots.
As well as being ready to use straight from the bottle, white glue is also ideal to water down for crafts such as paper mache and decoupage, and when using on really porous surfaces such as these terracotta pots.
I diluted our white glue with roughly the same amount of water to glue. You can see from the photo below that it is similar to the consistency of single cream.
I covered the outside wall of each pot with the diluted glue and placed the fabric in position, smoothing it into place. I found working with the pot upside down made it really easy to position the fabric, leaving just a few millimetres sticking up ready to be stuck down in the next stage.
The glue happily stuck the fabric to itself on the overlaps, so I didn’t need to do anything extra with the seams. Once the fabric was in position on the walls of the flower pot, I left the glue to dry before returning for the next stage.
To finish the top edge of our fabric covered flower pots, I cut slits in the fabric, and stuck each one down and once again left to dry before upturning and folding the bottom edge over and glueing into place.
And here are my finished pretty fabric covered flower pots. Each one cost about a dollar to make and looks fab with a colourful plant in it. I won't be planting straight into these pots, so just dropped the plants straight it in their own plastic plant pots so that they are easy to remove for watering and changing up.
If you would like more inspiration for gifts you can make yourself, you’ll find lots more over on our craft blog, and I've shared two of my favourites below.
How to Make Fantastic Home-made Peppermint Foot Scrub
This simple recipe for Rosemary and Peppermint Foot Scrub ticks every box. It is super quick, super easy and super cheap to make. In fact, you probably already have all the ingredients you will need at home.
How to Make Wonderful Herbal Bath Soaks at Home
These wonderful herbal bath soaks are great fun to make, fabulous for your health and well-being and can be tailored to suit the recipient.
DIY home decor using vintage fabric
Enjoyed the project?
Resources for this project:
See all materials
Comments
Join the conversation
-
-
 Katen
on Jan 11, 2023
Cute. But best part was the happy memory your post gave me. Mom who lived out in country at age 71 got so bored being snowed in. So she started painting her pots with nail polish. They turned out cute and she finally explored her creative side after 8 kids. Thanks for making me smile
-
 Craft Invaders
on Jan 11, 2023
So pleased that I triggered a happy memory, theres nothing more precious :)
-
-














Frequently asked questions
Have a question about this project?
How did you get the 'cuff' of the pot to fit without puckering at the point of turning?
So pretty and certainly unique using your own fabric. Would this work as well on ceramic or plastic pots too?
Are these for outdoors ? I’m just wondering if you coated the outside with anything? Very pretty!