How to Build a Stylish Wood Ball Coffee Table

Looking to create a unique statement piece for your living room without spending a fortune?
This DIY wood ball coffee table is a perfect weekend project that blends creativity with functionality.
Using simple materials like planters and a wood board, you can craft your own stylish sphere leg coffee table in no time.
Let’s dive into the steps to make your own!
This post was transcribed by a member of the Hometalk editorial team from the original HometalkTV episode.
Tools and Materials:
- 1 wooden board (large enough for your tabletop)
- 4 large plastic or ceramic planters
- Jigsaw
- Orbital sander
- 100 and 220 grit sandpaper
- Clamps
- Gel stain (color: hickory)
- Satin polyurethane
- Construction adhesive
- Dark wood filler
- Clean cloth
- Chip brush
- Foam brush
- Heavy books (for weighting)
Hometalk may receive a small affiliate commission from purchases made via Amazon links in this article but at no cost to you.
1. Trace and Cut Your Wooden Board
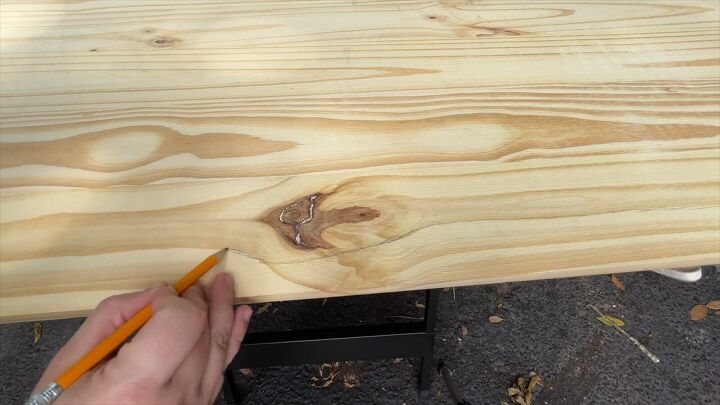
Start by laying your wooden board flat on a clean surface.
Trace an organic shape following the natural grain of the wood—this will give your wooden bowl coffee table a natural, fluid appearance.
Once you’ve traced the shape, clamp the board securely to your workbench or any stable surface. Use a jigsaw to carefully cut out the traced design. Don’t rush—follow the curves closely!
2. Sand the Wooden Surface
With your board cut, it’s time to smooth out the rough edges. Grab your orbital sander and begin with 100 grit sandpaper, working up to 220 grit to ensure a smooth finish.
Sand both sides of the board to remove any splinters or imperfections.
Once the sanding is complete, wipe down the board with a clean cloth to remove dust.
3. Stain and Seal the Wooden Board
To bring out the wood’s natural beauty, apply two coats of gel stain in the color hickory.
Make sure to follow the product instructions on the can for the best results.
Once the stain is dry, apply two coats of satin polyurethane for a durable finish, sanding lightly between coats with 220 grit sandpaper.
Let the table top sit and dry.
4. Prepare the Planters (Your “Wooden Balls”)
Now let’s create the legs for your DIY sphere leg coffee table. Head over to Walmart or order online to grab four planters—these will be the base legs of the table.
Wipe the rims of the planters with a clean cloth to ensure the adhesive sticks.
Apply a strong layer of construction adhesive to the rim of one planter and place the second planter upside down on top.
Repeat this for the remaining two planters.
Let the adhesive dry completely.
5. Fill and Sand the Gaps
Once the adhesive has dried, use dark wood filler to fill in the gaps between the planters for a seamless look.
After the filler dries, sand down the planters with 220 grit sandpaper.
This step will remove any glossy texture and make the legs look more like part of the wooden bowl coffee table.
6. Stain the Planter Legs
To give the planters a wood-like finish, use the same gel stain you used for the tabletop.
Apply it using a chip brush to mimic the look of real wood grain on the planters, turning them into convincing “wooden balls.”
7. Assemble Your Wooden Ball Coffee Table
Now it’s time to put it all together.
Apply a generous layer of construction adhesive to the tops of the planters (now your table legs).
Use a foam brush to smooth it out evenly.
Center the wooden board on top of the planters and weigh it down with heavy books.
Let the adhesive cure for 24 hours.
Craving more unique coffee table designs?
Steps to Create a Wood Ball Coffee Table
Your very own ball foot coffee table is now complete and ready to make its debut in your home!
This project shows that with a little creativity and patience, you can turn simple materials into a one-of-a-kind piece.
If you have any questions, suggestions, or if you made your own version, drop a comment below. I’d love to see what you created!
Enjoyed the project?

Comments
Join the conversation
-
AWESOME!!
 Pat81934129
on Sep 26, 2024
-
-
 Michelle
on Feb 02, 2025
This would be just the project for my live edge slab of walnut wood. Thanks for The idea!
-
 The Simple Homeplace
on Feb 02, 2025
Yes! Just a tip I realized after the fact was to weigh down the bowls. I'm not sure why I didn't think to do that before everything was glued up, but it's a must!
-
-









Frequently asked questions
Have a question about this project?