DIY Upholstered Bed

Have you ever eyed something for so long, and then you finally bite the bullet, take the plunge and go to buy it only to find the lead time is 10 WEEKS! Yes? Well, that was me, I had eyed the Alrai bed from Wayfair for SO LONG, however once I went onto the site to purchase it I found there was a 10 week lead time. Truthfully, I don’t have that kind of patience and I really didn’t have that kind of time because I had just sold our bed frame. If you follow me on Instagram then you know this haha @schoolsidedesign.
So… naturally I decided to make my own version of this bed, and man I am so happy I did as the overall size fits our space perfectly and its taller than the Alrai bed, which fits our space so much better.
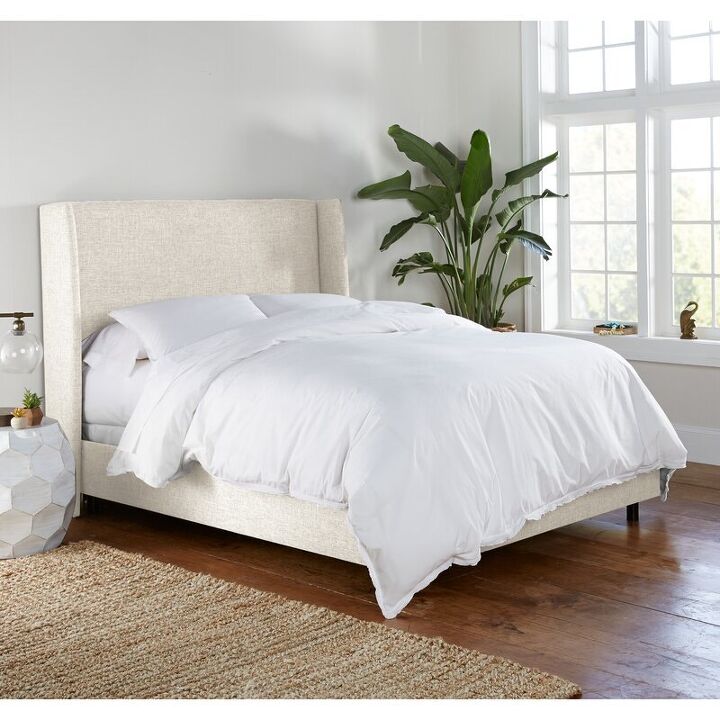
Here is the bed that inspired this whole project, its so pretty and I have seen it in so many of my favorite bloggers homes.
Okay so let me break down how I made my own upholstered bed, and saved so much money in the process!
Here is a list of the supplies you’ll need in order to make the complete bed.
- Metal Harbor Frame (I already had one, and you might too!)
- Bed Hardware ( you’ll only use the clip part of this set)
- Upholstery Tack Strip
- 1 sheet of 1/2″ Plywood for the headboard
- 2 – 1x8x8 For each side wing
- 3 – 1x10x8 These are used for the side rails and footboard
- 2 – 1x4x8 These are attached to the wings, and then to the headboard.
- 5 yds of Fabric, I used a white cotton duck fabric
- Batting to wrap around the wood pieces
- Foam for the frame I used a mattress topper
- Spray Adhesive
- 1.5″ screws
- Staple gun
To start, I decided to build the headboard, starting with each of the wings. Our room as a slant ceiling, and I wanted to top of the headboard to measure to the start of the slant. When making yours, just make the bed the size that would fit your space best.
For our space, our wings measured 59″ tall, so I took the 2 1x8x8 boards as well as the 1×4 boards and cut them both to 59″.
Once these pieces were cut, I attached the 1×4 to the 1×8 by screwing it together with 1.5″ screws.
Now that each wing was screwed together we took to cutting the sheet of plywood. You do not need to have the main headboard piece to be the same size as the wings, as the mattress (and in our case box spring) will be high enough to block any open space.
With that, we cut our headboard piece to be 40″ x 73″ wide. We made it an inch wider to make sure there was going to be enough space for the side rails to fit in.
We just used a circular saw to cut the board to size.
Since we were already in the mode of cutting, we cut the rest of the boards. For the side rails and front we used the 1x10x8 boards. You need the 10″ width to make sure to cover the box spring.
Each side rail for our case measured 85″ long, again to make sure we left an inch space to accommodate the box spring.
The front of the bed was cut the same width as the sheet of plywood at 73″ wide.
Now that I had all the boards cut, it was time to start actually upholstering the each section. I started with each of the wings.
To start you want to get the foam bed topper, and measure the inside space of wing, as this will be the exterior part of the bed. Once you have both sections cut, you will use the spray adhesive to spray the wood and lay each part down. This is such an important part as it really holds the foam in place, when you are wrapping the batting around.
I made sure to use the foam as best I could, it doesn’t matter if there are separated parts, as the batting goes over top of this.
Once you have both of the wings and foam attached to the board, next you’ll want to cut the batting to size. You want the batting to wrap around the front (where the foam was just placed) and back part of the 1×8 board. I used my staple gun to attached the batting around.
Once each of the wings are covered with the foam and the batting, you can then cover it with your fabric. I chose to use a white cotton duck fabric. Same as with the batting you want to cover the front and back part of the wing.
I used the upholstery tack strip to staple the fabric to the 1×4, I thought this would give a cleaner look once the headboard was rested over the top. Again, you’ll use the staple gun to attach the fabric, this tool is your best friend through all of this!
For the top and the bottom portion of the wing you really want to fold it over neat, its unlikely you will see it, but it is important for the look to be clean and straight. I folded mine like a present and did a neat vertical line of staples.
The last part of the wing is to pull the fabric all the way around the side and stapling on the back side, which will sit against the wall. When doing this, you really want to make sure the fabric is pulled tight.
Once each wing was completed, I moved onto the main part of the headboard.
Similar to the wings, I cut a piece of foam to fit the size of the headboard, and used the spray adhesive to attach it to the piece of plywood, and then I wrapped it with the batting.
I pulled the fabric and stapled it all around the back side, pulling it tight and make sure it was neat. I just folded the edges neatly so that the corners looked right. Even though you likely wouldn’t see it.
Now I had all the pieces for the headboard complete, however I did not assemble it until I was in our bedroom space, purely for easy in getting it upstairs.
Prior to moving it upstairs, I wanted to get all parts of the bed complete. So as with the headboard, I brought in the side rails and the foot board and I went through the same steps.
- First cutting the foam to size
- Next spraying the adhesive and attaching the foam to the board
- Followed by cutting the batting as well as the fabric to fit each piece
- Finally attaching the batting and fabric with the staple gun.
Now that all the pieces were upholstered I brought all the pieces to the bedroom to get it all assembled there.
I attached the wings to the headboard by flipping the headboard over, and then screwing the 1x4 part to the back of the main piece, making sure the wing and headboard were level at the top. I used 1.5" screws along the length of the headboard, which was about 5 screws.
Here is the completed headboard with both wings attached! I was so excited at this point, as I was finally seeing the bed come to life!
Next you'll want to attach the bed clips on the side rails, I placed one about at 1/4 of the way down from the top of the side rail and another 1/4 up from the bottom. I placed them close to the bottom of each side. These will then attach to the metal frame. I screwed these into the side rail with 1" screws.
I then moved the headboard it into the spot where it was going to be and pushed the metal frame up to it. I then attached the metal frame to the 1x4's of the wing.
The final step of this was adding the footboard to the side rails. I attached this by using 4 corner brackets, I did not have matching ones, but it truly doesn't matter.
Once that was complete, we dropped the box springs in to make sure all fit and it was perfect! We had an upholstered bed!
More Gorgeous Bedroom Ideas
Enjoyed the project?
Resources for this project:
See all materialsComments
Join the conversation
-
 Elizabeth Marsh
on Aug 21, 2022
I wonder what you paid in total. I just bought a similar one for $180 online, but with a little more features like the studs and slightly taller feet. It also come apart for moving easier. Debated about buying or making one for
my daughter.
-
 Kni68781432
on Aug 21, 2022
Can you share the website?
-
-
-
 Sheryl Monaspa
on Jun 02, 2023
Loved the bed and the space as a whole. I wanna try to create something similar in 3d, probably on planner5d. Do you mind if I do that? Also, what is this style called?
-








Frequently asked questions
Have a question about this project?
Did you make the sides, able to fold up, so that you can access the storage under the bed? It doesn't seem like there is enough room from the floor to the bed to access them.
Beautiful job! Just wondering how you will clean it when it gets dirty with the fabric nailed down? Fabric always gets dusty and dirty with use. Thanks for any ideas.
Well look at you👍👍
This is awesome - what a great iob♥️♥️
Keep building and keep sharing‼️‼️