How to Make the Perfect Pallet Headboard
by
Therese Antonsen
(IC: vlogger)
11 Materials
$60
2 Weeks
Medium
In this post, I thought I would tell you step by step how we made the perfect headboad out of pallets. I've made a video of the entire process that I added at the bottom of this post, but if you want to know what we used and how we did it, just keep on reading.
The whole process took about 1-2 weeks
-------------------------------------------------
WHAT YOU NEED
-------------------------------------------------
- Pallets (Here you have to choose the number according to how big you want the result to be. We used 4 pallets and we have a 180cm bed)
- 1 plank for the top of the headboard (Used as a shelf. Optional!)

- Scale and pencil (To measure where to cut)
- Saw / circular saw (recommended)
- Drill / screwdriver
- Screws
- Paint and brushes (preferably a roller for the undersides)
- Something to cover the floor with when painting (we used plastic bags)
- Decor (Light, plants, light bulbs .. whatever you like)
STEP 1: Planning, picking up pallets and flushing
First of all, it's all about planning some groves of how you want the result to be. I searched for a long time after inspiration on Pinterest, and then I finally found out how I wanted it to look. Then you have to plan what size you want it to be, whether it should be low or high, whether it should stand all the way from the floor or start at the edge of the bed, and finally, what color it should be. We quickly decided that we would not fine-tune it, but have it in a rough style.
We picked up our pallets from a local building store, where there was a whole stack of pallets that we could choose from. Then we picked out 4 pallets that worked well together. After getting them safe home, we started flushing them to get them all clean and ready.
When all the pallets were flushed, we carried them into the garage to let them dry. This took a long time, but it is important to let them dry completely before painting to prevent the paint from flaking. In sunny days, we carried them out to let them dry in the wind and sun.
STEP 2: Saw
The next day, this restless soul was ready to take on the project. Even though they were not completely dried, we decided to start the sawing. The pallets were 120x60 cm and the bed is 180cm. If we had left them long, it would be too long, and if they had been on the high side, it would be too short. We had to pick up the scale and the saw. We decided to cut 30 cm on each of the pallets, so that the result should reach 180 cm, but also to get the finest result by letting the cut sides meet in the middle.
The first thing we did was to measure a straight line 30 cm in, and then sawed it off. We started with a normal saw, but we quickly found out we had to find a faster and better way to get started. The solution became a circular saw, and I promise you - it went 10 times faster and became much more precise. So if you have a circular saw available, use it.
STEP 3: Screw them together
When all the pallets were ready to bind, we first put them down to find out which ones fit best. When that was done, we screwed them all together. We used planks that had already been scrapped to stick them together on the backside. Make sure the planks do not get too wide and visible on the front. To tie, we used a drill and a whole bunch of screws. You can of course do it by hand with a screwdriver, but it is also recommended to use an electric drill if you have access to it, so it will go a little easier and faster. We started by tying two and two pallets together before we finally joined them all together using the remaining planks.
When all the pallets hung together, we ended up attaching a plank of what would be the top of the headboard. In this way we can use the top as a shelf. This step is voluntary, but highly recommended!
STEP 4: Paint
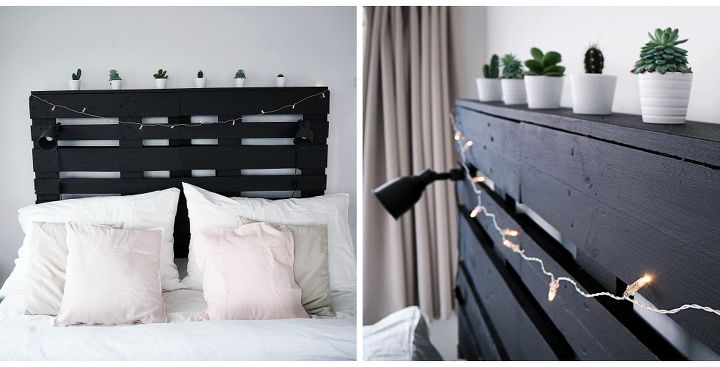
When the pallets were fully dried, we started painting. We used Butinox Futura Soft Look in the color Dark Brown. I recommend using a roller for the underside of the pallets, as well as regular paintbrushes. Remember to cover the floor with, for example, plastic bags or paper to avoid spills.
The first evening we painted a coat on the front. The second evening the backside. Here I wish we had painted the pallets BEFORE we screwed them all together, because that would make it a lot easier to get into the hooks. This was the biggest challenge with the entire project! Fortunately, I found a roller that I could use to paint the underside of the planks. Then it all became a bit easier. The final evening we were just fine-tuning on what we had overlooked, and then we finished with a second coat on the front. Now we could finally see the final result. The headboard was DONE!
Then we had to let it dry overnight.
STEP 5: Place it and decorate it
The last and the most enjoyable step: place it where you want it to be, push the bed in front of it and start the decorating. We bought to ''HEKTAR'' lamps on IKEA that we attached on each side of the headboard. In the end, we decorated with a light bulb and some mini-plants on the top shelf.
Then you're done!
{
"id": "4000743",
"alt": "VIDEO (ThereseAntonsen on Youtube)",
"title": "VIDEO (ThereseAntonsen on Youtube)",
"video_link": "https://www.youtube.com/embed/R15Q_d9zFDE",
"youtube_video_id": "R15Q_d9zFDE"
}
{
"width": 634,
"height": 357,
"showRelated": true
}
Make sure to subscribe to my channel: https://www.youtube.com/c/ThereseAntonsen for more upcoming DIY projects!
Now I hope you feel inspired to do the same. It's really worth it and I'm so happy with the result! If questions, just contact me and I'll answer as well ♥
Enjoyed the project?
Resources for this project:
See all materials
Any price and availability information displayed on [relevant Amazon Site(s), as applicable] at the time of purchase will apply to the purchase of this product.
Hometalk may collect a small share of sales from the links on this page.More info
Published July 9th, 2017 12:46 PM
Comments
Join the conversation
2 of 51 comments
Frequently asked questions
Have a question about this project?
Why did you not show the entire finished project. I never try any project without seeing it finished..
Will it make you sick
So what can I do if I have to bring it upstairs and I have a Queen size bed😉, I guess I can put hinges in the middle that I can ununscrew when I'm ready to move so that it fits going down the steps, I just thought about it while I was asking you the question....