


Instant Home Upgrade With Malibu Wide Plank

This post is sponsored by Malibu Wide Plank.
Have you ever walked into a room and felt like something was missing? That was exactly how I felt about my home. The worn, cheap, and downright ugly floors were a major turnoff, especially since I was planning to sell my house. I needed a game-changer, something affordable yet stunning enough to wow potential buyers. That's when I discovered Malibu Wide Plank Flooring.
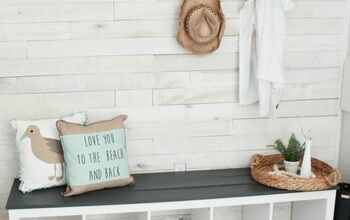
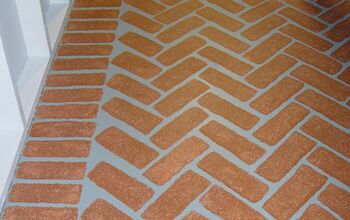
The first thing that caught my eye was the luxurious look and feel of the long and wide planks. They truly resembled real wood, adding an instant touch of elegance to any space. What's more, the one-millimeter underlayment made the DIY installation a breeze with its click-lock system. I was amazed at how easy it was to transform my floors without the need for expensive tools or professional help.


I decided to install the planks right over the old flooring, saving time and effort. With a few scores and snaps using a simple box cutter, I was able to cut the planks to size effortlessly. The process was so smooth, and I didn't encounter any issues with fitting the planks together. It was a satisfying feeling to see the transformation unfold right before my eyes.


One of the best parts of using Malibu Wide Plank was its durability. Unlike my previous floors that got damaged just from moving furniture, these planks were scratch-proof, stain-proof, and 100% waterproof. It gave me peace of mind knowing that my floors would look pristine for years to come.
I continued with the installation, staggering the planks for a professional finish. It was a simple yet effective technique that added a touch of sophistication to the rooms. The difference in size and quality between the old floors and the new Malibu Wide Plank floors was staggering.


Moving on to the carpeted rooms, I used a box cutter to cut and roll strips of carpet and padding. This made the disposal process a breeze, revealing the concrete underneath. I removed any leftover tacking strips, scraped off glue residue, and swept the area clean, preparing it for the new flooring.
But it wasn't just about the floors; I also wanted to maintain the character of my home while making it more sale-ready. I opted for a neutral color palette, painting most walls white but keeping some brick features for added charm. The decision to go with a pretty putty color for the cabinetry was a game-changer, adding a touch of elegance to the space.


One of the key takeaways from this project was the importance of virtual staging. It allowed me to showcase my home's potential to buyers without the hassle of physical staging. Coupled with the stunning Malibu Wide Plank floors, it was a winning combination that made my home stand out in the market.
Whether you're looking to sell your house or simply upgrade your space, Malibu Wide Plank Flooring is the perfect solution. Its timeless elegance, durability, and easy DIY installation make it a top choice for homeowners. I couldn't be happier with the results, and I'm confident that you'll love it too.
So if you're ready to transform your home and boost its resale value, give Malibu Wide Plank Flooring a try. You won't be disappointed!


Malibu Wide Plank LVP: French Oak Atelier

Malibu Wide Plank Flooring Upgrade to Increase Home Resale Value


Comments
Join the conversation
-
Yes it is brighter
-
Yes


Frequently asked questions
Have a question about this project?