14 Successful Bathroom Cabinet Makeovers
Have you just bought a property and you’re unhappy with the original bathroom cabinets? Or perhaps you’ve just grown fed up with the look and feel of your bathroom? These 14 Hometalkers below have been in exactly the same boat. With minimal budget and a lot of creative flair, these DIY bathroom cabinet makeovers have helped make their suites look brand new all over again.
1. Stylish Bathroom Storage Cabinet Paint Job
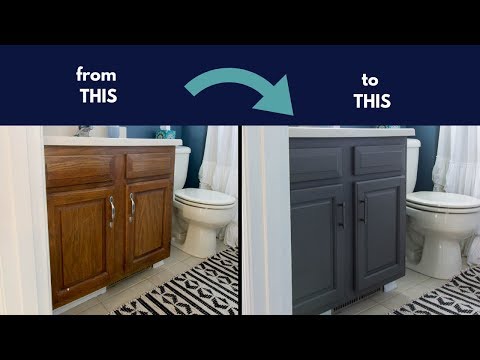
The bathroom vanity is an often-overlooked feature of your bathroom space, but Hometalker Jenni discovered how easy it was to renovate her bathroom cabinets in a single day using only paint. After sanding with 220-grit paper and cleaning the wood, Jenni repainted the cabinets a warm dark gray, with great coverage in just a single coat. She finished by applying a water-resistant topcoat. Get tutorial here
2. All-In-One Oak Bathroom Cabinet Paint
TaKenya’s home cabinets were outdated oak, but buying brand-new replacements simply wasn’t in her living budget. For her oak bathroom cabinets, she tried a new all-in-one product called Beyond Paint, which she could apply instantly without stripping, sanding, or priming. After a basic clean with a solution of water and vinegar, she painted the framework and the doors with ease. Get tutorial here
3. Decoupage-Inspired Bathroom Linen Cabinet
Debbie was fed up with her original bathroom cabinets. The particleboard had swollen, and the edges were beginning to look shabby. To breathe new life into them, she opted to decoupage each door using linen fabric, cutting it to size before applying several coats of Mod Podge as a sealer for perfect, water-tight results, without bumps or bubbles. Get tutorial here
4. Rustic Stencils for Bathroom Sink Cabinets
This Hometalker wanted to make a decorative feature of their powder room. They used the plain bathroom cabinet panels as a perfect surface area to bring in some stylish, rusted patterns. After prepping and priming the cabinet surfaces, they painted two coats of iron patterns before letting it dry. The modellos and patina were later applied to reveal these unique designs. Get tutorial here
5. Brighter Bathroom Cabinet Makeover
Do you get frustrated with the darkness of your bathroom cabinets? Take a leaf out of Pat’s book and lighten up your bathroom by painting the vanity doors with a brighter color. After removing the doors and wiping the surfaces with a deglosser, Pat was ready to prime and paint the cabinets. She used a foam roller for the large panels and paintbrushes for all those nooks and crannies. Get tutorial here
6. Bathroom Cabinet Transformation with a Brush
Does your bathroom suffer from very boring, generic vanity cabinets? Check out Hometalker Stephanie’s transformation of her cabinets using only a paintbrush. After removing and cleaning the cabinets, she deglossed the surfaces before painting two coats of pale green paint in the direction of the wood grain. She finished by applying a protective topcoat once fully dried. Get tutorial here
7. Cabinet Painting and Updated Hardware
If you know that you’re unlikely to live in your home for the long term, painting your bathroom cabinets and changing up their hardware is an easy facelift. Hometalker Ashley did just that, painting her builder’s grade, beige, 'boring' units with two coats of Behr’s Elephant Skin paint, before topping it off with a sleek coat of satin finish polyurethane for good measure. Get tutorial here
8. Simple Hack for IKEA Bathroom Cabinets
There’s nothing particularly wrong with IKEA bathroom cabinets, but there’s not a lot right with them either! Hometalker Becky opted to 'hack' her IKEA cabinets to create some much-needed additional bathroom storage. With no countertop space, she built her very own floating shelves using joist-angle brackets. The hack cost less than $30 and ensures the vanity is less 'gap-like'. Get tutorial here
9. No More Boring Honey Oak Cabinets
This task played a big part in Hometalker Heather’s DIY revamp of her guest bathroom. Having become 'obsessed' with black and white bathrooms, she opted to change up her cabinets, using Behr’s one-coat semi-gloss enamel. Although it says it’s a single-coat product, Heather opted for three coats to properly cover the lighter honey oak and remove the visible brush strokes. Get tutorial here
10. Shabby Chic Corner Bathroom Cabinet
Bathroom wall cabinet makeovers don’t come much more unique than Tammy’s recent project. Her vanity units used to be a 'shiny white' MDF, but wanted to create a 'shabby chic' makeover using chalk paint. Tammy used a dry brush to create the feeling and appearance of old, bleached wood. She also hand-painted the moldings and detailing to accentuate the lines of the vanity. Get tutorial here
11. Hearth Stone Bathroom Cabinet Paint
Although Chandra’s bathroom cabinets were in incredible condition, she saw fit to give them a lick of paint to alter their orange tones. After removing the drawers and wiping them clean, she taped the inside of the frame to prevent the paint from bleeding inside. The rich, classy Beauti-tone hearth stone paint was applied with three coats before fixing the new brass handles and knobs. Get tutorial here
13. DIY Garbage Bathroom Sink Cabinets
If you’d rather keep your trash away from the countertop of your bathroom vanity, take inspiration from Stephanie’s DIY garbage can door, fitted on the inside of her bathroom sink cabinet. Using ½" plywood, she glued and brad nailed the pieces together before painting and attaching the angle brackets to mount the garbage can – one bracket on either side and one at the base. Get tutorial here
14. Rustic Restain for Corner Bathroom Cabinet
Hometalker Jenni was keen to continue her rustic wood theme into her bathroom. She wanted to restain her original vanity cabinet a warm, dark wood color. She started by cleaning the cabinets and removing all hardware. Jenni opted for only a single coat of stain, and within two hours it had already developed into a gorgeous walnut color, with no need for a second coat. Get tutorial here


