Learn 3 Easy Ways to Create Faux Granite Countertops

Do you love the look of granite countertops but they're not quite in your budget? Not to worry! You can create incredible faux granite looks for your countertops using paint. We'll show you three techniques that will give you the granite look for less using our All In One paint. Find the one that works for you and get your DIY on!
Plastic Bag Faux Granite Technique
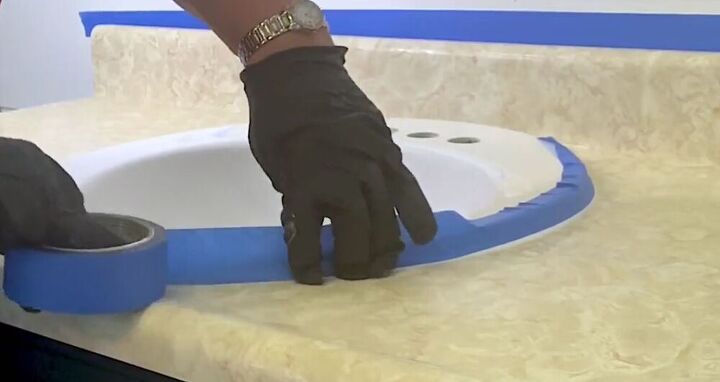
The first technique we'll show you uses a plastic bag, believe it or not. The first thing you need to do is clean your countertops well and tape off the sink, backsplash, and walls. This will prevent paint from getting into places you don't want it to.
Next, apply a smooth, even coat of paint using a high-quality brush. We used our Syntec brush for this project. We also used our True Applicator to stipple wet paint to even out the surface.
Then, using a crumpled up plastic bag, evenly apply a light texture of darker paint over the countertop. Make sure to get into the tight areas around the sink so that it looks as natural and realistic as possible.
Alternate between lighter and darker shades of the same color to achieve your desired look.
Look how much this countertop looks like granite already!
Use a paintbrush in order to get texture into those hard to reach areas that your plastic bag just won't reach.
Once you've achieved your desired texture, soften and seal your work with our Whitewash Antiquing Gel. Make sure to allow it to cure completely before using it.
Isn't that stunning! Your guests will never know that all you needed to create this amazing faux granite look was some paint and a paintbrush!
Faux Granite Tissue Technique
To get started on this next faux granite technique, first, apply a base-coat. We used the color Colosseum for our base-coat.
Before the paint dries, take a single-ply sheet of tissue paper and crumple it up. Then lay it onto the wet paint, pushing down as you go. Make sure to cover the edges of the counter as well.
As you lay down the tissue paper, paint over it, making sure to keep any texture from the creases of the paper. Continue this process until you have covered the entire countertop.
Tip:
Overlap layers of tissue paper to achieve even more texture.
Once you've covered the entire countertop and it's fully dried, it's time to move on to our next paint color. We used the color Stonehenge in our countertop makeover.
Grab our One True Applicator and apply a mottled layer of paint, allowing the base coat to show through.
Look at how incredible this countertop already looks!
Next, go back over the countertop with the base color to add more visual interest, and then soften it using a cotton rag. Continue layering and softening, alternating between the two colors to create more texture.
Once you're happy with how it looks, go back in with a thin brush and gold leaf paint to add veins throughout the countertop.
Finally, add a water-based topcoat to seal and smooth your countertops. Add as many coats as needed to get a nice, smooth feel.
Doesn't it look totally high end? We simply love it!
Faux Granite Stamping Technique
Once you've cleaned your surface and taped off anything you don't want to get paint on, use our Syntec paintbrush to paint on an even coat of color.
Then use our One True Applicator to stipple the wet paint. This will even out the texture. Our One True Applicator works best to soften and blend paint when you mist it with water.
Now here is where you have a decision to make. If you want to completely cover your countertop's color, add a second coat. But if you want your countertop's original color to show through a bit, as we did, only do one coat.
The next step was to add texture to the countertops. We grabbed the colors Colosseum and Cobblestone for this part, but you can grab whatever colors you like. Make sure to have one that is darker and one that is lighter.
Using the One True Applicator, smear on a rough coat of the darker color. Make sure not to completely cover up the paint underneath.
Then use a silicone stamp to add veining in the lighter color.
Randomly stamp the lighter color all over the countertop. This part absolutely does not need to be perfect, as imperfections will make it look more realistic.
Stamp the veining all over your countertop, alternating between the two colors as you go. Make sure to get all of the edges and corners of the countertop. Use the One True Applicator to soften the stamped parts a bit, and use a small paintbrush to get into tight areas.
We also used the edge of a feather dipped in paint to add veins to the surface. As with our previous projects, once dry make sure to add a coat of our White Wash Antiquing Gel to soften, seal, and protect your newly painted countertop.
Is this not an absolutely stunning kitchen? Nobody will ever know that these countertops are not truly made of granite!
We hope you have been inspired to give your countertops that makeover you've been dreaming of!
Enjoyed the project?
Resources for this project:
See all materialsComments
Join the conversation
-
-
 Ger68335671
on Dec 23, 2023
Granite does not have “veins”.
That would be “marble”.
-









Frequently asked questions
Have a question about this project?
So do you leave the tissue paper on the counter, or do you remove it??
Do you need to prime the countertops before painting? Thanks
How well does it hold up with the wax verses the sealer? Is one better than the other? I have teenage boys so it’s important that it holds up. Thank you