Dollar Store Dollar Tree DIY Backsplash: Budget Friendly Bathroom Reno

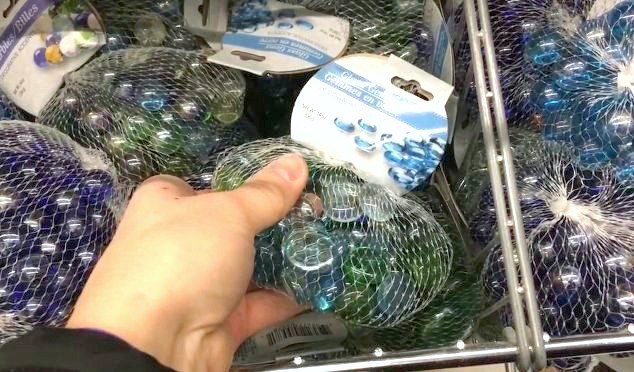
If you’re a regular Dollar Store/Dollar Tree shopper (and aren’t most DIYers?), you know about those little glass gems in the floral aisle. Their purpose is to hold your flower stems straight in a vase but there’s so much more you can do with them.
Today I am going to show you a simple and affordable Dollar Store Dollar Tree DIY Backsplash idea using those gems. The effect is gorgeous!
There are two different kinds of gems - one with a flat back and one that looks like a marble. I used the one with a flat back.
The area I wanted to cover was 24”x10” so three bags would be enough.
This is our basement bathroom. It’s right inside a door to the outside, where our pool is located. It gets used pretty hard in the summer (obviously) and the wall behind the sink gets pretty gross with all the handwashing.
There is a little backsplash that is attached to the vanity but that isn't enough to protect the wall.
So I went to the Dollar Store and purchased three bags of gems that came in assorted colors - clear, light blue, dark blue, and green. These would be the perfect colors for this room.
1. Wash the Dollar Tree Gemstones
They were pretty dusty so after I sorted them, I washed them with blue Dawn and rinsed them well.
2. Mark the Backsplash Area
I first drew a line under the mirror and then removed the mirror.
Then I drew lines from the edge of the sink to the line under the mirror.
These lines gave me a reference for applying the gemstones.
3. Apply Dollar Store Gems
Because this is near a sink and will be exposed to water, I wanted to make sure it was done properly.
I bought Mastic which is a tile adhesive. This container was more than enough for this little project.
I also bought this little notched tile scraper for 99 cents. This is what I used to adhere the Mastic on the wall.
Before I began, I used painter’s tape to tape off the top of the vanity.
I then went through the following process:
A) Using my notched scraper, I applied a thin layer of mastic using the flat edge in a small area
B) I then turned the scraper to the smallest notch edge and made grooves in the mastic
C) I placed the gems onto the mastic pushing them gently into the mastic
D) I continued to add mastic to the wall in small sections
E) And continued to place the gems until I had completely filled in my marked-off space.
I allowed the mastic to dry for 2 hours.
4. Prepare Grout
While the mastic dried, I mixed up the grout. This bag was much more than I needed. You can buy already mixed grout but it is more expensive than the dry version.
A) Using a recycled plastic container, I added one cup of grout powder.
B) Then I added 1/4 cup of water and mixed. It didn’t seem to be enough water, so I mixed in another 1/4 cup of water. The ratio was then 1:1/2.
C) I mixed everything together using a paint stirrer
According to the directions on the grout bag, you should let the grout sit for 30 minutes, stir it and then let it sit an additional 30 minutes.
A) This is the grout after 30 minutes. I gave it a good stir.
B) This is the grout after 1 hour. Perfect!
5. Apply Grout
A) There is a tool to apply grout but I used a magic eraser which worked well.
B) I worked in small sections, squishing the grout between the gems.
C) I made sure the grout was even and there was grout between each gem.
D) Once I had grouted the entire wall, I went over it again to make sure there weren’t any gems covered with a lot of mastic.
One cup of grout + 1/2 cup of water was the perfect amount for my area which was 24” x 10”
6. Allow Grout to Set
According to the bag, allow the grout to set for 30 minutes & check to see if it’s dry.
A) After 30 minutes, I touched the grout
B) And it was still wet
C) After an hour, the grout was dry
7. Remove Excess Grout
Once the grout was dry, it was time to wipe off the excess.
A) I used a large sponge and warm water.
B) I made sure the sponge was not sopping wet, and rung it out well
C) Then I ran the sponge over the gems, removing any grout that was on top of the gems.
I changed my water several times to make sure that I was using clean water to remove the grout.
8. Caulk the Edges of the DIY Backsplash
Once the grout was clean
A) I removed the painter’s tape
B) Some of it was stuck under the grout so I used a utility knife to cut it out.
C) I added a bead of caulk along the edge,
D) and smoothed the caulk with my finger.
Dollar Store Dollar Tree DIY Backsplash
I'm so happy with the result of my Dollar Store Dollar Tree DIY backsplash. It looks great, and I learned something new too. I had never worked with mastic and grout before, but I was surprised at how good everything looked after I finished.
Here's a closer picture. I like that the sides are not perfectly even; it gives it a nice, natural look.
No more dirty, splattered wall!
The project cost me $20 because I bought big containers of mastic and grout. But if you count only the materials I used, it was just $6.
I'm really pleased with how it turned out, and it didn't cost much. Now I don't have to worry about my wall getting dirty and messy anymore!
Have you tried a similar project? I'd love to hear about your experiences and any tips you have. Drop a comment below and let's share our creative DIY ideas!
Enjoyed the project?
Resources for this project:
See all materialsComments
Join the conversation
-
 Weh33869307
on Sep 29, 2022
When I do it sure
-
-
 Dis139830964
on Jan 19, 2026
I cannot wait to try this in my kitchen after new drywall and paint!! 👏👏
-










Frequently asked questions
Have a question about this project?
Very pretty. But splatters still land there, it's just harder to see them. How do you clean the "jeweled" wall? With a sponge?
I would like to do a similar project using old jewellery instead of beads and on a box or jar rather than an area subject to water. Would you have any idea what material I would use to set the Jewellery in. Just mastic or tile adhesive? Obviously grout would not be used..
I cringe every time this one pops up.