Pool Patio Makeover- How We Doubled the Space

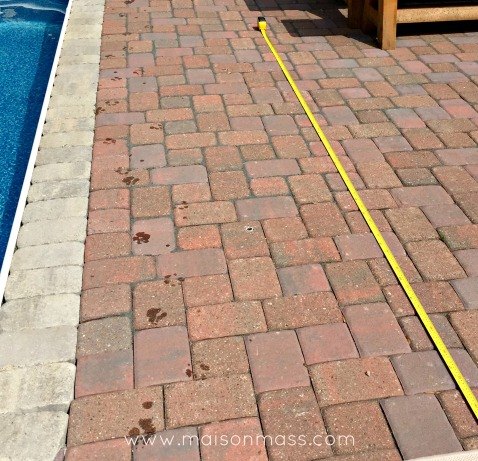
We tackled a project last summer that I was loathe to do, but after years of praying to the Yard Crasher gods to no avail, we plunged into the pool patio project. Our inground pool is surrounded by a paver patio that pre-project resembled an animal pen. By that, I mean the metal fence that runs the perimeter was very, very close, allowing just enough space for two people to pass but certainly not to comfortably seat anyone. I don’t know how it is that I cannot locate a photo of the before, to illustrate how tight it was. However, here is a photo taken afterward, where the measuring tape denotes the end of the former pool patio. Tight, right?
Hometalk Recommends!
There were other issues as well: like popping pavers no longer flush and wily weeds that dotted the landscape. I should add that we love the pool, use it often, and are very grateful to have it, but did also hope to entertain there. So, with misgiving and self-doubt, we undertook the patio project. Mind you, we did price out all our options first – stone, new pavers, and poured concrete. Each was more than we’d expected (naturally) or could rationalize spending.
Onward. We began by pulling up every last paver.
There are a lot of very sweaty, dirty details you needn’t know. Above, we had just started to mortar in new stones around the pool to prevent frost heave around the bullnose edge securing the liner. Below, we’ve created a muddy mess. Where the fence ends is where the old patio ended, abruptly. The dirt below is the now cleared land to be readied for gravel.
Many wheelbarrows of gravel later, we have tamped down the area and readied for sand. More wheelbarrows of sand, tamped down again, then leveled with a level and multiple leveling strings in every direction! We were constantly getting caught up in these strings and losing our footing. Sorry not to have a photo of that!
Long story made short: after purchasing a few hundred more matching pavers, trucking in loads of gravel and sand, and multiple pieces of rented machinery, we relaid all of them, extending the patio another 13 x 25 square feet. We doubled our patio size. New and old pavers were intermingled, so as not to draw attention to the fact that part of the patio was new.
It was a grueling and aggravating project (because of course we undertook it at the start of the pool season, in the heat) but the pay-off was truly worth it and had we waited to have it done professionally, we’d be waiting until our kids were grown. We researched the job online and tried to follow the instructions to the letter, as best we could. It certainly isn’t perfect and a professional would surely attest to that, but we’re not entertaining any professional masons, so its a non-issue.
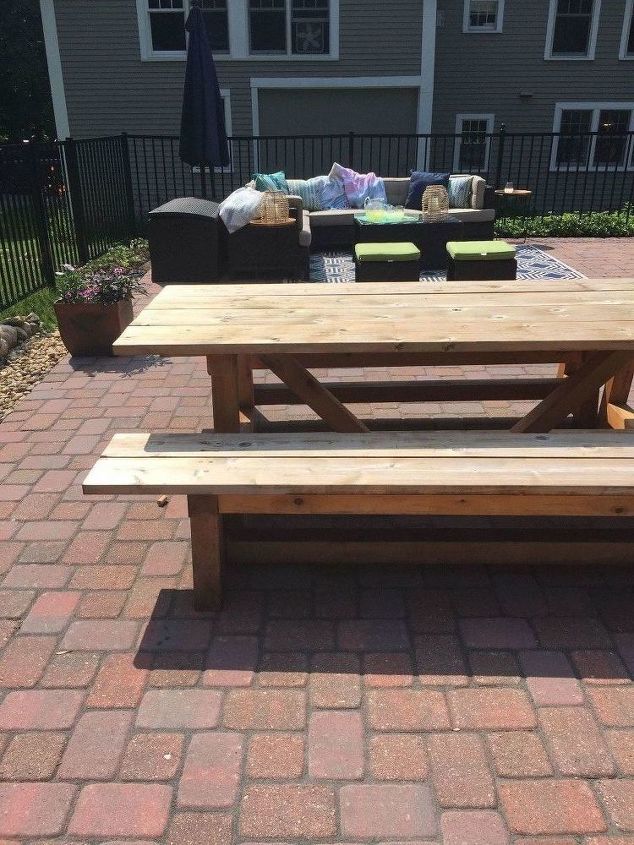
Having extended the patio, we subsequently had to extend the fencing as well. It always seems that every move we make, every step we take .. is dependent on another task being completed first. Scope creep is real. With more space comes more opportunity for entertaining. The first is what is commonly referred to as a chat area. I call it a lounge area (more accurate depiction of how we use it). After many price comparisons, we purchased this set online. These outdoor sectionals aren’t cheap but we decided to regard the expense as money saved, having done the job ourselves.
This set is possibly one of the best furniture purchases we’ve made, maybe next to our living room couch that we’ve lived in for the last ten years. Couches and lounges – clearly that says a lot about our lifestyle, and were this a different type of blog, we might want to explore that. It’s not. We do applaud ourselves often though for our smart purchase.
The rug too, in my opinion, makes the space more cohesive. I found this one at Hayneedle. Amazon and Wayfair also have loads of options.
The second area of the new patio is utilized for eating. My husband had long envisioned building a cedar farm table that would, with age, patina to a natural grey. So, we filled the back corner of the patio with his table and two bench masterpiece. It’s oversized, like the crowd we expected to pack in. New last summer, its still got it’s golden hue.
While we had use of a rented Kubota last summer to tackle the patio, we took advantage of it, searching the yard for things we needed moved, plowed, or overturned. With the Kubota and a trencher attachment, we dug a trench the length of the pool, from the pool house to the far end, on the outside of the fence and ran electrical conduit. I then turned the conduit and ran it under the fence, through my flower bed and through the stone wall, to the patio (pictured here).
What for, you ask? Nothing, yet. A project for another day – the hope being that eventually we’ll actually connect that wire to… electricity. We’ll then have run electricity from the pool house to the back corner patio for .. whatever. To charge my phone perhaps, but just maybe, for that built-in kitchen that I’ve imagined since Matt Blashaw first dangled it in front of me. Blog for another day.
This patio project was laborious and we may have sworn aloud, or at each other, under every breath, but we knew it was only the heat exhaustion talking. And like all awful things, it passes and we forget how peeved we were in the moment. Were it different, we’d each be an only-child.
This undertaking, sweat and swears aside, was absolutely worth the investment of time and money we sunk into it. A professional is preferred: duh. When that isn’t a realistic option though, there are still options. Don’t despair and…don’t wait on Matt; he’s unreliable.
Lisa
Enjoyed the project?
Resources for this project:
See all materials
Comments
Join the conversation
-
 Ski108931915
on Jun 23, 2024
I grew up with a pool with a vinyl liner 16 feet by 32 feet 8 ft deep . Bricks would be too hot on my barefeet when getting out of the pool.Also walking on the surface with all those cracks between the bricks would not be good for bare feet.Fine if you have shoes on. We had a pool for 28 years. In my experience it is better to have concrete for about 3 feet around the pool and then you could out pacers on the rest of the area.You can pour concrete yourself. Our concrete lasted 50 years even after we took the pool out because the wooden sides would have had to be replaced .It made a great garden with concrete all around and lights at night plus a fenced area.
-
-


















Frequently asked questions
Have a question about this project?
You mentioned “pool liner” is that a vinyl liner or plaster like most in ground pools?
I have been looking for months for this exact patio furniture set! Where did you purchase it st please? I love it and need to get something fairly fast. Thanks so much.
Great job, it looks absolutely awesome! The transformation is truly remarkable, and it's clear that a lot of effort. Seeing your beautiful makeover has inspired me to start planning my own pool project. Any reviews of pinch a penny? I've been looking for ideas and inspiration, and your patio makeover has definitely given me some great ideas to consider. Thanks for sharing your amazing transformation!