Turn Your Wine Bottle Into A Beautiful Copper Wire Hummingbird Feeder

Hummingbirds are so pretty and fun to watch. This is a wonderful way to reuse and upcycle empty wine bottles. The hummingbird feeders look beautiful and attract hummingbirds to your yard.
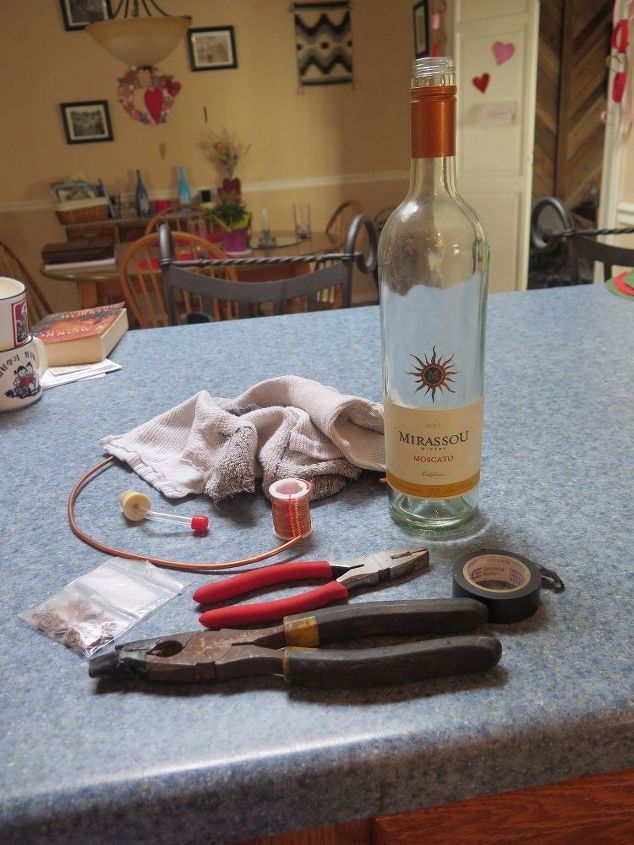
Step 1: Gather your supplies.
You will need
1. Empty wine bottle
2. 4-5 feet of 6 gauge, bare copper wire (sold by the foot or in packages at most hardware stores)
3. red embellishments such as charms or beads to attract the humming birds (DO NOT dye the food you put in the bottle red! It is harmful to the birds!)
4. rubber stopper hummingbird feeder end (can be found online)
5. Optional copper charms to decorate the feeder
6. 20 gauge copper wire (sold at most craft stores for jewelry making)
7. pliers
8. heavy duty wire cutters (or if you had your wire cut to lenth at the store just some regular wire cutters for the 20 gauge wire)
9. electrical tape
10. old rags
11. razor blade or X-acto knife (if your wine bottle had a twist top and so has a metal band like the one pictured)
12. Goo Gone or similar product
To BUY this beautiful hummingbird feeder click here!
Step 2: Prepare your wine bottle.
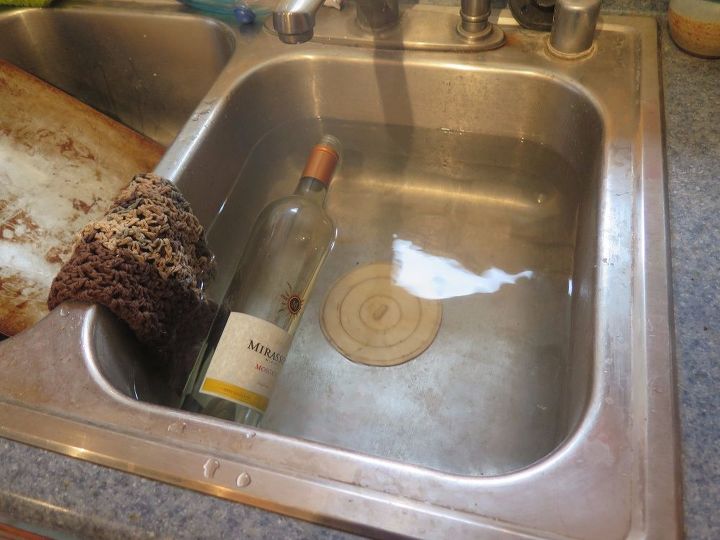
1. To remove the labels soak the bottle in a sink of warm water. Some labels will remove cleanly once soaked other will still need to be removed with your fingernails.
2. If there is still sticky residue once you remove the labels. Use a rag with Goo Gone or something similar to get all the adhesive off the bottle.
3. If your bottle had a screw top use an X-acto knife to carefully cut the metal off the neck of the bottle. This is most easily done as 1 cut from the top of the metal to the bottom.
4. Wash out your wine bottle with soap or place it in the dishwasher as I do to get it really clean inside.
Step 3: Cut the 6 gauge wire into a 4 to 5 foot length using the heavy duty wire cutters. (Some tutorials say to use 5 feet. I did on my first feeder, but decided 4 feet was plenty of wire, but I will leave that up to you.)
Step 4: Wrap the ends of your pliers with electrical tape. This will help keep them from leaving ridges and lines in the copper wire.
Step 5: Using your pliers wrapped with electrical tape and an old rag for added protection for the wire. Bend the 6 gauge copper wire into a small loop ~1 inch in diameter.
Step 6: Take that loop and place it at the top of the neck of your wine bottle. Hold it in place with one hand while using the pliers and rag to bend the wire tightly around the bottle at least once on the neck of the bottle. This will be what keeps the wire from slipping off your bottle so you can hang it neck down.
Step 7: Wrap your wire 2 to 3 times around your bottle creating a spiral look, but leaving enough at the top for a large bend and a hook loop to hang the feeder by.
Step 8: Create your hook loop on the top of the bottle by bending your wire across the bottom of the bottle (If the bottle is not flat on the bottom, but is concave, try and bend the wire into that before creating the curve for the hook. This will make the wire tighter on the bottle.) Then create a large circular spirl loop for hanging your feeder.
Step 9: Embellish your bottle. You need red charms or beads to attract the hummingbirds to your feeder. Again DO NOT dye your food red as this is harmful to the birds.
1. Take the 20 gauge wire and your embelishments and string them onto the wire.
2. Using wire cutters cut off your section of 20 gauge wire.
3. Using pliers wrap the 20 gauge wire with embelishments around the copper wire on the feeder tightly to hold the beads and charms on. You can also bend the ends of the wire into small loops with the beads behind the loops to hold the wire in place. (How much or how little embellishment you give your feeder is up to you, but red put on all sides of the bottle will make it more attractive to hummingbirds)
Step 10: Fill your feeder. (recipes to make your own can be found online or you can buy premade nectar-avoid ones with red food color since it is not good for the birds).Extra nectar can be stored in your fridge for at least a week. Discard if you see mold growth.
1. In order to minimize dripping fill completely, tapping out bubbles and filling to the very brim of the bottle
2. Over a sink, take the feeder end and insert with a twisting motion as you push down
• The nectar should go up the feeder stopper and some should come out the end. This is ok you are trying to create a vacuum seal in order to keep the nectar from pouring out the bottom of your feeder and to minimize dripping.
Step 11: Hang your feeder
The preferred hanging spot is in the shade. Large fluctuation in temperature will cause the bottle to heat and cool and in so doing change its pressure and leak more. It will probably still drip a little, but not much.
It may take some time for the humming birds to notice your feeder. The best time to place it out for the first time is early spring as the birds will be flying around looking for the best feeding places for the rest of the spring and summer.
Step 12: Empty and clean your feeder once a week to prevent mold growth.
To BUY this beautiful hummingbird feeder click here!
DIY home decor using recycled glass bottles
Enjoyed the project?
Suggested materials:
- Empty Wine bottle
- 4-5 feet of 6 gauge, bare copper wire (hardware store (sold by the foot or in packages))
- Red embellishments such as charms or beads (craft store- jewelry section)
- Rubber stopper hummingbird feeder end (online)
- Optional copper charms (online and craft stores)
- 20 gauge copper wire (craft store jewelry section)
- Plyiers
- Heavy duty wire cutters (if 6 gauge wire isn't cut to length)
- Wire cutters
- Electrical tape
- X-acto knife
- Old rags
- Goo Gone or similar product
Comments
Join the conversation
-
 Carol Cole
on Sep 03, 2018
That is beautiful. Thank you.
-
-
 Becky Graves
on Jun 18, 2020
I tap the bottle to get rid of bubbles, fill to the top with nectar, push the cork/tub feeder in, nectar squirts out, tip the bottle over and cork blows out. What is the secret to filling the feeder?
-













Frequently asked questions
Have a question about this project?
I did this once. It looked good, but since water seeks its own level, this continuously leaked. Any suggestions?
Nancy
Couldn't you also paint bottle red using spray paint?
Where can I find 6 gauge wire?