DIY Concrete and PVC Pathway Lights for Under $10

Homeowners pay close attention to how their home looks during the day but many neglect the way it looks after dark. Outdoor and walkway lighting is a wonderful way to increase safety and security around your home but also provides a dramatic boost to your nighttime curb appeal. These DIY concrete and PVC walkway lights will have neighbors slowing down to take a closer look and give your yard a fun and inexpensive glow.
Best quick drying cement!
You Will Need:
- PVC (about 2 ½ feet)
- Quick-drying cement
- Epoxy glue
- Spray paint
- Par lamp holder
- Power cord
- LED bulb
- Plastic bowl (Dollar Store popcorn bowl style)
- Saw
- Glue gun
- Drill
- Dremel tool
Step 1: Create Sleeve
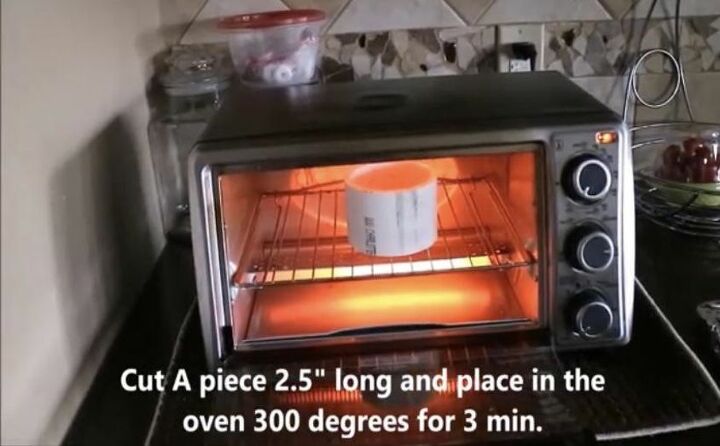
I cut a 2.5-inch piece of PVC and heated it in a 300-degree oven for 3 minutes. Heating this section of PVC will enable it to be stretched over the outside of the other section of the pipe to create a sleeve.
Step 2: Make Cap
Wearing protective gloves, I removed the PVC from the oven and pressed the longer section of PVC into the heated cap. The heat makes the PVC pliable and I stretched the hot piece over the other.
Step 3: Cut 3” Section for Base
To make the base for my lamp, I split a 3” section of PVC down the middle and then heated at 300 degrees for 3 minutes. Wearing gloves, I removed the pipe and opened it flat. After clamping the flattened pipe between two boards for ten minutes, I used a section of pipe to trace two circles and cut out both the base piece for my lamp and a cap to be used in an upcoming step from the flattened PVC sheet. (These circles can be cut using a jig saw)
Step 4: Attach Lamp Base to Base Plate
I mixed and applied epoxy to the lamp base and base plate and clamped them together. I let this dry overnight but you could allow for much less drying time.
Step 5: Glue Base Inside Plastic Bowl
I used a hot glue gun to glue the light base to the center of a plastic bowl and then glued an additional scrap piece to that which I planned to remove later. This extra piece would create a void at the bottom.
Step 6: Mix and Pour Cement
I mixed cement in a 5-gallon bucket and poured it into my plastic bowl mold. Spray the outside of the PVC pipe with cooking spray or coat with vaseline so that it will slide out of the hardened cement. Fill the bowl to the top and press down with gloved hands. I used my hand sander to lightly vibrate the bowl in order to remove all of the air bubbles from the mixture for a smoother finished product.
Step 7: Remove Cement
I wiggled and rotated the center piece of PVC out of my mold, then inverted and removed the hardened cement light base from the bowl. Be certain that the cement has had adequate drying time or it will crack when removing from the mold.
Step 8: Remove Glue and Residue
I used a Dremel tool to clean excess glue and roughness from the inside edges to be sure that my top piece would fit easily and snugly inside the base. Check for fit and continue smoothing until the fit is perfect.
Step 9: Drill Hole and Insert Socket
I drilled a ¾ inch hole in the PVC base for the lamp socket and threaded my socket into the hole. It should fit securely enough to pick up the base by it without coming out.
Step 10: Create Light Opening
I drew a straight line on the center of the long PVC light section and cut out the area that would be illuminated by my bulb. Clamp the PVC to your work table and cut with a jig saw. I drilled large holes on each end of where I wanted my opening first and then cut from one to the other.
Step 11: Smooth Cut Edges
I once again used the Dremel tool to smooth and sand the just-cut edges of the PVC light opening and then went over the surface with a hand sander.
Step 12: Paint Light Components
I slid the body of my light down on top of the bulb and base to test the fit. If you choose to paint the cement base, do so now. I spray painted my base to hide imperfections in the cement and my light silver but the light looks great without paint as well. Just be sure to tape the light fixture before spray painting. I spray painted the interior of my light a glossy black. Let dry.
Step 13: Attach Light Cap and Apply Final Coat of Paint
I used epoxy to attach the cap that I traced and cut earlier from the flattened PVC to the top of my light. I clamped the cap on and then, while wearing gloves, removed any excess epoxy with my hands. I protected the inside of my light and spray painted the exterior silver. Let the paint dry thoroughly.
Step 14: Install Bulb and Attach Light to Base
After my final coat of paint was dry, I installed my LED bulb and covered it with the light. I chose a 60-watt color-changing LED bulb for a fun effect but you can choose a bulb for the atmosphere you are trying to create.
This was an enjoyable and not difficult to create DIY outdoor lighting project that resulted in truly one-of-a-kind walkway lights in our outdoor living space. You can choose paint colors and light styles to suit your taste and design style. These lights would also look amazing as is with the white light on a cement base. The sky is the limit in terms of how to personalize this look.
Have you created DIY lighting in your outdoor space or have tips for how to use unexpected materials for lighting? Share your outdoor living space projects and ideas or find inspiration for how to increase your home’s nighttime curb-appeal on Hometalk!
Enjoyed the project?
Resources for this project:
See all materialsComments
Join the conversation
-
-
 P
on Feb 11, 2024
heating plastic in an indoor toaster oven is releasing toxic vapors into your home- many of which are carcinogenic! if you HAVE to do this for goodness sake plug it in outside & let the vapors disperse more!
-
 Emmawilliams1
on Feb 12, 2024
Was just going to say the same thing. Nice what I could see, but a lot of work for .............
-
-















Frequently asked questions
Have a question about this project?
I can’t find the subscribe button, is this on u tube also?
You went to a lot of steps then we are left hanging. Why not show us the finished product in action? Show us how it looks in your yard. Did all this work just make one?
So I would need to run extension cords all over my yard?