Macrame Lawn Chair

by
Wendy at myfrenchtwist.com
(IC: blogger)
3 Materials
$20
4 Hours
Medium
Upcycle an old lawn chair with bold macrame cording with this easy tutorial! It will become your favorite chair for long summer nights.
Finally this tutorial is done! For those of you who have been waiting for it, I promise your patience will be rewarded once your chair is finished and you’re toting it to the next outdoor concert – having to continuously stop along the way to rake in all the oohs and ahhs.
supplies needed (visit my blog for supply sources)
- one metal lawn chair in need of a face-lift (For this tutorial, I actually ordered a new chair frame, and I love it! It’s large & sturdy.)
- 200 yards of 6mm craft cord
- two size 19/Q plastic crochet hooks
- lighter
- scissors
step 1 – prep the chair
If you are using an old chair, remove the webbing and clean the chair well. For my first chair, I upcycled a vintage lawn chair, and it was fun to see the transformation!
step 2 – getting started
(For this tutorial, I'm using white cording.)
To begin with the vertical weave, place your roll of cording on the floor beneath the chair (& keep it here during the entire weaving process.) Tie a double knot onto the left end of the front bottom bar.
Pull the cording back & under the fold bar, then up to the top back rim of the chair.
**Remember, you will always go under the “fold bar” and always over the top back bar & the bottom front bar.
(1) Pull the cording over the top back bar, (2) then down behind it, creating a “U” loop. (3) Insert one crochet hook into the “U.” (4) Tighten by pulling the loose end of the rope. As it tightens, the crochet hook will act as a “placeholder.”
Next, you will pull the loose cord back down and under the fold bar, (1) then over the front bottom bar. (2) Create a “U” loop. (3) Insert the second crochet hook through the “U” and tighten rope to create another “placeholder.” This is the same procedure as you used for the top bar.
You can also view my video tutorial for this step.
step 3 – chain stitch
From this point on, you will be using the chain stitch to continue with the vertical weaving. You can view my video tutorial to learn the chain stitch; I have also provided a photo tutorial below.
(1) Pull the cording over the top back bar, and pull a “U” loop down behind it. (2) With the crochet hook still acting as a placeholder, grab the “U.” (3) Pull the “U” loop back through the current loop holding the crochet hook. (4) Now tighten the cord, so the crochet hook once again becomes a placeholder. Only now the hook has moved a bit to the right, thus creating a chain stitch.
Now continue this process for the lower front bar, then back under the fold bar and to the upper back bar. Continue making chain stitches in this fashion until all the vertical weaving is complete.
step 4 – finishing ends
When you’ve made enough vertical weaves to fill the chair and are on your last cord, (1) from the point where I am holding the cord in the photo, measure out another 60 inches and cut the rope. (2) Now switch that cord from OVER the top back bar to UNDER it. Thread the end of the cord through the loop holding the crochet hook. (3) Remove the hook and tighten rope.
Following the photos below, repeat this process for the cording for the bottom. (1) After running the last cord down under the fold bar, pull it UNDER the front bottom bar. (2) Then thread it through the loop holding the crochet hook. (3-4) Tighten rope and make a double knot. (5) Cut the end of the cord short, as shown. (6) Using a lighter or match, light the end of the cord. The heat will cause the polypropylene cording to melt. Using the tip of your scissors, immediately press the melting cord tip to the underside of the bar. (7) This view from underneath the chair shows how the cord will fuse onto the metal. (8) Don’t worry; from the top, the ugly fused end cannot be seen!
**This fusing process is the same method you use to hide all the loose cord ends once all the weaving is finished. Or you can seal the end with a match to prevent fraying, let it cool, then weave the end through the underside cords of the chair.
step 5 – horizontal weave
You will weave from side to side to create the chair bottom, using the same process you did for the vertical weave, using your two crochet hooks to create a chain stitch on the two metal side bars.
step 6 – weaving patterns
As you weave cords horizontally, your pattern or design will depend on which strands of vertical cords you cross over or under.
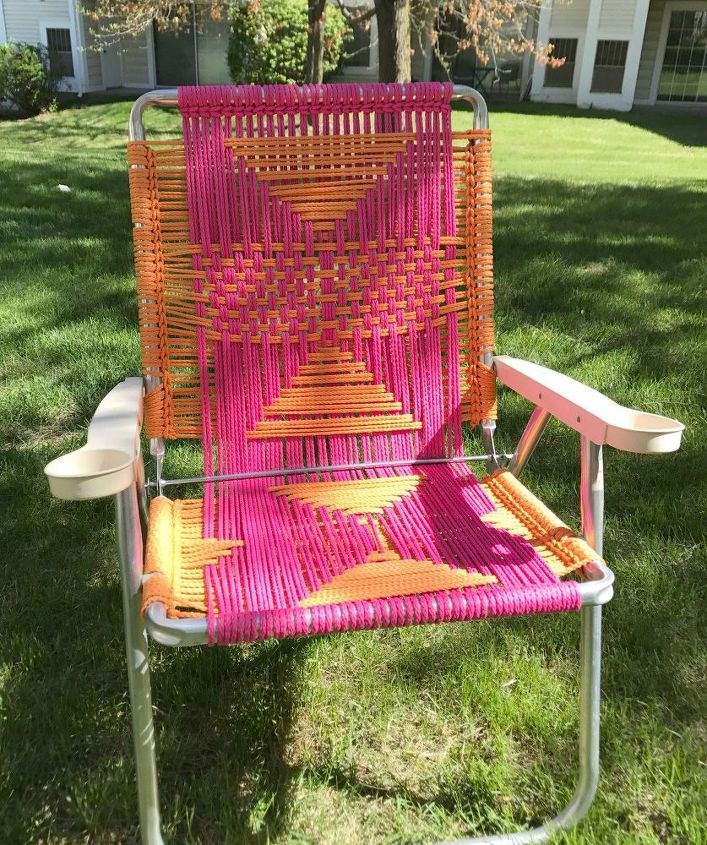
For the pink and orange chair above, I used 100 yards of orange cording and 100 yards of pink. This is the pattern I followed for the chair back:
And I used this pattern for the chair bottom:
Now, I can't wait to see what designs you'll come up with!
Enjoyed the project?
Suggested materials:
- 200 yds. 6mm polypropylene cording (Amazon)
- 2 size 19/Q plastic crochet hooks (Amazon)
- Metal lawn chair frame

Want more details about this and other DIY projects? Check out my blog post!
Published August 18th, 2017 1:35 PM
Comments
Join the conversation
2 of 43 comments







Frequently asked questions
Have a question about this project?
How long did it take you to do this?
Can an iron style chair be macramaed?
How long did it take you to do this?
Can an iron style chair be macramaed?
I am thrilled to see macrame return, many years ago I was addicted. Your colors are fabulous. What about the strength of the weave? Have any idea max weight? And was there no way to cover the metal bar where the seat folds?