Stop PORCH PIRATES With This DIY Mailbox!

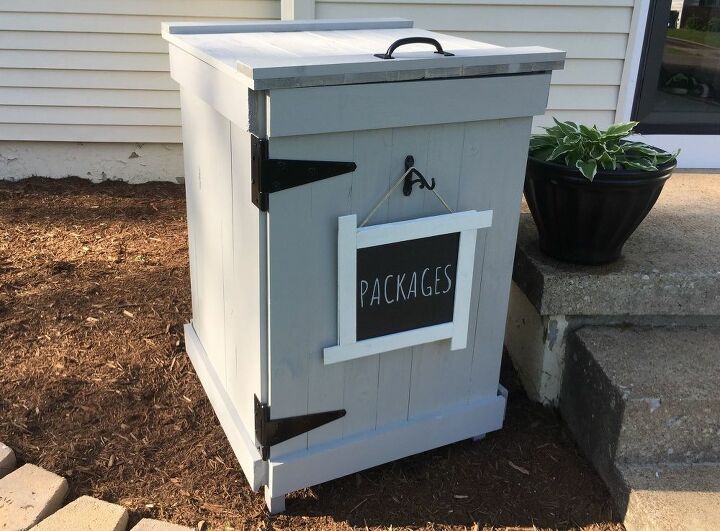
We use online shopping for almost EVERYTHING but porch pirates are putting a damper on this convenience. Even if you have a security system and catch the heinous act on camera, you more than likely never recover your package and have to file police reports, reorder the item, and wait for a replacement. Don't give thieves a chance with a Porch Pirate Proof Mailbox.
Hometalk Recommends!
Affiliate links below (if they make it through the copy/paste)! Proceeds are donated to no-kill animal shelters and rescue organizations. Do your shopping through these links and help animal in need!
You'll need:
* A drill, bits for drilling pilot holes and screws
* Pencil
* Rust-Oleum spray paint
* Drop cloth
* 34 - 3 inch screws
* 16 - 1 and a half inch screws
* 72 - 1 and a quarter inch screws
* Two 8 inch T hinges - Half of the accompanying screws will be used but you'll also need 8 - three-quarter-inch screws. I added washers as well.
* Two 3 ½ inch hinges
* Two small 1 inch hinges
* One handle with accompanying screws
* Four cabinet lid support hinges, two small machine screws that will fit through the hole of the hinge, and two small nuts
* An RFID lock and fob set
* A piece of plywood cut at 21 inches by 22 ¼ inches.
* Depending on the thickness of your plywood, you'll also need 8 screws that'll drive in but not go through the other side.
* For the 2x2s:
You'll need 4 - 40" long pieces and 8 - 21 and a half inches long pieces
* For the 1x4s:
You'll need
6 – 24 inch long pieces
4 - 25 and a quarter inch long pieces
4 - 26 inch long pieces
28 – 36 inch long pieces
2 - 28 1/8 inch long pieces
8 - 27 ¾ inch long pieces
* I also cut one at 21 and a half inches long. Then I ripped this board so I'd have one piece at 1 5/8 inch wide and the other at 1 3/8 inches wide.
Build a frame with the 2x2s. The 40" pieces will be used vertically at each corner and the 21 and a half inch pieces are screwed in horizontally at the top and four inches from the bottom. Drill a pilot hole to keep the wood from splitting and use the 3" screws to secure each piece.
Assembled frame
Using the 24 inch long 1x4s, build the floor of the mailbox. Screw in at each end with the 1 and a half inch screws. Those ripped pieces will fit snuggly at either end so you don't have any gaps.
Next, build two of the sides. Lay out two of the 26 inch long 1x4s and then place 7 of the 36 inch long pieces across them. Ensure you lay each of these out upside down - whatever's facing the floor will be the outside of the mailbox. Center the 7 pieces so you have the same amount of 'extra' on each side. Use the 1 and a quarter inch screws to secure each end of the boards in place.
For the last side and the door, lay out two of the 25 and a quarter inch long pieces the same way. As you place the seven 36 inch long pieces on top, ensure that you have no 'extra' on one of the sides. Use the 1 and a quarter inch screws to secure each end of the boards.
Once the sides and door are assembled, lay the frame down on top of the first side. Line up the top of the frame with the top of your side and secure in place with 3 inch screws. I'm using three screws along the top as well as three along the bottom.
Since my door will be opening from the right, I'm attaching the two sides with 'extra on both ends' to the right and back of the frame. The left side will be attached so the 'no extra' end sits flush on the frame.
Next, build the top. Lay out the two 28 1/8 inch pieces and place the eight 27 ¾ inch pieces on top. Secure in place with the 1 and a quarter inch screws.
Paint the three sided mailbox, the door, the top, and the piece of plywood with the Rust-Oleum spray paint. I'm using their 2X Paint and Primer in Stone Gray. Since it's rated for outdoors, it'll give the wood some added protection. Paint both sides of everything and allow to dry.
Place the mailbox on its back and the door on top so the edge with 'no extra' is lined up with the 2x2. Place the hinge so the knuckle is on the inside and use the accompanying screws to secure the hinge to the side of the mailbox. Use the shorter ¾ inch screws and washers, to secure the hinge to the door.
Stand the mailbox up and place the top so there is no overhang on the back. There should be equal overhang on the sides. Drill pilot holes and screw in the hinges.
Add the handle to the top front of the lid. Center and secure in place with screws.
Run a machine screw through the small holes at each end of the cabinet support hinge to make one long bracket. Secure tightly with a nut. Since gold was the only local color option, I'll be spray painting them to match the rest of the hardware.
The plywood piece will provide blockage when the mailbox lid is opened. To assemble, attach the 1 inch hinges to a 21 inch side of the plywood. Then flip over and secure your long brackets about 3 inches in from the other end.
Place the plywood inside your mailbox and screw the hinges into the underside of the front 2x2 frame. Your plywood should be able to move up and down inside the mailbox but should not be able to move out of the top.
Attach the other end of your long brackets to the lid of the mailbox, about 10 ½ inches in from the front edge.
Finally, install the RFID lock according to the manufacturer's directions.
I love that I don't have to put a hole in the door to secure the lock. And no fiddling with a key either. Simply swipe the fob and the door opens.
No more stolen packages!










Frequently asked questions
Have a question about this project?
Great work. I onder how you can do such a great work in high-hilled shoes? It's amazing. I see that you do shopping online, me too. It's rather cheaper and we don't our time going shopping. Recently I read the article about useful tips of online shopping and I saw that the statistic is arising.
I'm missing something here. How does the delivery person get into the box?
I work for the postal service and this is a great idea, As long as the carrier can have access to the box. Looks beautiful