DIY Mini Cement Balloon Planters

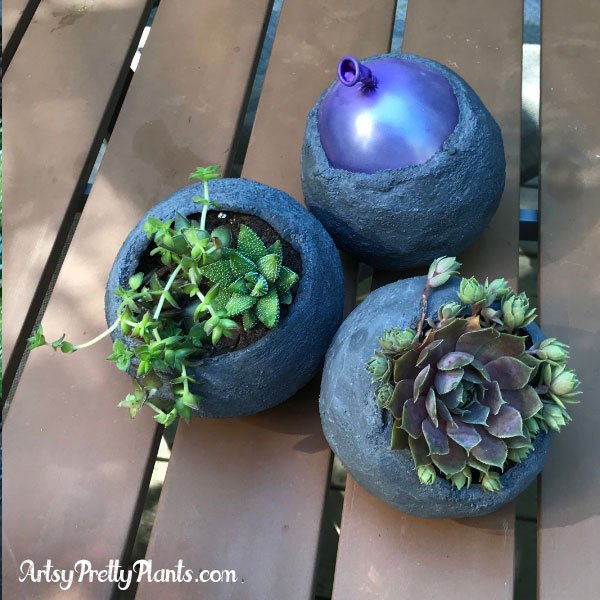
These adorable Mini Concrete Succulent Planters are made from balloons and cement and are easy to make. Darken the cement with colorant for a vibrant contrast with the succulents! These are a spin off of my original on ArtsyPrettyPlants.com.
I started this project out feeling really frustrated. Originally I tried to make these using concrete like other tutorials show, but it was a complete fiasco. Even though I sifted the concrete to get out the gravel, it just didn’t work. I must have popped 5 or 6 balloons in the process.
I also was working outside and accidentally polluted the environment with 4 runaway balloons I was never able to catch- it was really windy that day.
Aargh, I watched a million videos and read tutorials of people making these with concrete and I’m feeling like they have to be faked a bit, because it just doesn’t work.
Cement! It turns out that cement was the key.
When planning the size of your planter you’ll have to consider your balloon size. Make sure the balloon package says “round”. I used round balloons that said 5”. You can use bigger ones in place of the 5″and just blow them up with less air to be smaller, but be careful because they may end up being more oval than round.
Make sure to have everything set up and ready to go because once you start mixing the cement, you won’t have much working time.
Do you love making crafts with concrete and cement? I have a handy Free Pocket Guide you can download, where I compare the different concrete and cement mixes for making crafts! 
Inflate your balloon to a little larger than you want it to be, then push it into a round shape and let some air out. This helps make it round, because even the round ones can get oblong.
Place the balloon in a cup that is weighed down with stones or sand.
Mix up the colorant. Use the disposable measuring cup and add 1/3 of the powder to 2 cups of liquid. If you want your planters to be lighter or darker, adjust the powder accordingly. Now stir it in the measuring cup using a wood popsicle stick.
Once mixed, pour it into the disposable water bottle, put the cap on and shake well. You will want to shake it very well every time you add it to the mix because it separates quickly. If it separates, you will have uneven coloring.
In your big disposable plastic bowl, pour in about 1/2 a cup of water, then add some colorant until it’s the color you want. Add a little bit of cement and mix with your hands. Make sure you wear gloves! Mix the cement slowly, adding more cement as you go. You will do this a few times until the cement is the consistency of a milkshake.
This doesn’t have to be an exact science, just play with it. If it gets too thick, add water. If it’s too thin, add cement. You can also just add only the colorant as you are mixing if you still need the cement to be darker, but make sure to mix it well.
This cement is rapid set so you need to work quickly. If your mixture starts getting too thick as it starts to cure, you can add water to thin it. It’s important to keep the color consistent so make sure you add the appropriate colorant amount.
*Hint- When you are done making these, you can keep the bowl and re-use it by gently pushing on the sides of the bowl. The cement will crack and you can throw it away. Do not wash these, cement will ruin drains.
Start with the tied end of the balloon facing downward. Scoop the cement onto the top balloon and start molding it and work your way around, shaping and smoothing as you go. You can keep wetting the cement or your hands as you are sculpting, and also add cement to any areas that it may need to be built up.
Be careful not to let the cement touch the edge of the container or strainer or it will cause a bump. The second side will be easier, so don’t worry about trying to get the first side fully covered, a third will be good.
**Do you want to learn how to add pigments to concrete and learn about the different types and methods? Then yo may want to check out my Concrete Pigment Tests! I even talk about how to color cement after it's cured. 
Immediately after you are done, carefully use a Q-tip to press a few small holes for drainage, just sort of spin the tip to create the space. You may need to wet the Q-tip to get the holes free of cement.
Let the cement dry. In this photo you can see each of three I made at different stages, including a finished one from the original Cement Balloon Planter project (click my website link below to see that!).
It should take about 1 hour to 1 1/2 hours depending on climate conditions, then you can pop your balloon. If you wait too long to pop it, the balloon may be more difficult to pull out and could stick to the cement.
To pop it, just use scissors and snip the tied piece, then pull out the balloon.
You should reinforce the balloon by adding more cement inside. Mix up some more cement into a slurry so it is thinner than you made it before. This makes it easier to pour in and coat the insides. After pouring it in, just roll the planter back and forth till the edges are coated.
Make sure to keep your drainage holes clear, use the Q-tips again if you need to. I made mine about 1/4-1/2″ thick on the bottom, then built up the sides just a bit. Your planter may be durable enough without this step, but better safe than sorry.
Now go ahead and plant some succulents in your new pots!
Enjoyed the project?
Resources for this project:
See all materials
Comments
Join the conversation
-
 Sue81698581
on Jul 07, 2023
You could also coat with pottery clay
-
-
 Sue81698581
on Jul 07, 2023
I will try using pottery clay.
-












Frequently asked questions
Have a question about this project?
Why not to improve the process? To paste the balloon over with paper and its vulnerable surface will not contact with alkalic concrete? To use fiberglass lath and you will not need thick coat of concrete. To mix water for concrete with some PVA glue (5 - 7% of glue to the volume of all water) and your concrete mixture will be ductile and reinforced with PVA corpuscles.
Hi, this is a totally unrelated question, but, where did you find such a clear, plastic bin?
I've tried this using plastic pots instead of balloons on a different project. As the cement it cracked and fell apart. Was it too thick??