Cantilevered Pergola -- DIY Designed and Built

Read about our self-designed and built cantilevered pergola built for around $400.
We just had a new composite deck installed and wanted a pergola to cover a portion of it. My husband, Craig, designed this one and set to work with just the plans in his head. It is cantilevered, thus supported by two legs on the outside of the deck, in order to be more sturdy and stable than one attached to the top of the deck. It is attached to the side of the deck as shown in my blog post. No kits were available for this type of deck, so he purchased the materials from a nearby lumber yard.
When the deck was being built, we had the contractor attach two 24-inch all-thread bolts into the deck’s foundation so he could use these to anchor the two legs of the pergola. In the photo above, you see one of those bolts sticking out from the side of the deck (bolt is just above the far-left end of the lattice in the lower portion of the photo above…just to the right of the center).
The second foundation all-thread bolt is shown above between the little strip of lattice and the steps on the right side of photo. Craig would use these two bolts to attach and stabilize the main support legs of the pergola.
He’d pre-drilled the hole in the lower portion of these support legs and slid them onto the large all-thread bolts that extended from the deck. He’d previously dug-in two 6-inch post footers directly underneath the all-thread bolts. The support legs and first braces go up. Craig had pre-drilled most of the holes for the carriage bolts and lag screws.
Additional supports are added to serve as counter-weights since the rafters extend 7' over the deck without supports on the other end.
Notches were cut on both ends of the cross-pieces. He used carriage bolts and lag screws to connect all of the supports.
Once the seven rafters were in place, Craig measured the distance between them and moved them as necessary to even out the spaces at roughly 16″ on center. He toe-nailed a 3″ exterior wood screw into each of the seven rafters on the outside notches to secure them.
Later he added 10 8′ 2″ x 2″s to provide a little extra shade and additional support for vines to cling to in the future. (see last photo below)
He spent $400 on materials. Kits for traditional pergolas begin around $800.
See additional photos in the Comment area.
Materials List Item Quantity 6” x 6” x 10′ pressure treated post 2 4” x 6” x 10′ pressure treated post 3 2” x 8” x 10′ pressure treated board 4 2” x 6” x 16′ pressure treated board * 7 1/2” x 10” carriage bolt 20 1/2” nut and washer for carriage bolt 20 1/2” x 8” lag screw 20 1/2” x 6” lag screw 4 6” post foot 2 Concrete for 2 post footings Total with delivery ~ $400** * Note: number of 2” x 6” x 16′ boards may vary from 7 – 10 depending on desired spacing between rafters. We used just 7 for rafters 16” on center. My husband pre-drilled holes in the boards and laid them on the garage floor in the manner in which they would be put together. He could also mark the angles for his cuts for the smaller support pieces with everything on the ground. I hope this helps anyone who might be interested in building this pergola.
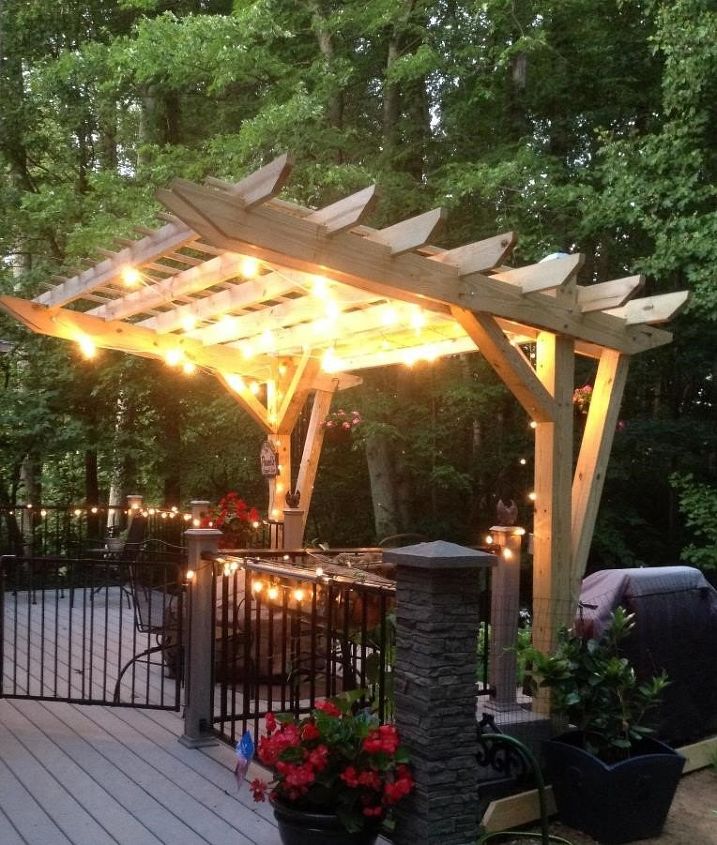
We added commercial globe string lights from Save-on-Crafts so we can enjoy the deck at night.
Craig later stained the pergola and planted non-invasive American wisteria in pots next to each post. Here you see it in 2018 (pergola built in 2015) after we redesigned the screen porch, had the house re-sided and cut down the giant cedars that were blocking the view of the southern Virginia mountains.
Enjoyed the project?
Suggested materials:
- See materials list in the Comments section along with additional photos
Comments
Join the conversation
-
 Brian
on Aug 17, 2024
Like others here, I was inspired by your wonderful design to create something similar of my own. Getting close to finished. Many thanks for sharing details, Sue; a huge help!

-
 Sue P.
on Aug 17, 2024
Brian, your pergola looks great! So glad our plans and post could be an inspiration to you. We're still enjoying ours -- it's covered in wisteria vines year-round. We planted them in a big pot, one at each of the two supporting posts, so it doesn't spread along the ground.
Thanks for sharing your pergola with us!
-
-
-
 Saloumbufing
on Oct 09, 2024
It’s impressive that Craig designed the pergola himself. When we did our outdoor space, we faced a similar challenge. We built a small gazebo to create some shade, and I was amazed at how much we saved by sourcing materials locally. It’s nice to have a spot to relax outside. I also got some inspiration from victoriaribeiro.com.br; her architectural style really helps bring a touch of elegance to outdoor designs. Having a unique structure like that can really enhance your space, and it's so rewarding to see your vision come to life.
-










Frequently asked questions
Have a question about this project?
Thank you for answering my question. I have another, the pressure treated wood that you used I never see that color I only see the dark red at Home Depot where do you find the pressure treated wood of the color you used
Is there a way to modify and use corrugated metal roofing instead of open rafters for a vine?
How wide is your cover?