DIY Cube Storage Makeover: Under $20

DIY Cube Storage Makeover: Under $20
Give your cube storage unit a major makeover that cost less than $20
Who else currently counts toys as part of their home decor 😅
Hometalk Recommends!
We just can’t seem to get away with not having every toy Eli owns all over the living room floor…
If you have been following along with our living room makeover, you know that finding a way to store Eli’s toys was big on the priority list!
Originally his toys were put into an old laundry bin in the corner but that just wasn’t really cutting it.
So I decided that we would put our old cube storage unit to good use!
But first it needed a serious makeover because as is it’s just plain boring.
Some affiliate links provided see our policies here
Supplies:
- (2) 1x3x8 Pine Boards
- Scrap Piece of 2×4
- Paint
- (1) Edge Glued Panel Board
DIY Cube Storage Makeover
I did not hate the color of our cube storage unit, so I left that alone.
But if you are not a fan of yours, you can easily paint it with an oil based paint!
I definitely recommend priming it first if you are going that route.
The first thing I tackled was building a base for the cube storage unit.
Getting off the floor is what is going to really make it feel like a real piece of furniture.
Building a Base
I started by cutting the 1×3 boards to the length of my unit minus 4 inches ( I want the base set in a bit)!
Next I cut the side pieces out of the leftover 1×3.
Again I wanted them to be inset so I cut them the width of the cube minus 4″.
The legs of the base will be cut out of scrap 2×4, cut them 1″ wide.
Now I got a little fancy & drilled pocket holes at each end of the long boards.
If you don’t want to mess with pocket holes you can use longer screws & attach the base from the outside.
After the pocket holes were drilled, I attached the long sides to each foot, followed by the short sides.
Extra points if you also use a little wood glue before attaching, I might have forgot to do that step…
The pine boards I am using were a little rough so I lightly sanded them with 220 grit sandpaper.
After that I primed the base with white primer.
Then I used flat black spray paint as my final color choice!
Adding a Top
While the base is drying, cut the board for the top of the cube storage unit.
For our top I went with panel board.
I cut it two inches longer than the cube storage unit so there would be a little overhang.
Mine cut easily with a circular saw but a miter saw would work too!
After it was the correct size I primed & painted it to match the cube storage base.
Assembling The Pieces
Attach the base first, it’s easier if you flip the cube storage over, set the base on it, & drill from the inside of the unit up into the base.
1-1/2″ wood screws worked great for me.
Next, flip the unit over & attach the top.
Use wood glue & 1-1/4″ screws drilled in from inside the cubes so that they aren’t noticeable.
If your new DIY cube storage unit isn’t going to get harassed by a toddler, the wood glue might be enough to hold it in place…
Finishing Touches
Finally it was time for the organizing cuteness part!
I bought this set of matching linen bins for the bottom shelves.
These are perfect for the billions of blocks & other toys that are best left unseen.
The rope baskets are where I store all the things that are his current favorites so that he doesn’t have to go digging, that would be good for no-one.
Plus they feel the most durable for daily toddler hands.
I added in these woven baskets for a little texture & to store the miscellaneous living room items.
You can find more of my budget friendly storage baskets & bins here!
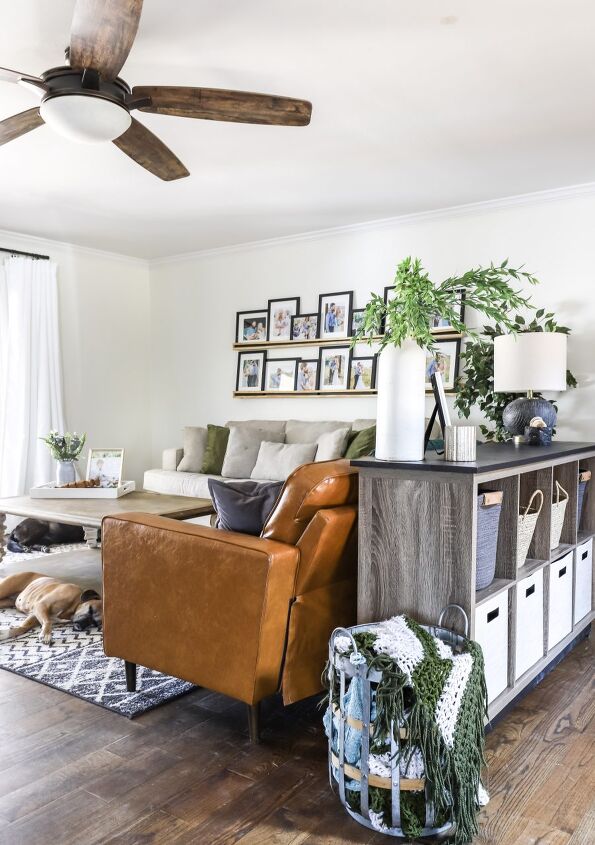
This little cube storage unit got a major glow up & looks like expensive furniture now!
Plus it is serving a very high purpose & our living room doesn’t have to look like Toys R Us threw up in it.
This little DIY makeover was pretty cheap too, even if you count the baskets!
Budget friendly storage solution that also looks like high end furniture, I would call this DIY cube storage unit makeover a success!
Let me how you like to store the not so pretty items in your home.
Follow along with the rest of our living room makeover here!
Enjoyed the project?

Comments
Join the conversation
-
 Krafty Mrs.K
on Mar 09, 2022
Adding the base was a big up grade.
-
-
 Kim Westwood
on Mar 06, 2023
Now that looks amazing. Nice work
-










Frequently asked questions
Have a question about this project?