DIY Concrete Overlay Counters #Spring2020Refresh

Hi again!!! I’ve gotten so many questions over the last year about my countertops, so I’m finally going to share it! I’ve hesitated to share this project for a long time, because I had some fails and couldn’t recommend it. However, after having these countertops for almost 15 months, I think I’ve worked out the kinks.
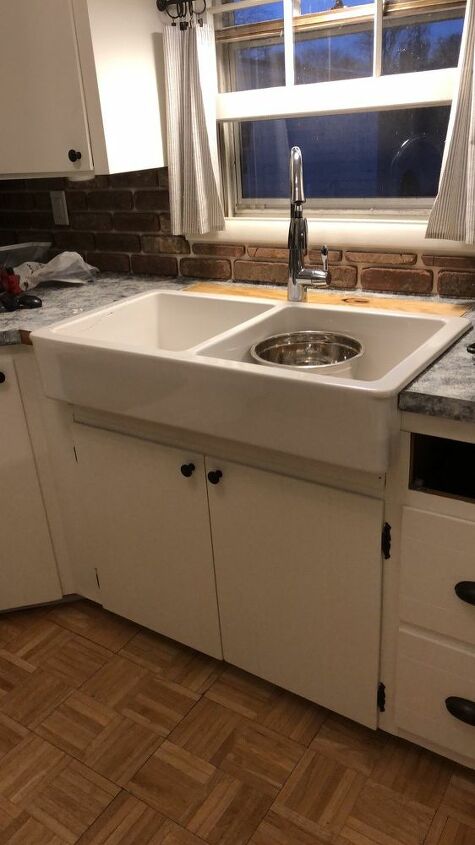
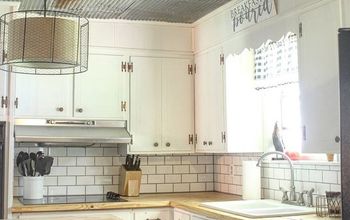
So originally, our kitchen had a metal sink. When I decided to upgrade to a farm sink, I knew we needed to either change the counters altogether or figure out a work around. We weren’t ready and still aren’t ready to invest in a real stone though, so we decided to fill the spot behind the new sink with a piece of wood and then resurface the counters for a cement look.
To get the stone look, I decided to go with this product by Ardex called Feather Finish. It comes in white and gray. I chose the white. It’s a powder and very easy to work with. I just scooped some of the powder out of the bag with an old laundry detergent scoop into a disposable cup and then added water to it. I used those plastic bondo spreaders pictured to spread the mixture onto my counters. I didn’t have to do any prep to my counters other than wipe them down. I did my whole kitchen with less than one bag of the Feather Finish.
I found the consistency that works best to spread the mixture on my counter was like a drywall putty or a room temperature frosting. I made sure to work in small batches, because the mixture tends to dry up fast. If I accidentally added too much water, I would just let it sit a few minutes and it would thicken on it’s own, rather than adding more powder and having to waste more later.
Application is so easy - I literally just scooped the mixture out onto my counter and spread it around. I did try to spread it as evenly as possible though, to minimize sanding later.
There’s no right or wrong way to apply - just try to get even coverage. You also don't need to spread the mixture in all one direction. For the front and sides of the counters, I had to make a couple extra passes with my spreader to get good coverage on the 90* angles. I would spread along the top of the counter and then go to the front and sides, then back to the top, front and sides to smooth out any extra product. The product sets up pretty quickly, so you will be able to smooth out any rough areas on the edges as it thickens.
The total dry time between each coat is only a couple of hours, depending on the temperature in your house.
You can stop whenever you achieve the look you want. I found that applying the mixture more messy and in different directions if you want more texture is helpful. To see more of this process, visit my story highlights on my Instagram titled ‘Concrete Overlay Counters’.
When I had good coverage, I sanded everything with 220 grit sandpaper. If you have a sander that hooks up to a vaccuum, make sure to use it!!!
I hand sanded the edges, so I wouldn't go through to the original finish but I still did in some spots. I touched up those little areas with some white paint and it matched perfectly. I used Sherwin Williams Alabaster.
Once everything was smooth, I sealed the counter with polycrylic. I did 5 coats, but later realized I should have sealed more around the sink and stove where things splash and splatter.
They turned out so good!
Here’s a closeup of the stone-look texture.
Adding the sink back in! My hubby broke our first farm sink when he was installing it (we think it may have had a hairline crack that we missed or something), but IKEA sent us a replacement! If you’re considering the IKEA Havsen sink, I highly recommend it!
Okay, here’s where the fails come in! I didn’t baby these counters at all after I finished them and quickly learned that the two areas on either side of my stove were my problem areas. I had many spots where grease would splatter and stain the counter and a larger spot where I set a paper plate that bacon grease had leaked through. A nice shiny new counter with random stains looked dirty and like a failure to me, so I would chip out the stains with a metal scraper and fix them after just a couple months.
The beauty of DIY is that you can fix these issues though. It was really pretty easy, just chip out the ugly spots, add the Feather Finish mixture, sand and seal.
Looks brand new again.
After doing this process a few times, I decided to switch my sealer to this outdoor product. I used this on my outdoor furniture and it has held up well, and I think it does a better job on the counters as well.
Fast forward to today, I still love these counters! I mean we’re talking like $60 here, guys!!! The Ardex Feather Finish was $40, a can of sealer is like $15 and the little spreaders are a few bucks. To see more views of my kitchen, visit my Instagram.
These counters have held up great. I don’t have any chips or anything like that. We slam things around and slide things all over. We spill and cook and hand wash dishes daily. I could probably use another coat of sealer around my sink, as standing water degrades the poly. The finish around my stove has ‘seasoned’ like real concrete, from the heat and splatters. I’ve also learned a few tricks to prevent stains - I use a splatter screen or lid on top of my pans 90% of the time. If I cook bacon, I don’t set the greasy paper plate on my counter. If I get a stain, I put rubbing alcohol on it right away, this seems to help break it down. So, if you’re looking for a cheap upgrade, this project may be for you! If you are someone who will not want to reapply a coat of sealer every year, you will probably hate these.
Enjoyed the project?
Resources for this project:
See all materialsComments
Join the conversation
-
 Erika
on Mar 05, 2020
Love the counters!!!! But loving the brick even more! It looks as if they weren’t white washed in one or two photos and then in others they seem to have been white washed-is that right or am I losing my mind??? Lol I want to do our kitchen and /or accent wall in our living room the brick look but don’t have a clue how or what to get started so any & all info would help! Thanks!!!!
- See 1 previous
-
 Lisa House
on Mar 08, 2020
I did a wall for my mother many years ago. I bought the thin bricks by the box from Lowes, sanded the wall a bit to help everything stick, applied mortar and the bricks. The wall was still there after 20+ years.
-
 Brooke | craftingupcuteness
on Mar 11, 2020
The backsplash wasn't grouted in some of the photos is all.
-
-
 K. Rupp
on Mar 14, 2020
WOW what an amazing project! I love this idea. How cool! We redid our countertops using something called envirotex (epoxy resin pour). That was more expensive to do but it is nice knowing we can live with old countertops and redo the surface and still have a kitchen makeover without the expense. I will point to your project whenever I see this question come up in the forum. Great tutorial and great job!!!
-
 Brooke | craftingupcuteness
on Mar 27, 2020
Thanks so much!
-
-












Frequently asked questions
Have a question about this project?
Does anyone know if this would work on an old fiberglass tub and surround? I removed my shower doors and now my tub (top) looks awful!
Yes!
Were the counters underneath Formica?
Thanks,
Betty Jane
Do you think this would work on tile countertops? I’m loving your kitchen and am completely inspired by how beautiful yours is.