


Trash Can Rain Barrel DIY: Easy Rainwater Collection for Under $30
If you’ve been eyeing those fancy rain barrels online but can’t justify the price tag, this DIY is about to change your mind.
I'm going to show you how to build your own functional (and leak-proof!) rain barrel using just a lidded trash can, a few plumbing parts, and some waterproof silicone.
It’s clever, affordable, and honestly? Kinda fun to put together.
This post was transcribed by a member of the Hometalk editorial team from the original HometalkTV episode.
Tools and Materials:
- Lidded trash can (plastic)
- Outdoor spigot with nut
- Rubber washer
- Waterproof silicone (outdoor-safe)
- Scrap piece of mesh or screen (like old door screen)
- Scissors
- Power drill with spade bit
- Wrench
Hometalk may receive a small affiliate commission from purchases made via Amazon links in this article but at no cost to you.

1. Drill the Spigot Hole
Start by figuring out where your spigot should go (as low as possible on the trash can), so it can drain fully.

Using a spade bit, drill a clean hole in the side of the trash can.

2. Prep and Attach the Spigot
Trim the rubber washer so it fits snugly on your spigot.


Add silicone around the spigot’s base and push it through the hole from the outside.

On the inside, sandwich the washer in place and tighten everything with the nut.
A wrench may help get it fully leak-proof.

3. Make the Lid Catch Debris
Flip the lid and drill a few small holes in the top, enough for water to get in, but not so many it weakens the structure.

On the inside of the lid, press a piece of screen over the holes using a ring of silicone.

Add another layer of silicone over the top edges to “sandwich” the mesh and keep it in place.
Let everything cure for 24 hours.

4. Set Up and Test
Once dry, set your new rain barrel under a downspout or wherever water naturally collects.

Pour some water on the lid to test your setup. You should see water drip in and flow smoothly out of the spigot when opened, with no leaks.

Add a short hose if you'd like and you’re good to go!

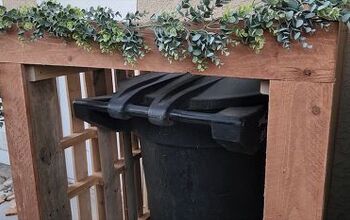
Looking for Another DIY Rain Barrel Style?

Why This Trash Can Rain Barrel DIY Works So Well
Sometimes the simplest ideas are the most effective. This rain barrel DIY takes common materials and turns them into a smart water-saving system that’s compact, functional, and easy to maintain.
If you’ve made your own rain collector or have ideas to improve this setup, drop a comment and let’s keep the DIY rainwater hacks flowing!

Comments
Join the conversation
-
You can dress up a pig.. but it’s still a pig
-
Thanks Becky!


Frequently asked questions
Have a question about this project?
How long are u leaving the rain water in the trash can l use the rain water as soon as possible
What is rain water used for?
What on earth is a spigot? Do you mean a water tap?