How to Dye and Personalize a Rug – Simple DIY Rug Craft

Got an old rug that needs a fresh look? In this rug craft project, we'll take an old or stained rug and give it new life.
By following these simple steps, you'll learn how to dye a rug with Rit and add a personal touch with handmade tassels.
Whether you’ve just picked up a second-hand rug or want to give an existing one new life, this project will help you create a unique piece for your home in no time.
This post was transcribed by a member of the Hometalk editorial team from the original HometalkTV episode.
Tools and Materials
- Old rug
- Rit fabric dye (color of choice)
- Boiling hot water
- Spray bottles
- Gloves
- Yarn
- Scissors
- Darning needle
- Small bowl for mixing dye
- Cloth
Hometalk may receive a small affiliate commission from purchases made via Amazon links in this article but at no cost to you.
1. Prepping the Rug for Dyeing
The first step in this rug craft project is preparing the rug.
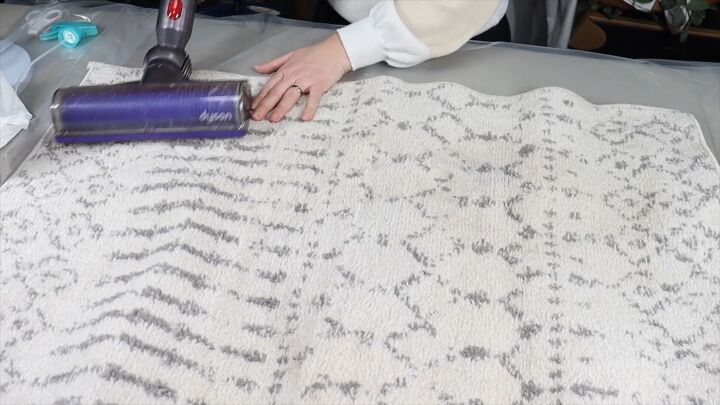
Begin by vacuuming it thoroughly to remove any dirt, debris, or hair caught in the fibers.
This ensures a clean surface for the Rit dye application.
Next, fill a spray bottle with water and lightly mist the rug. It’s essential to dampen the fibers before applying the dye, as this helps the dye absorb evenly.
For best results, focus on full coverage across the rug's surface.
2. Mixing the Dye
For this project, I used Rit fabric dye, following the manufacturer’s instructions on the package.
To dye your rug successfully, use boiling hot water when mixing the dye. This ensures the pigment will adhere better to the fibers.
Carefully pour the dye solution into a spray bottle for easier application.
Pro tip: Make sure to wear gloves while mixing the dye and throughout the entire dyeing process. In my excitement, I skipped this step initially and ended up with dye-stained fingers. Learn from my mistake!
3. Applying the Dye to the Rug
Using the spray bottle, begin applying the dye to the rug in even strokes, covering the entire surface.
You can also use a cloth to blend the dye into the fibers by rubbing it in gently. This technique helps the dye distribute more evenly.
If you’re aiming for a deeper color, consider applying a second coat.
Let the dye set for a while, ensuring the desired color saturation before proceeding to the next step.
4. Making Tassels for Your Rug
While waiting for the dye to dry, you can start making tassels to attach to the rug's edges. Here's how to make the tassels:
Wrap the yarn around your fingers several times to the thickness you want for each tassel.
Cut a separate piece of yarn and tie it at the top to form a knot.
Tie another knot a little lower to create the "head" of the tassel.
Use scissors to cut the bottom loops, creating the tassel’s frayed ends.
Repeat this process to make several tassels.
You can decide whether you want tassels of uniform thickness or a mix of sizes for added texture.
5. Attaching the Tassels to the Rug
After crafting enough tassels, it’s time to attach them to your rug.
Lay out the tassels along the ends of your rug.
Thread the end of each tassel onto a darning needle, push it through the rug's border, and tie it securely.
I alternated between light and dark tassels to add a subtle ombré effect.
Trim the excess yarn to ensure all tassels are the same length.
Continue attaching them evenly along the rug’s border for a finished look.
More Rug Crafts You’ll Love!
Transform an Old Rug With This Easy Rug Craft Tutorial
Once the tassels are secured, give the rug time to dry completely. I placed mine in my entryway, where it now adds a cozy bohemian feel.
While my dye application wasn’t perfectly even, I love how the color variation adds uniqueness to the piece.
Completing this rug craft not only saves you money but also gives you a one-of-a-kind piece that adds a personal touch to your decor.
By following this guide, you’ve learned how to dye a rug with Rit and how to make and attach yarn tassels to create a stylish, customized rug. The possibilities for future projects are endless now that you’ve mastered these techniques.
Don’t forget to share your creations and ideas in the comments—I’d love to see how your project turned out!
Enjoyed the project?













Frequently asked questions
Have a question about this project?