Make LARGE Canvas Wall Art for $14

Recently, I created a statement piece of art for my living room makeover. Not only does artwork cost a lot, but even just buying a large canvas (mine measures about 90″ long!) would cost an artist hundreds of dollars. Well, I’m very frugal and could not see spending money on something I could potentially do myself. Fortunately I have some artistic skills and a table saw so I was able to make this large canvas wall art for only $14.
We want to help you DIY, so some of the materials in this post are linked to sellers. Just so you know, Hometalk may collect a small share of sales from the links on this page.
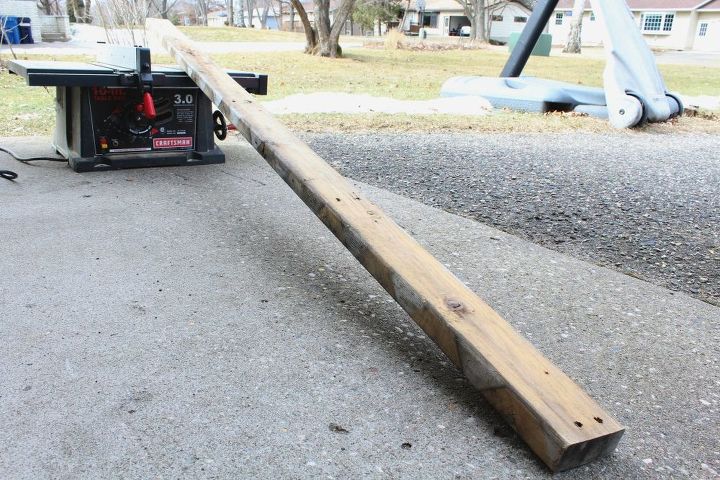
So the first thing I did was find the longest 2 x 4 I had in my scrap wood pile. I had found and purchased this 2 x 4 at a garage sale last summer for $1 and it measured 89″ long. I used my table saw to slice it in half the long way so that I had 2 x 2 boards of that length.
Then I did the same with two other 2 x 4 boards that were a shorter length, ripped off a pallet I found for free. These I measured at 44″ long.
Next I drilled two screws into each end to connect all the boards together. I used my square about a million times and was sure to work on a flat surface. I also cut 45 degree angles on a few flat boards from that free pallet to use later as corner supports.
The “canvas” is actually a white window curtain. Remember the new white curtains in my living room makeover? Well, those $20 LENDA curtains from IKEA came in packs of two panels, but I only needed three. This is what I did with the fourth panel.
I used my air compressor with the staple gun attachment to staple the fabric to the wood frame.
DIY large wall canvas Be sure to staple one end and then its opposite so you pull the canvas very tight. Leave the corners for last.
All stapled up, the corners were bulky, but I did my best!
Then I stapled on the corner support to help the frame maintain stability.
When building your DIY wall canvas, be sure to attach corner supports to add stability. I screwed little pieces of metal hardware to string a heavy duty wire through. I didn’t buy these, I hammered something flat I already had laying around my garage.
Sorry there’s not a picture, but at this point I went to Walmart and bought 10 ft of picture hanging wire for $2 and strung it through the black hardware across the back of the frame. This distributes the weight of the canvas (about 30 lbs!) across the wood and makes it easier to level when hanging on the wall (you just slide it along the wire).
This is snapshot from when I was in the process of painting. As you can see, the only place on the floor big enough and clear for me to work was in front of our patio door. In this photograph, you can see the frame through the canvas, but when it’s against the wall the fabric was not see through.
I used materials I already had to paint this piece: acrylic latex wall paint (the same I used to paint the coffee table and the beige from my living room walls), acrylic craft paint, some Plaster of Paris added to my teal paint to give texture, and silver water soluble ink to do the metallic drips you see below.
It took me about 9 hours to paint this piece, I had the idea envisioned for a long time. If you're curious, come see the other abstract painting I created that I used to have hang in my living room.
Be sure to come visit my blog to read about the concept behind this abstract work and see my whole living room design!
Affordable Ways to Update Your Home
Enjoyed the project?











Frequently asked questions
Have a question about this project?
What exactly was the fabric in the curtain panel?
Is the Plaster Paris powder?
Do you wait to paint in-between colors and plaster Paris?
Oh yes I would use colors light brown and med forest green.
Love your work .I also live in northern minn