Hide Ugly Outlets & Thermostats

Almost every home or apartment has that one weird thing on the wall. Maybe it’s a thermostat. Could be an old phone jack. Might be some bizarrely-placed outlet. Whatever it is, it’s probably unsightly. Like an unfortunate mole on your otherwise beautiful wall. Thankfully Kyle Schuneman is back with another 2BHack to save the day! Kyle shows you how to quickly and easily use a canvas art print to hide your ugly wall items. Plus you’ll make your wall prettier than ever! Bonus: extra hidden storage space.
See the full video tutorial below!
Step By Step Guide:
In this guide we’re going to be using a canvas art print to hide some ill-placed outlets and old phone jacks! This tutorial is ideal for our canvases thanks to their deep, solid wood frames. This leaves room for the wall objects to remain hidden without pressing against the back of the artwork. You can also try this with other types of artwork! Let your creativity run wild!
Step 1:
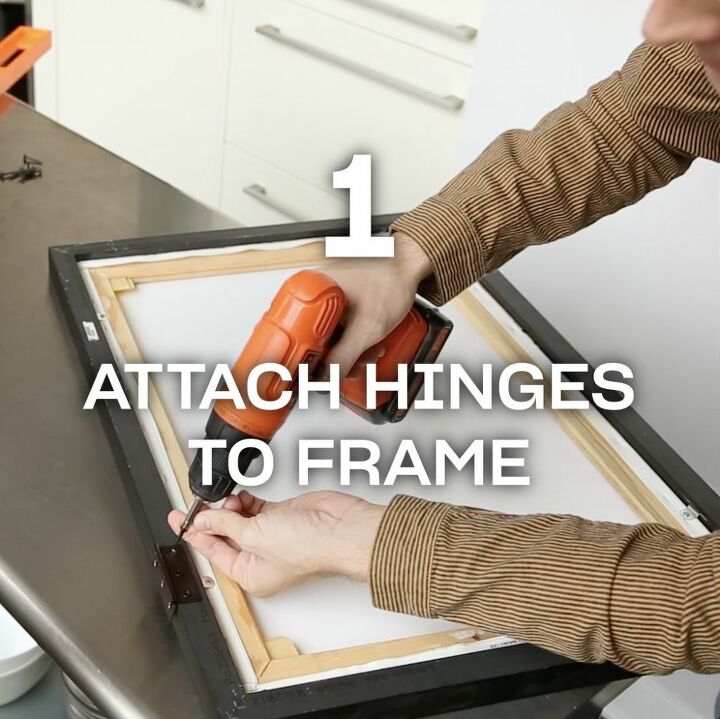
Lay your canvas print flat on a table top. To protect the artwork you can also lay down a blanket or towel first! Line up your hinges so that they sit flush along both edges. Drill screws through each hole in the hinges. Make sure your screws are shorter than the width of the frame so that you don’t accidentally drill clear through to the other side!
Step 2:
Now it’s time to attach the hinges to the wall. Use a level or other tool to insure that your hinges are straight and vertically-aligned. Kyle uses a professional level, but even a free iPhone app will suffice! You’ll want the artwork to cover the ugly wall units so choose your placement appropriately! Test out the hinges first to insure your positioning doesn’t become obstructed when opening or closing the art. Use a pencil to mark where the hinge holes line up on the wall. Now drill your next 6 screws through the hinges and into the walls. If your artwork is light enough you won’t need to hit a stud. If you have a very heavy frame then try as best as you can to mount the hinges into a stud!
Step 3 (Optional):
Now that your art is attached to the wall you’re all set! However, you might find that you have some extra space to spare behind the artwork. In this case, take a hammer and nail in some additional storage! Kyle adds 4 nails so that he can hide some extra sets of keys. But you can use this additional storage for anything you want! You could even mount a smaller piece of art with its own additional storage like a little Russian doll. OK, maybe not that, but you get the idea.
Did you enjoy this 2BHack? If so, try it out in your own home!
Enjoyed the project?
Resources for this project:
See all materialsComments
Join the conversation
-
-
 Katen
on Jan 09, 2023
Reminds me of my mom. Large family small house. Always some kind of wall oops. Mom just kept hanging pix of Sacred Heart over them all. Visitors thought we were Uber holy rollers!
-









Frequently asked questions
Have a question about this project?
If you cover the thermostat, it will no longer function properly. Don't do it.
If you cover receptacles and low voltage outlets this way, how can you use them if you need too? Do you just leave the "door" open?
Doesn’t this keep the thermostat from sensing the room temperature?
I have heard of Alien tape. I never used it. It is sold on Amazon. I'm not sure when you try to remove it if the paint on the walls would come off. Has anyone tried it??