Deco Mesh Poof Wreath Tutorial

Hi, I'm Jen, and I'm back again with another mesh wreath tutorial! This time, I'm going to focus on the poof (or pouf) technique in deco mesh wreath making. This was the first type I tried when I started making wreaths, and I'm going to tell you, I struggled with it! It took me quite a while to figure out how to achieve the look I wanted. Whether you're new to wreath making, or have been doing it for a while, I hope my tutorial will be informative! Love this project? You can buy your own by clicking the link below. Just so you know, Hometalk may collect a small share of sales from the links on this page.
To BUY this stunning wreath, click
You will be attaching pipe cleaners only to the 2 outer rings of the frame. Start on a crossbar of the the outermost ring. Fold the pipe cleaner in half, and then place it on to the frame. Then put a dot of hot glue on the frame in the center of where you will twist the pipe cleaner. I just do one twist to secure it. I found that putting the glue on before I twist, instead of after, makes it hold much better.
The way I attach all the pipe cleaners to the frame is as follows: Outer Ring: Crossbar, Middle of Section, Crossbar. Repeat this going around the entire frame. 2nd Ring from Outside: Two pipe cleaners, one on either side of the one I placed in the middle of the outer ring. Also repeat this for all sections of the entire frame.
Editor's note: To buy this adorable pink glue gun,
Once you gone around the whole frame, you should now have something that resembles a round millipede. Creepy, I know, but it's worth it.
Now get your mesh unwrapped and gather the whole width of it together. Leave a tail of about 3 to 4 inches. Pick a crossbar on the outermost ring and place the mesh inside it, leaving your tail on the other side. Give it two twists to secure it in place. You don't want to twist the pipe cleaners any more at this point because you will be opening some of them back up when it's time to add the ribbon.
So now it's time to start making poofs! Another thing I've found to keep the consistency of the poofs, is to measure them. Yes, I still measure EVERY single one. Another reason I measure them, is to make sure I don't run out mesh. Measuring every poof to 10 inches, will use pretty much the entire roll of mesh. (If you do happen to need to go into another roll, that's totally fine. You would start your new roll in the same pipe cleaner twist that you ended the first roll in and continue on.) If you don't have a pretty pink tape measure like I do, you can also use a regular one, or even measure something to 10 inches to use as a guide (such as a pipe cleaner, piece of string, strip of cardboard, etc).
When I'm making the poofs, I just slide my hand down the mesh with even tension. You don't need to pull it really tight. I measure out the 10 inches, place where you are holding it into the next pipe cleaner and secure it with two twists. I then pull apart the poof and fluff it before moving on. If for some reason I don't like the way the poof looks, I can fix it right then and there before continuing on. (I do the whole outer ring, and then the whole inner ring.) When you come back to where you started on the outer ring, open the pipe cleaner twist that you first started with and secure your last poof for this ring in that same twist. To continue to the next ring, make another poof and secure it in the pipe cleaner closest to where you ended on the first ring. (There will be a pipe cleaner twist to the left and right on the next ring of where you ended on the first ring. I go to the right, but either way is fine.)
Do the same as you did on the outer ring, just go around attaching poofs. I push the poofs from the second ring in between the poofs on the first ring, so it has an alternating effect that gives the whole wreath a uniform, fluffy look. When you've gone around the whole second ring, untwist the pipe cleaner you started with on this ring and secure your final poof in it. At this point you should have very little mesh left on the roll. I cut it off, leaving a few inch tail that can just be tucked to the back of the wreath.
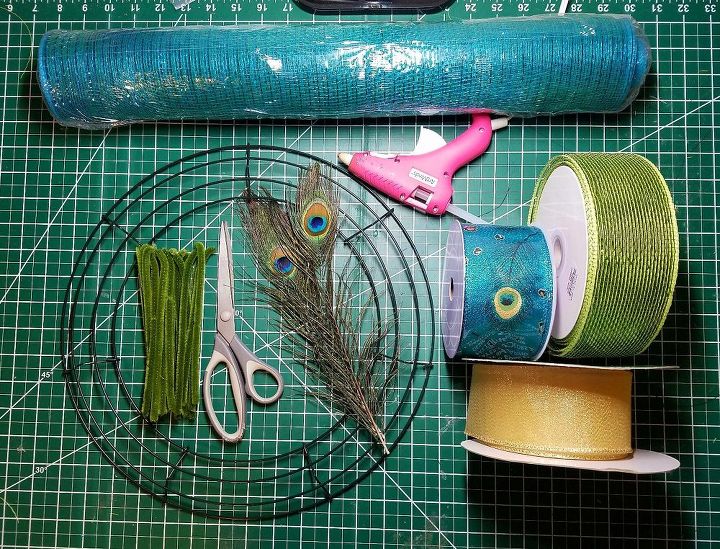
Now it's time to cut your ribbon. I highly recommend using wired ribbons, or like the green one in the picture, deco mesh ribbon. Wired ribbon is great because it holds whatever shape you want. While the deco mesh ribbon is not wired, it's stiff enough to hold it's shape. All the ribbon I used are 2.5 inches wide. You can also use 1.5 inches wide, but I wouldn't recommend going any smaller or bigger because it can get a little harder to work with. Feel free to mix and match the sizes, patterns, and colors as you please. I would also recommend using at least 2 strips of ribbon in each pipe cleaner twist to fill in the spaces and give enough visual interest. For this wreath, I'm using 3 different ribbons. We are going to put ribbon in every other pipe cleaner twist, so we will need 14 pieces of EACH ribbon, EACH cut 14 inches long. TIP: I use a piece of cardboard that I cut 14 inches long and wrap the ribbon around it so I can cut multiple pieces at once.
This part is optional. If you want the chevron (V shape) on the edge of your ribbon, fold it in half, then cut from the folded edge up to the finished edge in a triangle shape as pictured. Cut on both ends.
Pick a pipe cleaner twist on the outer edge of the wreath and untwist it. It's ok to leave it open a minute, the mesh won't go anywhere. Take one of each of your 3 types of ribbon and crisscross them as shown in the picture. Then scrunch the middle of the ribbons together and place inside the pipe cleaner. Now you can twist it more securely since we will not be adding anything else to them. I usually twist the pipe cleaner together then tuck it around to the back to give it a cleaner look. At this point, feel free to fluff the ribbon and fix it as you please.
Since we are doing every other pipe cleaner twist, now skip one twist and add your ribbon to the next one. Keep going around until that ring is done. (You should have 7 twists with ribbon in them.) Moving to the inner ring is just like when we did the mesh. Pick a twist you did on the outside that has ribbon in it, and to the left and right on the next ring will be twists. Pick one to start with and do the same thing of adding ribbon to every other one. (You will also have 7 twists with ribbon on this ring.)
This is a picture of all the mesh and ribbons on! You can absolutely stop here and call it done if you want. For this wreath I chose to add some peacock feather for embellishments. With any wreath you make, you can add anything additional that you want, whether it be a sign, flowers, floral picks, a bow, etc. The sky is the limit!
For the little peacock feather bundle, I just put a few feathers together and hot glued them. I wrap a little piece of ribbon around the bottom of the feathers, and hot glue that on so it gives it a finished look. I then just pick a spot on the wreath where I want it to go (preferably under a piece a ribbon or tucked down a little so it's not so visible), and hot glue it on. To BUY this stunning wreath, click !
The finished wreath will measure approximately 24 inches around and about 7 inches deep. I hope you enjoyed reading this tutorial as much as I had writing it, and please feel free to ask any questions you may have! Thank you!
Enjoyed the project?
Suggested materials:
- 14 inch box wire wreath form (4 rings) (Amazon)
- 21x10 roll of deco mesh (Amazon)
- Wired Ribbon (Amazon)
- Pipe Cleaners (Amazon)
- Pink Glue Gun (Amazon)
- Scissors
- Measuring Tape or something 10 inches long
Comments
Join the conversation
-
 Dorothy
on Feb 03, 2021
This isn't a question... but i just wanted to say THANK YOU SO MUCH, you have finally explained it in a way that I never could. So many people would ask me to show them how to make a poof wreath and I could never quite explain in a way that they would understand me, instead leaving them with a look on their face as if I was communicating with them in some type of new foreign language. You have a done an absolute superb job on explaining and showing how to correctly make a poof deco mesh wreath. You should do more videos on all the other techniques of wreath making because you do teach it in such an understandably, amazing way that makes it look so incredibly simple.
-
-
 GeorgiaBulldogsFan
on Feb 14, 2021
Love the colors in this wreath. Will go very nicely with a peacock painting I have hanging over my fireplace. Thanks for the inspiration!
-













Frequently asked questions
Have a question about this project?
what width is the ribbon?
Can you use 10 by 10 ft mesh. Thanks cannot wait to make it
You actually have 4 or 5 colors of the rolls of mesh. Could you please tell me the exact colors? I don't even see the peacock one on Amazon.