Planter House Number

by
Amanda C, Hometalk Team
(IC: paid contributor)
7 Materials
$20-40
3-5 Hours
Easy
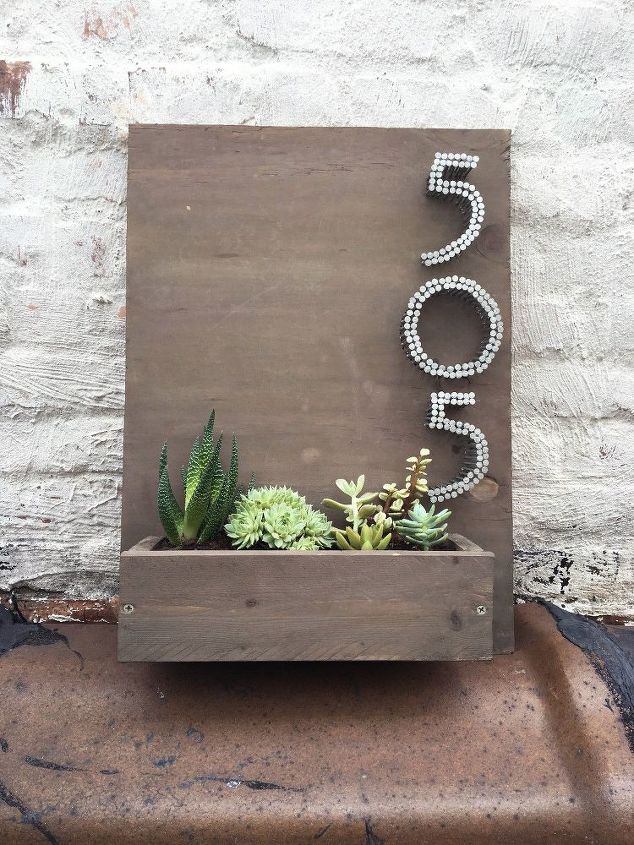
Yes, I know, another project for the brother-in-law and wifey, but their house numbers were falling off, so I decided to make them some new ones! I thought it would be fun to add some plant life by the door, so I decided to make it into a planter! With the crazy cost of nice house numbers I followed a little trick I saw online and made the number portion with nails. Hammer the nails into a wood slab and create a nice box for your plants and -BOOM- you have a cute little house number planter!
Look how lovely! And you can make it any color you want, add any plants you want, and use different colored nails if you so wish... or splurge and buy house numbers to post on the board.
Materials:
STEP 1: Cut your wood pieces to the dimensions you wish.
STEP 2: Grab the pieces you cut from your 1x4x8 board and prepare to make a sort of incomplete box shape for the planter portion of your piece.
STEP 3: Now grab your 12" piece and place it over the u-shape you just created and drill it in place. *Remember to drill pilot holes for the screws in this piece as well.
STEP 4: Drill drain holes on the bottom of the "box" you just created. *The bottom is the 10.5" piece.
STEP 5: Measure 1" over from the left and 1" up from the bottom and glue your half-box in the space you just marked.
STEP 6: While your wood glue is drying, it is time to prep the numbers for your board. Measure the distance from the top of your half-box to the top of the back board. (Mine measured at 15.5".) I didn't want my numbers to be all the way to the top of the board or touching the half-box, so I subtracted 1.5" from each end and was left with 12.5" to divide between the 3 numbers of the address. I gave each address 4" in height and about 3" or so in width. I then found a font that I liked on the computer and expanded the numbers to that size (4"x3") and printed it out to serve as a sort of tracing mechanism.
STEP 7: Place the numbers you printed out in step 6 on the board measuring evenly between them. You will be nailing over top the print of each number.
STEP 8: You could do this earlier in the game, but I decided to wait until it was all together. Either way it is time to sand down any rough edges.
STEP 9: Once your stain has dried you can turn the piece over (I didn't stain the backside) and install the hanging device for the piece. You can use picture hangers or whatever suits you best, but I did an old picture hanging technique. I simply screwed in 2 short screws into the wood at an even level and then wound a piece of wire and twisted it around each screw. I was sure to pinch the wire with pliers to secure it in place. Now it can be hung from a screw or nail by simply resting the wire over either.
STEP 10: Now you just fill the box portion with the plants of your choice!
I wish I didn't live in an apartment building cause I would make one for myself! Maybe I will make one for my door with my apartment number on it ;)
Enjoyed the project?
Suggested materials:
- Nails (Lowe's)
- 1x4x8 Wood Board (Lowe's)
- Wood Glue (Home Depot)
- Wood Screws (Lowe's)
- 15/32 2x2 plywood (Home Depot)
- Plants (Home Depot)
- Wood Stain (Homemade)
Published July 25th, 2016 10:48 PM
Comments
Join the conversation
2 of 18 comments
-
 Emily Harris
on Aug 18, 2024
So cute!
-
-
 Omaifi
on Aug 18, 2024
Such a great idea! I recently moved, so I have a lot on my plate with setting up the new place, including buying furniture and home decor. I’ve been browsing wayfair a lot lately, they have so many options that fit different styles and budgets. Adding something unique like a planter house number is definitely on my to-do list. It’s small details like this that really make a house feel like home. Plus, it’s functional and makes it easy for guests to find your place!
-









Frequently asked questions
Have a question about this project?
What size nails?? Nice idea & could work for me, too..
What font did you use?
How much you think is, more or less, the total cost including your time (work)? Thanks🙋🏼