DIY Anthropologie Primrose Inspired Mirror From An Old Bathroom Mirror
That title is a mouthful, but really this project deserves a thorough name. To put it short and sweet, we took down the large mirror in our main bathroom and replaced it during our renovation. It had been sitting in our girls playroom, acting, as a makeshift dance mirror for over a year until one day I had the idea to turn it into the mirror of my dreams. I've been wanting a large, floor mirror for a while, and I love the Primrose mirror from Anthropologie and the Amelie mirror from Arhaus, but my budget was not in concordance. Some creativity and wrestling of our vanity mirror later, and I had my dream mirror. Here's how it went down!
STEP 1: BUILD THE FRAME
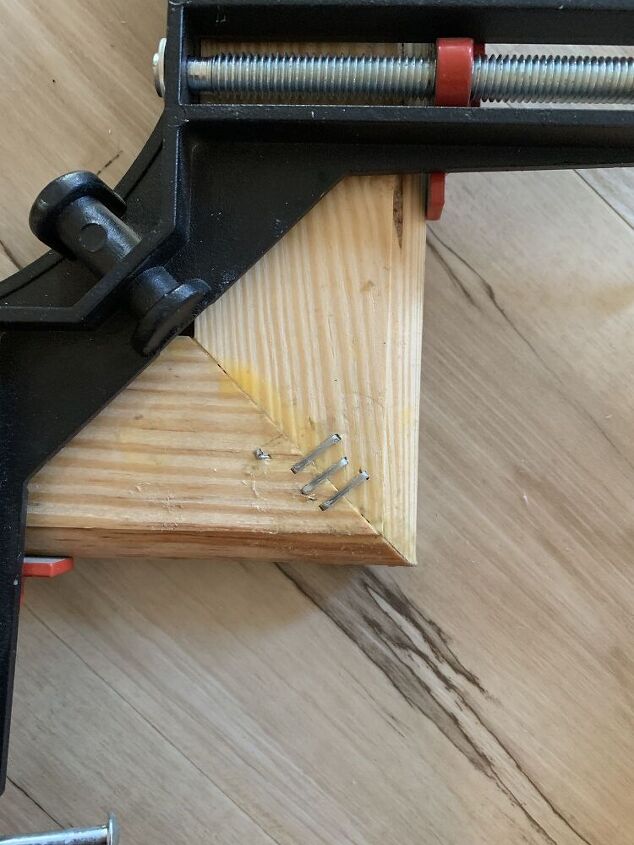
I used I used picture frame moulding to create a frame. Using wood glue and staples to secure the mitered corners (cut on my miter saw). I used corner clamps to hold everything in place while the glue dried.
Best wood glue!
STEP 2: ATTACH THE MIRROR
To attach the mirror I used Liquid Nails along the back of the frame (**make sure to use a Liquid Nails meant for mirrors), and then secured the mirror to the frame using metal mirror clips. I preferred the metal because of their lower profile. I didn't want to see the clips from the side of the mirror and I wasn't planning to extend the frame to cover that area. I also used two packs of them, so 8 clips total to give as much support as I could to the mirror since my frame was on the thin side. Note, my mirror was 1/4" thick, make sure you use clips made for the correct thickness of your mirror. I also used very small wood screws so they didn't go through the front of the moulding/frame.
STEP 3: WOOD FILL + SAND
I used plastic wood to fill any gaps, and then used a sanding sponge and my multi-tool detail sander to smooth the corners.
STEP 4: STAIN
For the stain I chose to use my favorite staining method, mixing my stain with satin sheen polycrylic. Mixing the two creates a beautiful, splotch-free, professional finish. You can read all about that method in this post. I ended up doing three coats of stain to get the look I wanted. I also used the same stain and method to stain wooden appliqués. I got the appliqués from Amazon, although you can find some pretty ones at places like Lowes and Home Depot, or Michaels and Hobby Lobby. These are the ones I ended up using here, here and here.
STEP 5: ATTACH APPLIQUES
I tried attached the appliqués using wood glue and liquid nails. I think either would work fine, I was in a hurry and didn't give the wood glue the needed time to fully dry and ended up going with the liquid nails. Once you place the appliqués, use clamps to hold them in place until the glue is dry. Also make sure to use a small paint brush to clean up any excess glue that has pressed out from under the appliqués.
AND DONE!
Don't miss out on the play-by-play of projects like this over at my Instagram here! And on my blog The Lauren Jamison Collective!
Has this project inspired you to transform your home with a designer touch?
Enjoyed the project?
Resources for this project:
See all materialsComments
Join the conversation
-
 Dl.5660408
on Feb 01, 2024
It looks beautiful 🙀. Love the rich color and the embellishments are perfect!
-
-
 Ann69234472
on Feb 02, 2024
I would have glued the mirror to a backer board first. Less chance of cutting up someone if they happen to fall against it. Looks like an accident waiting to happen!
-










Frequently asked questions
Have a question about this project?
Great job, but am 100% in agreement with William. BTW just out of curiosity what are you using to prevent the mirror from sliding on the floor and crashing?
Looks like the mirror is in the bedroom. Why would I take down my bathroom mirror and put one up in the bedroom??
This has me seriously rethinking the giant monster " matching mirror from my 9 draw draw dresser". So dated. 🙄 But, sideways, on the floor? 🤔 The challenge sawing?! Off the outside shelves. To keep it in the solid frame. I do wood working . Couldn't come up with what do with this mirror 🤷♀️ It's that, or toss it out! IDKNK? Ty 👍😉